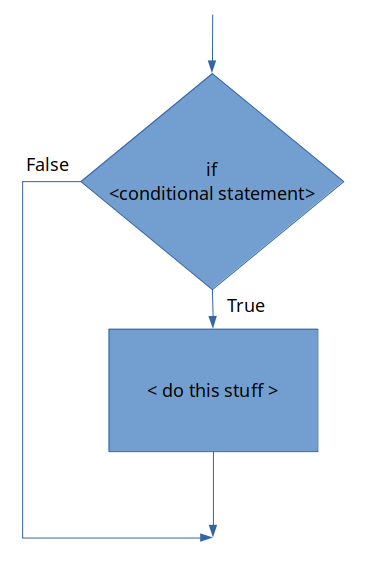
The if is followed by a conditional expression. Recall that the < > indicate that you need to replace this with actual MATLAB code. A conditional expression is simply an expression with at least one relational operator and any number of logical operators. For example: x > 12 is a conditional statement. So is angle > 25 & angle < 100.
Next, we have < do this stuff > . This is simply the MATLAB code that we want to execute only if the conditional expression evaluates to true. MATLAB will automatically tab the text within the decision structure over to make it easy to read.
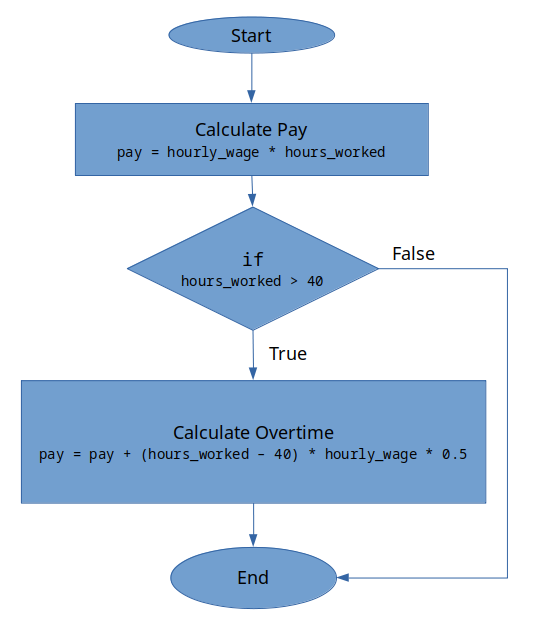
To see this in action let’s create a short script that calculates the weekly wage of an hourly worker. This program can be used to calculate the pay based on the number of hours worked and the worker’s hourly wage using two variables: hours_worked and hourly_wage. If the worker works over 40 hours a week, they are compensated at 1.5x their normal hourly rate for only the hours worked over 40. For example, if a worker worked 42 hours for $10 an hour, they would get paid $10 per hour for the 40 hours and $15 per hour for the extra 2 hours over 40.
This is a perfect example of using our mantra: think, sketch, code, test, repeat! Do not skip your brain workout for these sections. For each of the prompts below, I am expecting you to stop and actually work on this particular problem before moving on.
Think - during the think phase you need to ask yourself and then answer a bunch of questions. I can’t think for you but I can give you an example of my thinking process when solving the problem. Keep in mind that you might have other questions that need answering! That is OK! This is what I came up with as I was thinking.
Can you calculate expected answers based on a few different variables? That way you will have numbers to compare your program against to make sure it works. Example: if hours_worked = 42 and hourly_wage = 10, we would expect pay = 430.
How can you have the program calculate the correct value algorithmically? Remember, that means you need to write down the process into steps. Start with calculating the pay in the situation for under 40 hours a week. Then move on to what would happen at 41 hours a week…
Sketch- during the sketch phase, you need to draw a flowchart or write out a pseudocode for your algorithm that will solve this problem. The sketch phase will often require several repeats of the think stage. As you are sketching more questions may pop into your head about how to best solve this problem. Before scrolling down below, take a minute and try to sketch out a flowchart or write out pseudocode for this particular problem. Don’t skip out on giving it a try!
Figure14.2.4.Every time someone scrolls and looks at my flowchart before creating their own, this puppy doesn’t get a snuggle! Don’t be a monster! I was going to say the puppy gets hit but that is too dark. Look how cute he is!
Code - Now comes the fun part, translating our sketch into code! I highly encourage you to try this on your own before you look at my solution below! It is OK if you get stuck and struggle! That is what learning is about. Take a moment to review the generic version of the if-end statement (in Chapter 17) so you have a good idea of the MATLAB syntax necessary to complete the problem.
Example of my script file that calculates the pay. Notice I used sections (%%) to keep things organized and I have nice headers and comments explaining what each section does.
Test - the testing phase might be the most fun. Just spend some time with the script to double-check that it works. Try substituting different values for variables and verifying by hand that the calculation works. This is an important step and becomes even more important the more complicated your scripts become! Just play around with it and make sure it works the way that you expect.
Hopefully, by this point, you understand how the if-end statements are structured and how they are written in MATLAB. The reality is that there has been very little new material in this chapter. We have simply learned how to apply previous concepts to new problems. There are a few other decision structures MATLAB has that we should investigate.
The rest of the MATLAB conditional statements will be explained below and some example code will be provided but the think, sketch, code, test, repeat process will not be replicated in this much detail. The good thing is that the other MATLAB conditional statements are very similar and follow almost the exact same syntax.