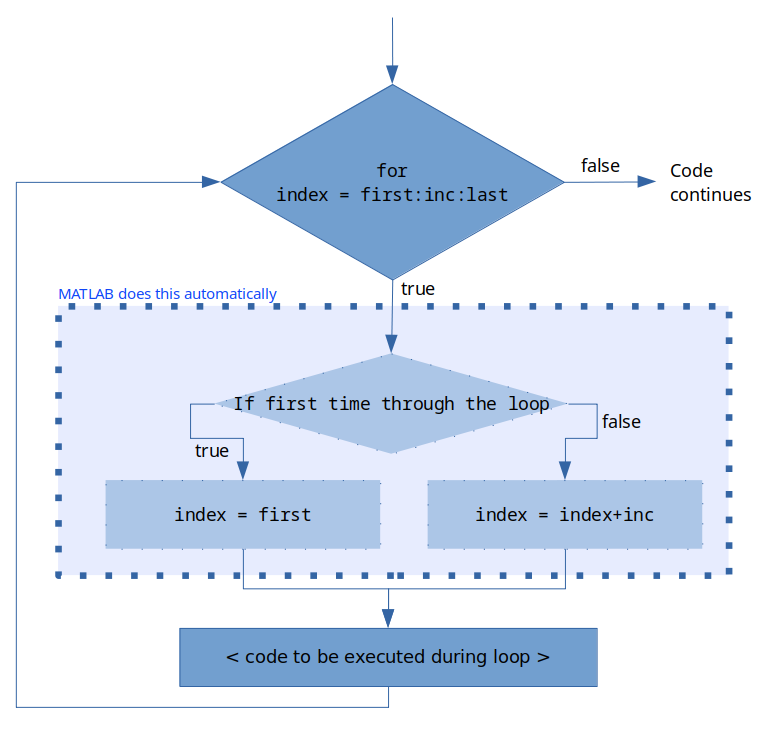
From our flowchart in figure 15.1.4 above, we can see that we are going to use a for loop. In the thinking algorithmically chapter we learned how and when to use a for loop. Now we just need to see how to program this type of loop into MATLAB.
The loop is completed when the index_variable value is greater than or equal to the last_pass number. In the flowchart below this is what is meant by the true/false condition on the for loop diamond box.
The index_variable persists in the workspace after the loop is completed. That means you can check it to make sure that it worked the way that you expected it to.
For example, consider an array named gamma is defined in the workspace: for kappa = 1:length(gamma) is valid because when the function length(gamma) is evaluated by MATLAB, an integer is returned. In this case, the increment is equal to 1 because a specific increment was omitted. So if length(gamma) = 5, this loop would run 5 times. The flowchart for the generic for loop is shown below in figure 15.2.4.
Figure15.2.1.Generic MATLAB for loop flowchart. The variable names are a little different than in the generic code example above (e.g. index_variable was shortened to index, etc) to preserve space but the logic is the same.
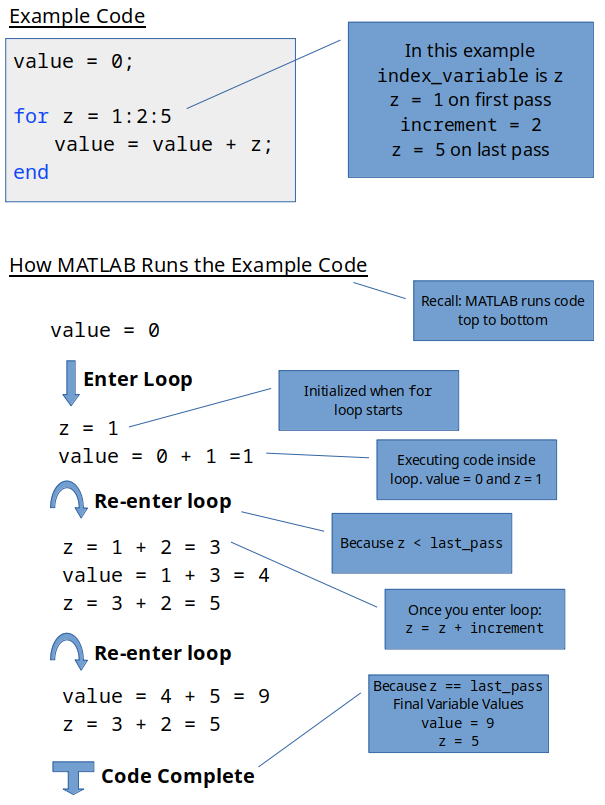
As an example, consider the example code below in figure 15.2.2. This may look complicated but in practice, it looks more complicated than it really is. See if you can follow the logic presented in the figure. It would also help to try and “follow along” on your own on a sheet of paper. See if you can follow the value variable throughout the looping process.
You need to spend some time reviewing figures 15.2.1 and 15.2.2 to really understand how these loops work. If this explanation is confusing to you, try taking a break from this text, and looking at someone else’s explanation. The important thing is that you understand what for loops are and how to use them.
Think about a time where you might want to use a for loop. How has this new information helped you for future coding projects? How does this built-in function differ from the other built in function(s) you have learned?
In the example loop: for z = 1:2:5 we can see that this loop will only run a total of three times. The first time through the loop z = 1, the second time through, z = 3, and the last time through, z = 5. The key to remember is that the for-end loop will only run a specified number of times that is pre-determined based on the first line of the loop.
When designing your programs, it is important to think about how to define your index_variable and what values to specify for it so that you can control the number of passes through the loop.
In addition to predicting the number of times loop code will execute you should also be able to “follow the variables” through the execution of the code. Following the variables is important so that you can troubleshoot errors in your loops and predict what values should be generated by your loop. An example of following the variables was shown in figure 15.2.2 above. The idea is that you can sketch what should happen when the code has been run.
The final important thing to consider when learning about for-end loops is that they can be used to analyze and build arrays. For example, let’s consider that we have an array defined in the workspace as follows:
As an example, let’s say that we want to add all the values in this array (you can use the built-in sum() function for this but let’s consider how to do this using loops as an example). We can use a for loop to cycle through all of the values in the array! This code will accomplish this:
The key here is to notice how the for loop was used to loop through every value of the array man_bear_pig. Since the increment is 1, we can use the index variable to access the data within the array. This is a common application of for loops and one that you need to have in your tool belt to be a successful programmer.