Loops are used to repeat actions. For example, in music or in dance, we often repeat the same notes or steps multiple times. A loop in coding, also called iteration or repetition, is a way to repeat a block of code. Computers are very good at automating repetitive tasks! Watch the following video about how loops can be used in dance choreography. In this lesson, we’ll try the unplugged activity in the video as well as learn how to write while and for loops in Python.
In groups or as a class or individually, come up with a sequence of steps like clap, clap, wave, stomp like in the video above. Then, put them in a loop to repeat 3 times. Some of the steps like clap 3 times can also have small loops nested inside the big loop. Write your dance algorithm down below. Once you construct the dance, have your group try it out together! Write down the steps in the following format:
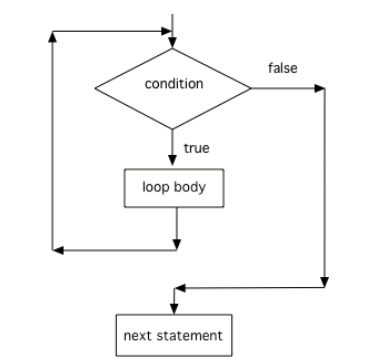
Let’s take a look at the following flowchart for a loop. Just like in selection, there is a condition that is checked to determine whether the body of code is executed. If the condition is true, the loop body is executed, but then unlike selection, we loop back to check the condition again. Selection just runs once, but in iteration, we repeate the code until the condition is false. If the condition is false, the loop stops, and the program continues with the next statement after the loop.
Put the following steps of the dance algorithm in order to create a dance that does stomp, wave, and then 3 claps. The whole sequence should repeat 2 times. You can use Repeat loops to represent the repetition of the claps and the whole sequence.
In Python, a while loop is written as follows, with a colon (:) and indentation marking the loop body instead of curly brackets; the parentheses around the condition are optional in Python and usually left out.
Notice that this looks just like an if statement, but with a while keyword instead of if! An if statement runs once if its condition is true, but a while loop continues to run as long as its condition remains true. By the way, here’s a video of a python snake climbing a tree in a looping pattern!
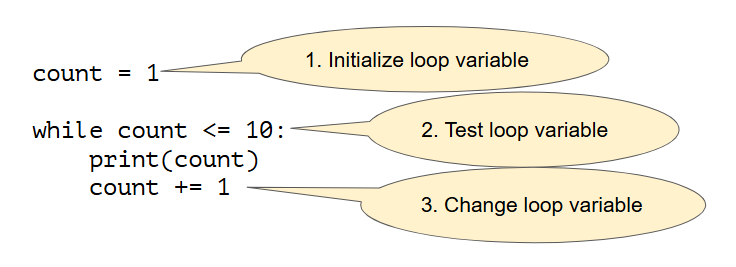
There are 3 steps to writing a loop as seen below in a loop that counts from 1 to 10. The simplest loops are counter-controlled loops like below, where the loop variable is a counter that counts how many times to repeat the loop.
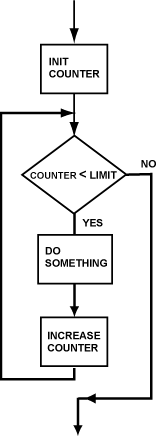
This flow chart shows how the while loop works. The counter is tested against a limit to control how many times the loop runs, and it is increased by 1 each time the loop runs.
Here is a while loop that counts from 1 to 5 that demonstrates the 3 steps of writing a loop. Can you change it to count from 2 to 10? Click on the Code Lens button and click on Next to see each step of the loop.
The following has the correct code to print out all the even numbers between 1 and 10, but the code is mixed up. Drag the blocks from the left into the correct order on the right and indent them correctly. Use all of the blocks! You will be told if any of the blocks are in the wrong order or not indented correctly when you click the “Check Me” button.
The for loop is a more concise way to write a counter-controlled loop because you put all 3 steps of the loop in one line. The function range generates a sequence of numbers from 0 up to the number in the parentheses (but not including that number). It repeats the exact number of times in the parentheses since it starts at 0. By default, for-loops in Python start at 0 and keep repeating up to a number but not including that number, but you can also indicate a different starting value and a increment number. All three of the loops below will run 10 times and print the numbers 0 to 9.
# default from 0 up to 10 (not including 10)
for i in range(10):
    print(i)

# Using range(start, stop)
for i in range(0, 10):
    print(i)

# Using range(start, stop, step)
for i in range(0, 10, 1):
    print(i)
Activity2.4.6.
Put the blocks in order to create the for loop header to set number from 2 to 5 (including 5). There are extra blocks that you don’t need.
Here is a for loop that counts from 0 up to 5 (but not including 5). It runs 5 times. Can you change it to count from 0 to 10 not including 10? Click on the Code Lens button and click on Next to see each step of the loop.
The following has the correct code blocks to print out all the even numbers between 0 and 10 (including 10) using a for loop, but the code is mixed up and there are 3 extra blocks that you don’t need. Drag the blocks from the left into the correct order on the right (except the 3 extra blocks)and indent them correctly. You will be told if any of the blocks are in the wrong order or not indented correctly when you click the “Check Me” button.
Let’s explore how to use loops with the Python turtles 🐢! With loops, we can draw complex shapes without writing the same code over and over again. Let’s look at some code to draw a square with a turtle. Click on all of the lines of code that are repeated below.
Run the code below to see the turtle draw a square. Change the code to delete the repeated lines by using a for loop to draw a side of the square four times.
The following code draws a triangle. Change the code to use a for loop to draw a hexagon instead of a triangle. A hexagon has 6 sides, and the turtle needs to turn 60 degrees after drawing each side. Feel free to change the color! For an extra challenge, after drawing the hexagon, draw another shape using a while-loop (this is not graded).
The following while loop is supposed to print out all the numbers between 1 and 10, but it does not run at all. Can you fix it so that it prints out the numbers from 1 to 10?
One common mistake with loops is to accidentally create an infinite loop which is a loop that never stops because the Boolean condition is always true.
while True:
    print("This is a loop that never ends!")
Most of the time, infinite loops happens by accident. When this happens, your program may appear to freeze because it keeps repeating the same instructions forever. For example look at the loop below. Does it have all 3 steps of creating a loop? Try it in the active code below to see an infinite loop in action.
This while loop should print out the numbers 0 to 9, but it has an infinite loop. Try running it to see the infinite loop. The Runestone server will stop it after a while. Can you fix the error? Remember all 3 steps of writing a loop: initialize, test, and update the loop variable.
The for-loop does not have this problem with infinite loops. The range function in for-loops makes it impossible to create an infinite loop, because it always has a stopping value determined. For example, for i in range(10) will always stop when it reaches 10. There is no easy way to make the value given to range be an infinite value.
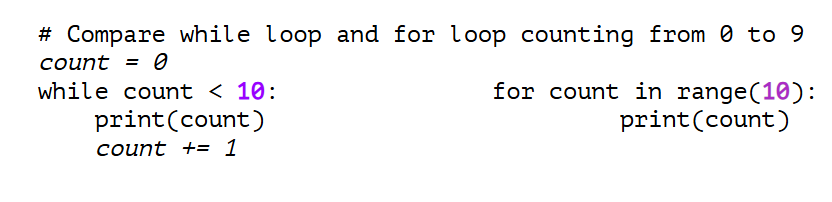
Here is a comparison of a while loop vs a for loop for a loop that counts from 0 up to 9. Notice that the for loop is much shorter because it combines all 3 steps of the loop into one line. By default, it initializes the loop variable to 0, tests the loop variable to be less than the number in the parentheses, and increments the loop variable by 1 each time.
Here is a while loop that counts from 0 up to 5. Run it and see what it does. Can you change it to a for-loop? You will get to delete some lines! Run your for-loop. Does it do the same thing?
While loops are useful when you don’t know how many times you want to repeat a block of code. It is often used for an input-controlled loop where the user’s input indicates when to stop, like below.
The following while loop is an input-controlled loop. The loop variable is used to get input from the user. If the user enters -1, the loop stops. Otherwise, it checks if you entered lucky number 7 then asks for another input. Try it out!
Then, change the code so that it asks for names of people in your class. Change it to stop when the user enters q to quit instead of -1. Instead of checking for the lucky number 7, if the user enters your name, print out Hello or something else. You will no longer need to convert the input to an integer with int() since it will be a string.
Tracing is a technique where you follow the code line by line, keeping track of the variables and output, as if you were a computer. This can be used to find bugs in your code, check that your program works correctly, or understand what a program does. The Code Lens feature in the active code activities help you to trace code by showing the variables as you run each line of code. But you can also trace code on paper!
A trace table helps you to keep track on paper of what happens as the code runs. Create a column for each variable, and record its value each time it changes. Some trace tables also include columns for the current line number and any output the program produces. By the end of the trace, you can clearly see how the values changed throughout the program.
How many times will this pseudocode print a *? Create a trace table to help you figure it out. Work in pairs if possible. Remember that % 2 checks if there is a remainder when dividing by 2 to determine if a number is even or odd.
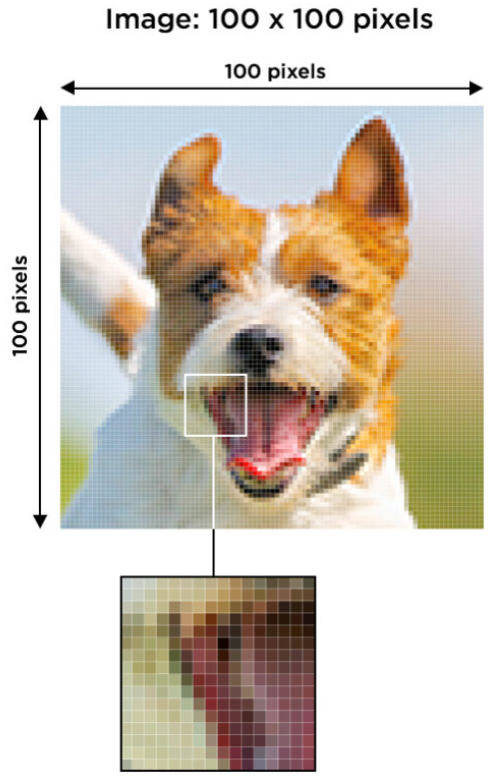
A digital image is made up of pixels (short for picture elements) which are small squares of color. Each pixel has a color value that is made up of a combination of red, green, and blue (RGB) values, each ranging from 0 to 255. Try the RGB Color Picker to create different colors from RGB values.
# Loop through the pixels of the image img
for p in img.getPixels():

    # get the rgb values of the pixel p
    r = p.getRed()
    g = p.getGreen()
    b = p.getBlue()
    print("Pixel RGB values:", r, g, b)

    # change the pixel p by erasing red values
    p.setRed(0)
    # update the image
    img.updatePixel(p)
In the project below, you will see an image loaded in of a student in a red t-shirt. The given code changes the background color of the image. Your challenge is to change background color, and then the hair color and the t-shirt color to other colors. You will need to use if-statements inside the loop to look for specific colors using their rgb values, and then set them to another color. Here is what the original image looks like. You can also try loading in a different image with a full image link like "https://images.pexels.com/photos/17502401/pexels-photo-17502401.jpeg" instead of the student image file. If you enjoyed this project, there are more image manipulation activities in the Unit 2 Coding Practice lesson.
Run the following code to see how it changes the white background to blue. The loop goes through all the pixels in the image and the if statement checks each pixel’s RGB values and changes them. In this case, the if statement looks for white which is rgb values close to (255,255,255), so anything > 220. Then, it sets the blue value to 255 and the red and green values to 0 to make the background blue. Work in pairs for this project if possible to do the following:
Then, add another loop with an if statement inside the loop to change the color of the student’s hair to another color. Look for pixels close to black, rgb values close to (0,0,0).
Then, add another loop with an if statement to change the color of the student’s t-shirt to another color. The if statement should look for red pixels, which means they probably have a high red value but low green an blue values. Experiment to try to find the right values.
Review the vocabulary in this lesson. Drag the vocabulary term from the left and drop it on its correct definition on the right. Click the "Check Me" button to see if you are correct.