Algorithm 5.7.1. Rounding to 2 decimal places.
1. Multiply the number by 100, giving 7519.9999.
2. Add 0.5 to the number giving 7520.4999.
3. Drop the fractional part giving 7520
4. Divide the result by 100, giving 75.20
Math class methods, let’s consider the problem of rounding numbers. When dealing with applications that involve monetary values—dollars and cents—it is often necessary to round a calculated result to two decimal places.
1. Multiply the number by 100, giving 7519.9999.
2. Add 0.5 to the number giving 7520.4999.
3. Drop the fractional part giving 7520
4. Divide the result by 100, giving 75.20
Math.floor(R) method, which rounds its real argument, R, to the largest integer not less than R (from Table 5.6.1). If the number to be rounded is stored in the double variable R, then the following expression will round R to two decimal places:
R = Math.floor(R * 100.0 + 0.5) / 100.0;
Math.round() method ( Table 5.6.1). This method rounds a floating-point value to the nearest integer. For example, Math.round(65.3333) rounds to 65 and Math.round(65.6666) rounds to 66. The following expression uses it to round to two decimal places:
R = Math.round(100.0 * R) / 100.0;
Temperature class and a TemperatureUI class. The Temperature class will perform the temperature conversions, and TemperatureUI will serve as the user interface (Figure 5.7.3).

TemperatureUI), which interacts with the Temperature object.Temperature.Temperature class is to perform the temperature conversions. To convert a Celsius temperature to Fahrenheit or vice versa, it is not necessary to store the temperature value. Rather, a conversion method could take the Celsius (or Fahrenheit) temperature as a parameter, perform the conversion, and return the result. Therefore, the Temperature class does not need any instance variables.
Temperature class resembles the Math class. Unlike OneRowNim, which stores the game’s state — the number of sticks remaining and whose turn it is — the Math and Temperature classes are stateless. They just perform certain calculations for us.
Math class, the Temperature class will have two public static methods: one to convert from Fahrenheit to Celsius and one to convert from Celsius to Fahrenheit. Recall that static methods are associated with the class rather than with its instances. Therefore, we needn’t instantiate a Temperature object to use these methods. Instead, we can invoke the methods through the class itself.
double, the double type is more widely used than float. Moreover, using double wherever a floating point value is needed will cut down on the number of implicit data conversions that a program would have to perform. Therefore, each of our conversion methods should take a double parameter and return a double result.
int type for integer literals and double for real-number literals. Therefore using int and double for numeric variables and parameters reduces the number of implicit conversions a program would have to perform.
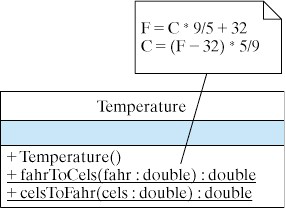
Temperature.Temperature class is shown in Figure 5.7.6.
public class Temperature
{
    public static double fahrToCels(double temp)
    {
        return (5.0 * (temp - 32.0) / 9.0);
    }
    public static double celsToFahr(double temp)
    {
        return (9.0 * temp / 5.0 + 32.0);
    }
} // Temperature
Temperature class.celsToFahr() uses the double value temp in its calculation, it uses floating-point literals (9.0, 5.0, and 32.0) in its conversion expression. This helps to reduce the reliance on Java’s built-in promotion rules, which can lead to subtle errors. For example, suppose we had written the celsToFahr() method using this calculation:
return (9 / 5 * temp + 32); // Error: equals (temp + 32)
temp + 32, which is not the correct conversion formula. This kind of subtle semantic error can be avoided if you avoid mixing types wherever possible.
celsToFahr() method to test the freezing point and boiling point temperatures, two boundary values for this problem. A boundary value is a value at the beginning or end of the range of values that a variable or calculation is meant to represent. The second pair of tests performs similar checks with the fahrToCels() method. One advantage of using these particular values is that we know what results the methods should return.
TemperatureUI Class.TemperatureUI class is to serve as a user interface—that is, as an interface between the user and a Temperature object. It will accept a Fahrenheit or Celsius temperature from the user, pass it to one of the public methods of the Temperature object for conversion, and display the result that is returned.
TemperatureUI uses a KeyboardReader to handle interaction with the user and uses static methods in the Temperature class to perform the temperature conversions.
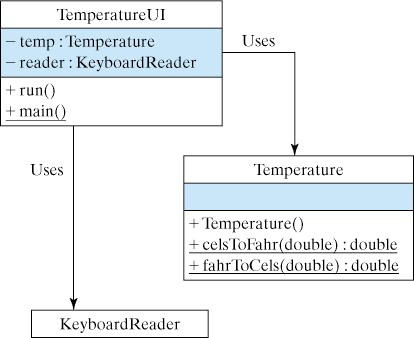
TemperatureUI class and use it to test the methods in Temperature class. The run() method should use an input-process-output algorithm: Prompt the user for input, perform the necessary processing, and output the result.
Temperature’s conversion methods are class methods, you do not need to instantiate a Temperature object in this project. You can invoke the conversion methods directly through the Temperature class:
double fahr = Temperature.celsToFahr(98.6);
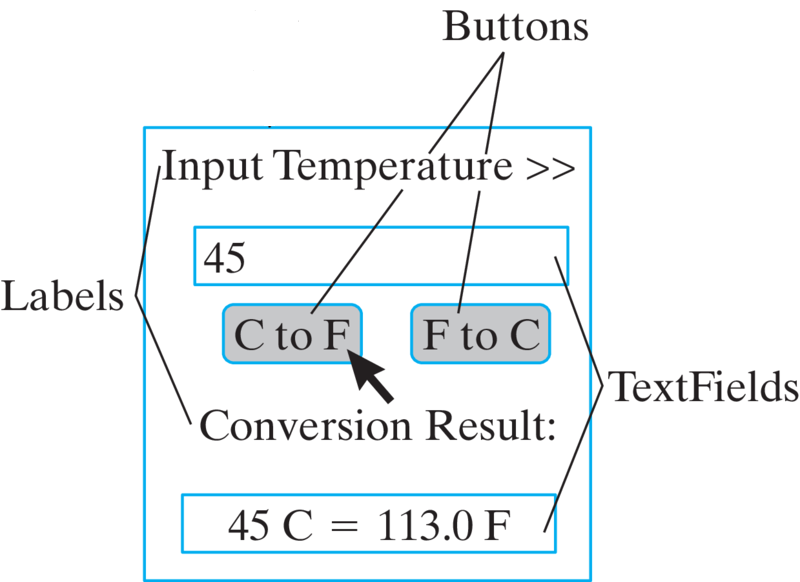
Temperature class. The GUI should have the layout shown in Figure 5.7.11.
OneRowNim, to illustrate using class constants.
static modifier. If a variable is declared static, there is exactly one copy of that variable created no matter how many times its class is instantiated. To turn a variable into a constant, it must be declared with the final modifier. Thus, the following would be examples of a class constants, constant values that are associated with the class rather than with its instances:
public static final int PLAYER_ONE = 1;
public static final int PLAYER_TWO = 2;
public static final int MAX_PICKUP = 3;
public static final int MAX_STICKS = 7;
final modifier indicates that the value of a variable cannot be changed. When final is used in a variable declaration, the variable must be assigned an initial value. After a final variable is properly declared, it is a syntax error to attempt to try to change its value. For example, given the preceding declarations, the following assignment statement would cause a compiler error:
PLAYER_ONE = 5; // Syntax error; PLAYER_ONE is a constant
OneRowNim class, compare the following two if conditions:
if (num < 1 || num > 3 || num > nSticks) ...
if (num < 1 || num > MAX_PICKUP || num > nSticks) ...
OneRowNim more readable, we should replace all occurrences of the literal value 3 with the constant MAX_PICKUP. This same principle would apply to some of the other literal values in the program. Thus, instead of using 1 and 2 to represent the two players, we could use PLAYER_ONE and PLAYER_TWO to make methods such as the following easier to read and understand:
public int getPlayer()
{   if (onePlaysNext)
        return PLAYER_ONE;
    else return PLAYER_TWO;
} // getPlayer()
OneRowNim so that the maximum number of sticks that can be picked up is 4 instead of 3. If we used literal values, we would have to change all occurrences of 4 that were used to represent the maximum pick up. If we used a named constant, we need only change its declaration to:
public static final int MAX_PICKUP = 4;
static. However, the idea of associating constants with a class makes good sense. In addition to saving memory resources, by creating just a single copy of the constant, constants such as MAX_STICKS and PLAYER_ONE make more conceptual sense to associate with the class itself rather than with any particular OneRowNim instance.
java.awt.Color class —Color.blue and Color.red. Similarly, java.awt.Label uses int constants to specify how a label’s text should be aligned: Label.CENTER.
OneRowNim game = new OneRowNim(OneRowNim.MAX_STICKS);
OneRowNim instances. A new version of OneRowNim that uses class constants is shown in Listing 5.7.15.
game, we can refer to MAX_STICKS with either OneRowNim.MAX_STICKS or game.MAX_STICKS.
OneRowNim uses named constants.public class OneRowNim
{ public static final int PLAYER_ONE = 1;
public static final int PLAYER_TWO = 2;
public static final int MAX_PICKUP = 3;
public static final int MAX_STICKS = 11;
public static final boolean GAME_OVER = false;
private int nSticks = MAX_STICKS;
private boolean onePlaysNext = true;
public OneRowNim()
{
} //OneRowNim() constructor1
public OneRowNim(int sticks)
{ nSticks = sticks;
} // OneRowNim() constructor2
public OneRowNim(int sticks, int starter)
{ nSticks = sticks;
onePlaysNext = (starter == PLAYER_ONE);
} // OneRowNim() constructor3
public boolean takeSticks(int num)
{ if (num < 1 || num > MAX_PICKUP || num > nSticks)
return false; // Error
else // Valid move
{ nSticks = nSticks - num;
onePlaysNext = !onePlaysNext;
return true;
} //else
}//takeSticks()
public int getSticks()
{ return nSticks;
} //getSticks()
public int getPlayer()
{ if (onePlaysNext)
return PLAYER_ONE;
else return PLAYER_TWO;
} //getPlayer()
public boolean gameOver()
{ return (nSticks <= 0);
} // gameOver()
public int getWinner()
{ if (nSticks < 1)
return getPlayer();
else return 0; // Game is not over
} // getWinner()
public String report()
{ return ("Number of sticks left: " + getSticks()
+ "\nNext turn by player " + getPlayer() + "\n");
} // report()
} // OneRowNim class
OneRowNim making use of the MAX_STICKS and MAX_PICKUP in the main method.
OneRowNim — we’ve developed two new versions in this chapter— are backward compatible with the previous version is due in large part to the way we have divided up its public and private elements. Because the new versions still present the same public interface, programs that use the OneRowNim class, such as the OneRowNimApp from Chapter 4 (Figure 4.5.2), can continue to use the class without changing a single line of their own code. To confirm this, see the Self-Study Exercise at the end of this section.
OneRowNim, the implementation details — its data and algorithms — are hidden from other objects. As long as OneRowNim’s public interface remains compatible with the old version, changes to its private elements won’t cause any inconvenience to those objects that were dependent on the old version. This ability to change the underlying implementation without affecting the outward functionality of a class is one of the great benefits of the information hiding principle.
OneRowNim still works correctly with the user interfaces we developed in Chapter 4, compile and run it with OneRowNimApp in a development environment that allows user input. (Figure 4.5.2).
1 % 4  == 1
5 % 4  == 1
9 % 4  == 1
13 % 4  == 1
17 % 4  == 1
21 % 4  == 1
sticksLeft represents the number of sticks left before our turn. The first thing we have to acknowledge is that if sticksLeft % 4 == 1, then we have been left with 1, 5, 9, 13, and so on, sticks, so we cannot force a win. In that case, it doesn’t matter how many sticks we pick up. Our opponent should win the game.
M be the number of sticks to pickup in order to leave our opponent with N, such that N % 4 == 1. Then we have the following two equations:
sticksLeft - M == N
N % 4 == 1
(sticksLeft - M) % 4 == 1
(sticksLeft - M) == (Q * 4) + 1
M to both sides and subtracting 1 from both sides of this equation, we get:
(sticksLeft - 1) == (Q * 4) + M
M, which is the number of sticks you should pick up. Thus, to decide how many sticks to take, we want to compute:
M == (sticksLeft -1) % 4
sticksLeft     (sticksLeft -1) % 4     sticksLeft
  Before                                  After
  ----------------------------------------------------
    9            (9-1) % 4 == 0         Illegal Move
    8            (8-1) % 4 == 3         5
    7            (7-1) % 4 == 2         5
    6            (6-1) % 4 == 1         5
    5            (5-1) % 4 == 0         Illegal Move
sticksLeft equals 9 or 5, we can’t apply this strategy because it would lead to an illegal move.
move() method makes use of two important Math class methods:
public int move()
{ int sticksLeft = nim.getSticks();   // Get number of sticks
  if (sticksLeft % (nim.MAX_PICKUP + 1) != 1)   // If winnable
    return (sticksLeft - 1) % (nim.MAX_PICKUP +1);
  else {                                // Else pick random
    int maxPickup = Math.min(nim.MAX_PICKUP, sticksLeft);
    return 1 + (int)(Math.random() * maxPickup);
  }
}
move() method will return an int representing the best move possible. It begins by getting the number of sticks left from the OneRowNim object, which is referred to as nim in this case. It then checks whether it can win by computing (sticksLeft-1) % 4. However, note that rather than use the literal value 4, we use the named constant MAX_PICKUP, which is accessible through the nim object.
then clause computes and returns (sticksLeft-1) \nim.MAX_PICKUP+1, but here again it uses the class constant.
Math.min() method to decide the maximum number of sticks that can be picked up:
int maxPickup = Math.min(nim.MAX_PICKUP, sticksLeft);
min() method returns the minimum value between its two arguments.
Math.random() method to calculate a random number between 1 and the maximum:
1 + (int)(Math.random() * maxPickup);
random() method returns a real number between 0 and 0.999999 — that is, a real number between 0 and 1 but not including 1:
0 <= Math.random() < 1.0
Math.random() times 2, the result would be a value between 0 and 1.9999999. Similarly, if we multiplied it by 3, the result would be a value between 0 and 2.9999999. In order to use the random value, we have to convert it into an integer, which is done by using the (int) cast operator:
(int)(Math.random() * maxPickup);
double is cast into an int, Java just throws away the fractional part. Therefore, this expression will give us a value between 0 and maxPickup-1. If maxPickup is 3, this will give a value between 0 and 2, whereas we want a random value between 1 and 3. To achieve this desired value, we merely add 1 to the result. Thus, using the expression
1 + (int)(Math.random() * maxPickup)
maxPickup, where maxPickup is either 1, 2, or 3, depending on the situation of the game at that point.
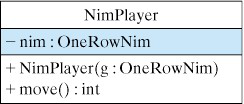
NimPlayer class.NimPlayer that incorporates the move() method with the winning strategy designed in this section. Use the RndPlayer below as a guide. The class should implement the design shown in Figure 5.7.17. That is, in addition to the move() method, it should have an instance variable, nim, which will serve as a reference to the OneRowNim game. Its constructor method should take a OneRowNim parameter, allowing the NimPlayer to be given a reference when it is instantiated.
OneRowNim’s command-line interface to play One Row Nim between the user and the computer, where the NimPlayer implemented in the previous exercise represents the computer.
