Principle 4.5.3. EFFECTIVE DESIGN:Code Reuse.
A well-designed user interface can be used with many computational objects.
OneRowNim, and a user interface object, for which we will use either a KeyboardReader or a OneRowNimGUI. One goal of our design was to develop the OneRowNim class so that it can be used, without changes, with either a command-line interface or a GUI.
OneRowNim class to maintain the state of the game and to provide methods that enforce the rules of the game. Thus, we know that after each legal move, the number of sticks will decline, until it is 0 or less, which indicates that the game is over. Also, an instance of OneRowNim keeps track of whose turn it is and can determine if the game is over and who the winner is when the game is over. Finally, the game ensures that players cannot cheat, either by taking too few or too many sticks on one turn. Figure 4.5.1 shows the UML diagram of the OneRowNim class as described at the end of the previous chapter.
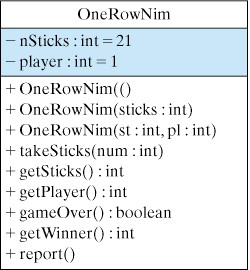
OneRowNim
OneRowNim instance with a KeyboardReader instance, the command-line interface we developed at the beginning of this chapter. To do so requires no changes to KeyboardReader(Fig. Figure 4.3.7). Unlike in the greeter example, we will use a third object to serve as the main program. As shown in Figure 4.5.2, the OneRowNimApp class will contain the run() method that controls the game’s progress. OneRowNimApp will use the KeyboardReader object to prompt the user, to display the program’s output, and to perform input from the keyboard. It will use the OneRowNim object to keep track of the game.
run() method, which will use a loop algorithm to play the game. The user and the computer will repeatedly take turns picking up sticks until the game is over. The game is over when there are no more sticks to pick up. Thus, we can use the game’s state—the number of sticks left—as our loop’s entry condition. We will repeat the loop while there are more than 0 sticks remaining.
OneRowNim instance as the game object, and we refer to the KeyboardReader instance as the reader object. We use the notation game:get the number of sticks left to indicate that we are sending a message to the game object.
Create a game object with 21 sticks
 Create a reader object
 sticksLeft = game:get the number of sticks left
 reader:display the rules of the game
 while (game: the game is not over)
     whoseMove = game: find out whose turn it is
     if (whoseMove == user)
         game: user chooses number of sticks to take
     else
         game: computer chooses number of sticks to take
     sticksLeft = game: get the number of sticks left
     reader: report the number of sticks left
 // At this point the game is over.
 if game: the user is the winner
        reader: report that the user wins
 else
       reader: report that the computer wins
sticksLeft. We use a while loop structure to control the game. The loop’s entry condition is that the ’the game is not over’. This is a piece of information that comes directly from the game object. As long as the game is not over, the body of the loop will be executed. Note that in the loop’s body, either the player or the computer makes a move. Again, it is up to the game object to determine whose move it is. Following the move we ask the game how many sticks are left and we use the reader object to report this.
OneRowNim object. We know that this will cause the game to have 21 sticks and it will be the user’s move. The loop-entry condition is that the game is not over, which is based on the fact that there are still sticks remaining to be picked up. But again, this knowledge is kept by the game object. Finally, we have an updater that consists of either the computer or the user picking up some sticks. This in turn changes the value of sticksLeft on each iteration, moving us ever closer to the condition that there are no sticks left, at which point the game will be over.
OneRowNimApp application. It uses a KeyboardReader as a command-line interface and a OneRowNim instance as it computational object. Thus, it has private instance variables for each of these objects, which are instantiated in the constructor method. The algorithm we just described has been placed in the run() method, which is called from main() after the application is instantiated. The use of the boolean method gameOver() to control the loop makes this code segment easier to understand. Also, it leaves it up to the game object to determine when the game is over. From an object-oriented design perspective, this is an appropriate division of responsibility. If you doubt this, imagine what could go wrong if this determination was left up to the user interface. A user-interface programmer might end up, mistakenly, implementing the wrong rule for the game being over. A similar point applies to the getWinner() method. This determination rests with the game, not the user interface. If left up to the user interface, it is possible that a programming mistake could lead to the loss of the game’s integrity.
OneRowNimApp, a command-line interface to the OneRowNim.public class OneRowNimApp
{ private KeyboardReader reader;
private OneRowNim game;
public OneRowNimApp()
{ reader = new KeyboardReader();
game = new OneRowNim(21);
} //OneRowNim()
public void run()
{ int sticksLeft = game.getSticks();
reader.display("Let's play One Row Nim. You go first.\n");
reader.display("There are " + sticksLeft +
" sticks left.\n");
reader.display("You can pick up 1, 2, or 3 at a time\n.");
while (game.gameOver() == false)
{ if (game.getPlayer() == 1) userMove();
else computerMove();
sticksLeft = game.getSticks();
reader.display("There are " + sticksLeft +
" sticks left.\n");
} // while
if (game.getWinner() == 1)
reader.display("Game over. You win. Nice game.\n");
else reader.display("Game over. I win. Nice game.\n");
} //run()
private void userMove()
{ reader.prompt("Do you take 1, 2, or 3 sticks?: ");
int userTakes = reader.getKeyboardInteger();
if (game.takeSticks(userTakes))
{ reader.display("You take " + userTakes + ".\n");
} else
{ reader.display("You can't take " + userTakes +
". Try again\n");
} // else
} //userMove()
private void computerMove()
{ game.takeAway(1); // Temporary strategy.
reader.display("I take 1 stick. ");
} //computerMove()
public static void main(String args[])
{ OneRowNimApp app = new OneRowNimApp();
app.run();
} //main()
} // OneRowNimApp
run() method calls userMove() and computerMove() to perform the specific set of actions associated with each type of move. The userMove() method uses the KeyboardReader() to prompt the user and input his or her move. It then passes the user’s choice to game.takeSticks(). Note how it checks the return value to determine whether the move was legal or not and provides an appropriate response through the interface.
computerMove() method uses a temporary strategy of taking a single stick and passes the number \(1\) to game.takeSticks(). Finally, computerMove() reports its choice through the interface. After we have covered operators of the int data type in the next chapter, we will be able to describe better strategies for the computer to make a move.
KeyboardReader user interface. In fact, for this problem, our interface didn’t require any changes. Although there might be occasions where we will want to extend the functionality of KeyboardReader, it can be used without changes for a wide variety of problems in subsequent chapters.
OneRowNim
OneRowNim is to decide how to use input, output, and control components to interact with the user. Following the design we used in the GUI for our greeter application, we can use a JTextField for the user’s input and a JTextArea for the game’s output. Thus, we will use the JTextArea to report on the progress of the game and to display any error messages that arise. As in the greeter example, we can use both the JTextField and JButton as control elements and a JLabel as a prompt for the input text field. For the most part then, the use of GUI components will remain the same as in our previous example. This is as we would expect. The relationship between the user and the interface are pretty similar in both this and the previous application.
private OneRowNim game;
...
game = new OneRowNim();
actionPerformed() method, whose actions depend on the actual progress of the individual game.
actionPerformed() method. Instead, because we are using event-driven programming here, we will rely on Java’s event loop to move the game from one turn to another.
actionPerformed() method will be called automatically whenever the JButton is clicked. It is the responsibility of the GUI to ensure that it is the user’s turn whenever this action occurs. Therefore, we design actionPerformed() so that each time it is called, it first performs the user’s move and then, assuming the game is not over and an error did not occur on the user’s move, it performs the computer’s move. Thus, the basic algorithm is as follows:
Let the user move.
    If game:game is not over and computer turn
       let the computer move.
    Game: how many sticks are left.
    display: report how many sticks are left
    If game:game is over
        Stop accepting moves.
        Report the winner.
OneRowNim object’s responsibility to keep track of whether the game is over and whose turn it is.
OneRowNimGUI class.import javax.swing.*;
import java.awt.*;
import java.awt.event.*;
public class OneRowNimGUI extends JFrame implements ActionListener
{ private JTextArea display;
private JTextField inField;
private JButton goButton;
private OneRowNim game;
public OneRowNimGUI(String title)
{ game = new OneRowNim(21);
buildGUI();
setTitle(title);
pack();
setVisible(true);
} // OneRowNimGUI()
private void buildGUI()
{ Container contentPane = getContentPane();
contentPane.setLayout(new BorderLayout());
display = new JTextArea(20,30);
display.setText("Let's play Take Away. There are " + game.getSticks() +
" sticks.\n" + "Pick up 1,2, or 3 at a time.\n" + "You go first.\n");
inField = new JTextField(10);
goButton = new JButton("Take Sticks");
goButton.addActionListener(this);
JPanel inputPanel = new JPanel();
inputPanel.add(new JLabel("How many sticks do you take: "));
inputPanel.add(inField);
inputPanel.add(goButton);
contentPane.add("Center", display);
contentPane.add("South", inputPanel);
} // buildGUI
private void userMove()
{ int userTakes = Integer.parseInt(inField.getText());
if (game.takeSticks(userTakes))
display.append("You take " + userTakes + ".\n");
else display.append("You can't take " + userTakes + ". Try again\n");
}// userMove()
private void computerMove()
{ if (game.gameOver()) return;
if (game.getPlayer() == 2)
{ game.takeSticks(1); // Temporary strategy
display.append("I take one stick. ");
} // if
} // computerMove()
private void endGame()
{ goButton.setEnabled(false); // Disable button and textfield
inField.setEnabled(false);
if (game.getWinner() == 1)
display.append("Game over. You win. Nice game.\n");
else display.append("Game over. I win. Nice game.\n");
} // endGame()
public void actionPerformed(ActionEvent e)
{ if (e.getSource() == goButton)
{ userMove();
computerMove();
int sticksLeft = game.getSticks();
display.append("There are " + sticksLeft + " sticks left.\n");
if (game.gameOver()) endGame();
} // if
} // actionPerformed()
} // OneRowNimGUI
OneRowNimGUI class. In terms of its instance variables, constructor, and its buildGUI() method, there are only a few minor differences between this GUI and the GreeterGUI(Listing 4.4.14). This GUI has instance variables for its JTextField, JTextArea, and JButton, as well as one for OneRowNim instance, its computational object. It needs to be able to refer to these objects throughout the class. Hence we give them class scope.
buildGUI() method have to do with application-specific details, such as the text we use as the prompt and the goButton’s label. One new method we use here is the setText() method. Unlike the append() method, which is used to add text to the existing text in a JTextArea, the setText() method replaces the text in a JTextArea or a JTextField.
userMove() and computerMove() methods. Their roles are very similar to the corresponding methods in the command-line interface: They encapsulate the details involved in performing the players’ moves. The primary difference here is that for the user move we input the user’s choice from a JTextField rather than from the keyboard. We use getText() to retrieve the user’s input from the JTextField and we use Integer.parseInt() to convert to an int value:
int userTakes = Integer.parseInt(inField.getText());
JTextField to display the program’s messages to the user.
GreeterGUI occur in the actionPerformed() method. Note there how we use OneRowNim’s public methods, getPlayer(), gameOver() and getWinner() to control the interaction with the user.
JButton and the JTextField. By disabling a control element, we render it unable to respond to events. To do this we use the setEnabled() method, passing it the value false to, in effect, “turn off” that component:
if (game.gameOver())
{  goButton.setEnabled(false);  // End the game
   inField.setEnabled(false);
   ...
}
setEnabled() method can be used repeatedly in a GUI to turn components on and off as the context of the interaction dictates.
JTextField, JTextArea, JLabel, and JButton as the GUI’s basic elements. A second design issue concerns the development of the actionPerformed() method, which must be designed in an application-specific way. Here we apply what we’ve learned regarding Java’s event-programming model: We designate one or more of our elements to serve as an ActionListener and we design algorithms to handle the action events that occur on that element.
JTextField s to handle input. At some point, we also might want to introduce JMenu s and other advanced GUI elements. Some of these options will be introduced in upcoming chapters. Others will be covered in Chapter 13, which provides a more comprehensive view of Java’s GUI capabilities.
