A Container is a component that can contain other components. Because containers can contain other containers, it is possible to create a hierarchical arrangement of components, as we did in the second version of our Converter interface. In its present form, the hierarchy for Converter consists of a JFrame as the top-level container (Fig. Figure 13.5.11). Contained within the frame is a KeyPad (subclass of JPanel), which contains 12 JButton s. Most GUIs will have a similar kind of containment hierarchy.
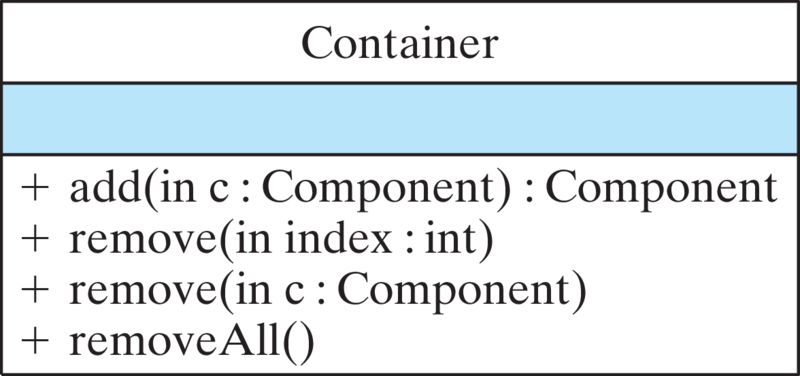
A Container is a relatively simple object whose main task is primarily to hold its components in a particular order. It has methods to add and remove components (Fig.Figure 13.6.1). As you can see from these methods, a container keeps track of the order of its elements, and it is possible to refer to a component by its index order.
The hard work of organizing and managing the elements within a container is the task of the layout manager. Among other tasks, the layout manager determines
Although it is possible to manage your own layouts, it is not easy to do. For most applications you are much better off by learning to use one of the AWT’s built-in layouts. Table 13.6.2 gives a brief summary of the available layouts. We will show examples of FlowLayout, GridLayout, and BorderLayout. Some of the widely used Swing containers have a default layout manager assigned to them Table 13.6.4.
Arranges elements along the north, south, east, west, and in the center of the container.
java.swing.BoxLayout
Arranges elements in a single row or single column.
java.awt.CardLayout
Arranges elements like a stack of cards, with one visible at a time.
java.awt.FlowLayout
Arranges elements left to right across the container.
java.awt.GridBagLayout
Arranges elements in a grid of variably sized cells (complicated).
java.awt.GridLayout
Arranges elements into a two-dimensional grid of equally sized cells.
java.swing.OverlayLayout
Arranges elements on top of each other.
To override the default layout for any of the JDialog, JFrame, and JWindow containers, you must remember to use the getContentPane() . The correct statement is
Attempting to add a component directly to a JFrame will cause an exception. --> For a top-level container like JFrame, components are added to its content pane.
It is simple to remedy the layout problem that affected the keypad in the most recent version of the Converter program. The problem was caused by the fact that as a subclass of JPanel, the KeyPad uses a default FlowLayout, which causes its buttons to be arranged in a row. A more appropriate layout for a numeric keypad would be a two-dimensional grid, which is exactly the kind of layout supplied by the java.awt.GridLayout. Therefore, to fix this problem, we need only set the keypad’s layout to a GridLayout. This takes a single statement, which should be added to the beginning of the KeyPad() constructor:
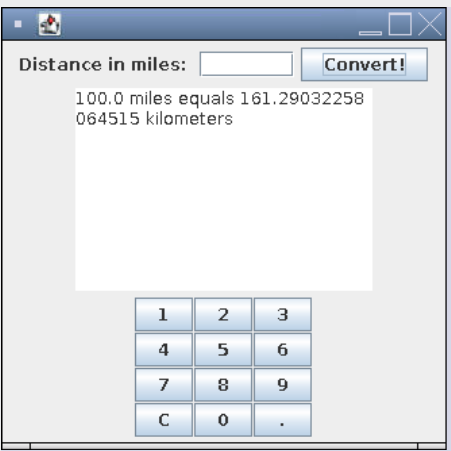
This statement creates a GridLayout object and assigns it as the layout manager for the keypad. It will ensure that the keypad will have four rows and three columns of buttons (Figure 13.6.5). The last two arguments in the constructor affect the relative spacing between the rows and the columns. The higher the number, the larger the spacing. As components are added to the keypad, they will automatically be arranged by the manager into a \(4 \times 3\) grid. Note that for a JPanel, the setLayout() method applies to the panel itself. Unlike the top-level containers, such as JFrame, other containers don’t have content panes. The same point would apply when adding components to a JPanel: They are added directly to the panel, not to a content pane. Confusion over this point could be the source of bugs in your programs.
Top-level containers, such as JFrame, are the only ones that use a content pane. For other containers, such as JPanel, components are added directly to the container itself.
Try the Metric Converter with KeyPad below. Fork the repl and change the code in KeyPad.java to add the line above to the KeyPad() constructor to change the layout to GridLayout. Try different numbers in the GridLayout to create a different number of rows and columns.
As its name suggests, the GridLayout layout manager arranges components in a two-dimensional grid. When components are added to the container, the layout manager starts inserting elements into the grid at the first cell in the first row and continues left to right across row 1, then row 2, and so on. If there are not enough components to fill all cells of the grid, the remaining cells are left blank. If an attempt is made to add too many components to the grid, the layout manager will try to extend the grid in some reasonable way in order to accommodate the components. However, despite its effort in such cases, it usually fails to achieve a completely appropriate layout.
Although the layout is much improved, there are still some deficiencies. One problem is that the convert button seems to be misplaced. It would seem to make more sense if it were grouped with the keypad rather than with the input text field.
A more serious problem results from the fact that we are still using a FlowLayout for the program’s main window, the JFrame. Among all of Java’s layouts, FlowLayout gives you the least amount of control over the arrangement of the components. Also, FlowLayout is most sensitive to changes in the size and shape of its container.
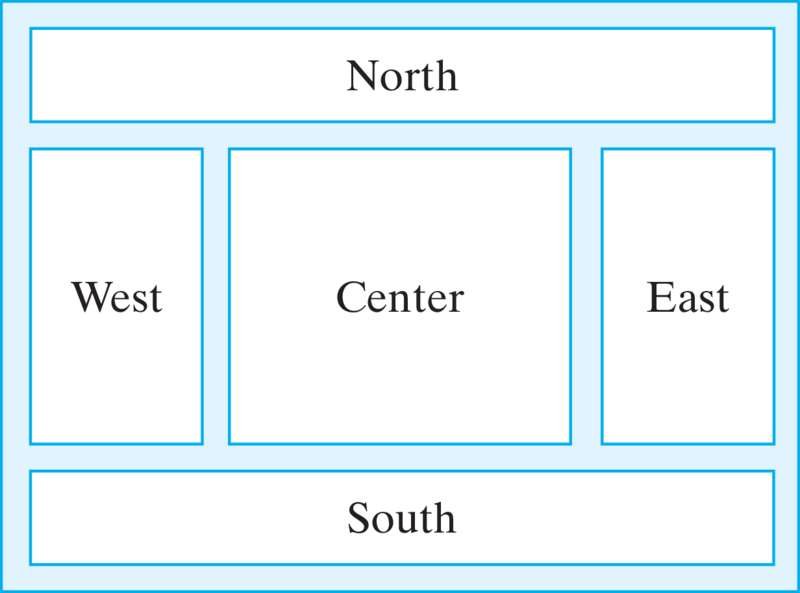
One way to fix these problems is to use a BorderLayout to divide the frame into five areas: north, south, east, west, and center, as shown in Figure 13.6.8. The BorderLayout class contains two constructors:
Components are added to a BorderLayout by using the add(Component, String) method found in the Container class. For example, to set the application window to a border layout and to add the keypad to its east area, we would use the following statements:
In this version of the add() method, the second parameter must be a capitalized String with one of the names, “North,” “South,” “East,” “West,” or “Center.” The order in which components are added does not matter.
One limitation of the BorderLayout is that only one component can be added to each area. That means that if you want to add several components to an area, you must first enclose them within a JPanel and then add the entire panel to the area. For example, let’s create a panel to contain the prompt and the text field and place it at the north edge of the frame:
JPanel inputPanel = new JPanel(); // Create panel
inputPanel.add(prompt);              // Add label
inputPanel.add(input);           // Add textfield
                    // Add the panel to the frame
getContentPane().add(inputPanel,"North");
The same point would apply if we want to group the keypad with the convert button and place them at the east edge. There are several ways these elements could be grouped. In this example, we give the panel a border layout and put the keypad in the center and the convert button at the south edge:
JPanel controlPanel= new JPanel(new BorderLayout(0,0));
controlPanel.add(keypad,"Center");
controlPanel.add(convert, "South");
                    // Add the panel to the frame
getContentPane.add(controlPanel,"East");
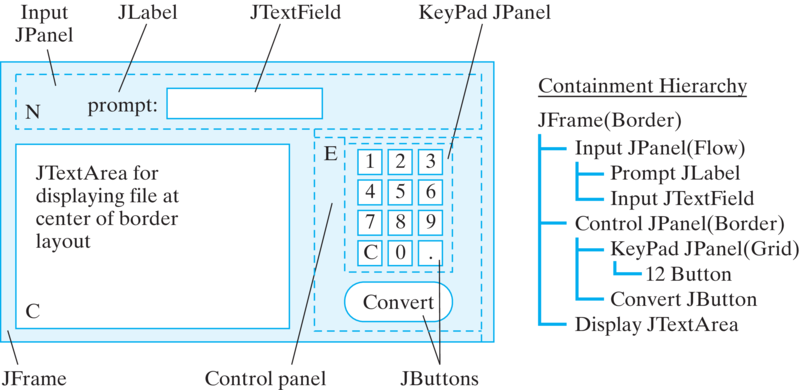
Given these details about the BorderLayout, a more appropriate design for the converter application is shown in Figure 13.6.9. Notice that the border layout for the top-level JFrame uses only the center, north, and east areas. Similarly, the border layout for the control panel uses just the center and south areas.
In a BorderLayout, when one (or more) border area is not used, then one or more of the other areas will be extended to fill the unused area. For example, if West is not used, then North, South, and Center will extend to the left edge of the Container. If North is not used, then West, East, and Center will extend to the top edge. This is true for all areas except Center. If Center is unused, it is left blank.
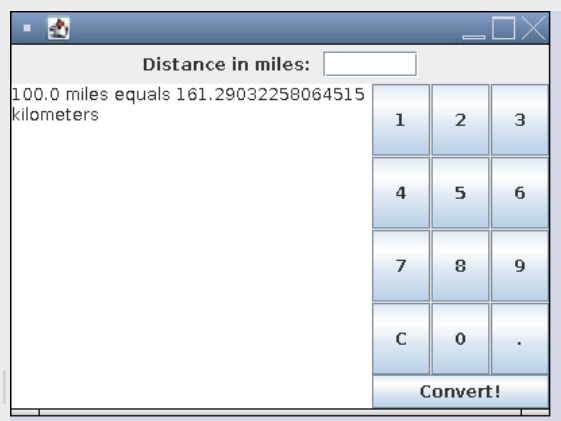
Figure 13.6.10 shows the results we get when we incorporate these changes into the program. The only changes to the program itself occur in the constructor method, which in its revised form is defined as follows:
public Converter() {
  getContentPane().setLayout(new BorderLayout());
  keypad = new KeyPad(this);
  JPanel inputPanel = new JPanel(); // Input panel
  inputPanel.add(prompt);
  inputPanel.add(input);
  getContentPane().add(inputPanel,"North");
  JPanel controlPanel= new JPanel(new BorderLayout(0,0));
                                  // Control panel
  controlPanel.add(keypad, "Center");
  controlPanel.add(convert, "South");
  getContentPane().add(controlPanel, "East");
                                 // Output display
  getContentPane().add(display,"Center");
  display.setLineWrap(true);
  display.setEditable(false);
  convert.addActionListener(this);
  input.addActionListener(this);
} // Converter()
This layout divides the interface into three main panels, an input panel, display panel, and control panel, and gives each panel its own layout. In addition, the control panel contains the keypad panel. Thus, the containment hierarchy for this design is much more complex than in our original design.
Try the Metric Converter with KeyPad in FlowLayout below. Fork the repl and change the code in KeyPad.java to add the GridLayout (as written in the GridLayout section above) to the KeyPad() constructor to change the layout to GridLayout. Change the Converter() constructor in Converter.java to the code above to use BorderLayout and JPanels.
The border layout for the Converter program above uses the north, center, and east regions. What other combinations of areas might be used for three components?