Section 13.6 CASE STUDY: Designing a Basic GUI
What elements make up a basic user interface? If you think about all of the various interfaces you've encountered—and don't just limit yourself to computers—they all have the following elements:
Some way to provide help/guidance to the user.
Some way to allow input of information.
Some way to allow output of information.
Some way to control the interaction between the user and the device.
Think about the interface on a beverage machine. Printed text on the machine will tell you what choices you have, where to put your money, and what to do if something goes wrong. The coin slot is used to input money. There's often some kind of display to tell you how much money you've inserted. And there's usually a bunch of buttons and levers that let you control the interaction with the machine.
These same kinds of elements make up the basic computer interface. Designing a Graphical User Interface is primarily a process of choosing components that can effectively perform the tasks of input, output, control, and guidance.
Principle 13.6.1. EFFECTIVE DESIGN:User Interface.
A user interface must effectively perform the tasks of input, output, control, and guidance.
In the programs we designed in the earlier chapters, we used two different kinds of interfaces. In the command-line interface, we used printed prompts to inform the user, typed commands for data entry and user control, and printed output to report results. Our GUI interfaces used JLabel s to guide and prompt the user, JTextField s and JTextArea s as basic input and output devices, and either JButton s or JTextField s for user control.
Let's begin by building a basic GUI in the form of a Java application. To keep the example as close as possible to the GUIs we've already used, we will build it out of the following Swing components: JLabel, JTextField, JTextArea, and JButton.
Subsection 13.6.1 The Metric Converter Application
Suppose the coach of the cross-country team asks you to write a Java application that can be used to convert miles to kilometers. The program should let the user input a distance in miles, and the program should report the equivalent distance in kilometers.

Before we design the interface for this, let's first define a MetricConverter class that can be used to perform the conversions (Fig. 13.9). For now at least, this class's only task will be to convert miles to kilometers, for which it will use the formula that 1 kilometer equals 0.62 miles:
public class MetricConverter {
    public static double milesToKm(double miles) {
        return miles / 0.62;
    }}
Note that the method takes a double as input and returns a double. Also, by declaring the method static, we make it a class method, so it can be invoked simply by
MetricConverter.milesToKm(10);
Subsubsection 13.6.1.1 Choosing the Components
Let's now design a GUI to handle the interaction with the user. First, let's choose Swing components for each of the four interface tasks of input, output, control, and guidance. For each component, it might be useful to refer back to Figure 13.2.2 to note its location in the Swing hierarchy.
A
JLabelis a display area for a short string of text, an image, or both. Its AWT counterpart, theLabel, cannot display images. A JLabel does not react to input. Therefore, it is used primarily to display a graphic or small amounts of static text. It is perfectly suited to serve as a prompt, which is what we will use it for in this interface.A
JTextFieldis a component that allows the user to edit a single line of text. It is identical to its AWT counterpart, theTextField. By using itsgetText()andsetText()methods, aJTextFieldcan be used for either input or output, or both. For this problem, we'll use it to perform the interface's input task.A
JTextAreais a multiline text area that can be used for either input or output. It is almost identical to the AWTTextAreacomponent. One difference, however, is that aJTextAreadoes not contain scrollbars by default. For this program, we'll use theJTextAreafor displaying the results of conversions. Because it is used solely for output in this program, we'll make it uneditable to prevent the user from typing in it.Let's use a
JButtonas our main control for this interface. By implementing theActionListenerinterface we will handle the user's action events.
Subsubsection 13.6.1.2 Choosing the Top-Level Window
The next issue we must decide is what kind of top-level window to use for this interface. For applet interfaces, the top-level component would be a JApplet. For Java applications, you would typically use a JFrame as the top-level window. Both of these classes are subclasses of Container, so they are suitable for holding the components that make up the interface (Fig. Figure 13.2.1).
Also, as noted earlier, JApplet s and JFrame s are both examples of heavyweight components, so they both have windows associated with them. To display a JFrame we just have to give it a size and make it visible. Because a frame runs as a stand-alone window, not within a browser context, it should also be able to exit the application when the user closes the frame.
Subsubsection 13.6.1.3 Designing a Layout
The next step in designing the interface is deciding how to arrange the components so that they will be visually appealing and comprehensible, as well as easy to use.
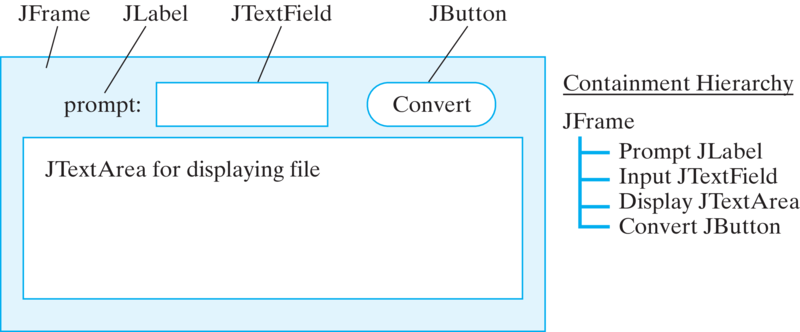
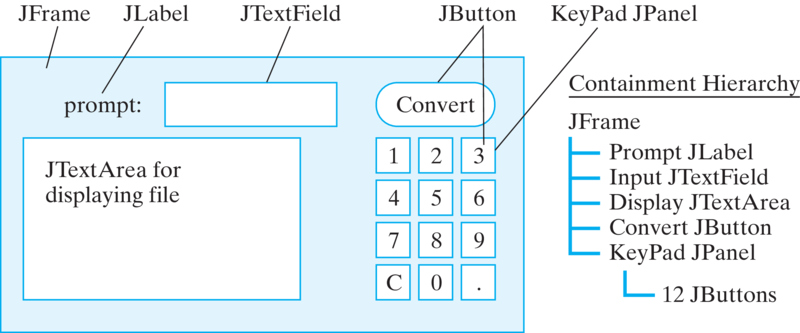
Figure 13.6.2 shows a design for the layout. The largest component is the output text area, which occupies the center of the JFrame. The prompt, input text field, and control button are arranged in a row above the text area. This is a simple and straightforward layout.
Figure 13.6.2 also provides a containment hierarchy, also called a widget hierarchy, which shows the containment relationships among the various components. Although it might not seem so for this simple layout, the containment hierarchy plays an important role in showing how the various components are grouped in the interface. For this design, we have a relatively simple hierarchy, with only one level of containment. All of the components are contained directly in the JFrame.
Figure 13.11 shows the design of the Converter class, which extends the JFrame class and implements the ActionListener interface. As a JFrame subclass, a Converter can contain GUI components. As an implementor of the ActionListener interface, it also will be able to handle action events through the actionPerformed() method.
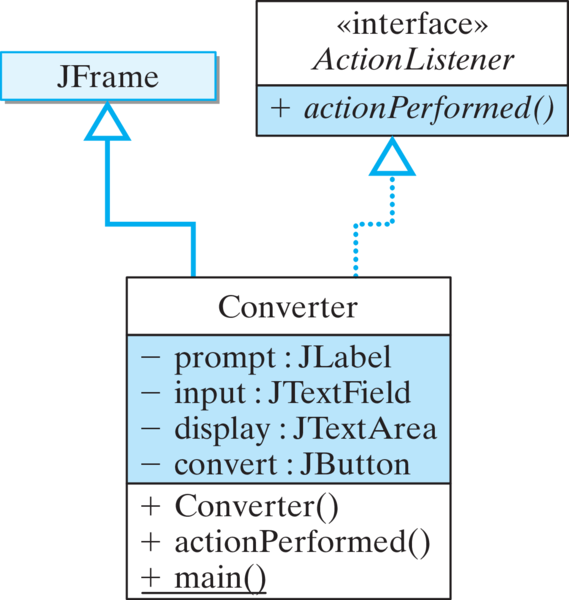
Figure 13.6.3 gives the implementation of the Converter class. Note the three packages that are imported. The first contains definitions of the Swing classes, and the other two contain definitions of AWT events and layout managers that are used in the program.
import javax.swing.*;             // Packages used
import java.awt.*;
import java.awt.event.*;
public class Converter extends JFrame
                            implements ActionListener{
  private JLabel prompt =
                  new JLabel("Distance in miles: ");
  private JTextField input = new JTextField(6);
  private JTextArea display = new JTextArea(10,20);
  private JButton convert = new JButton("Convert!");
  public Converter() {
    getContentPane().setLayout(new FlowLayout());
    getContentPane().add(prompt);
    getContentPane().add(input);
    getContentPane().add(convert);
    getContentPane().add(display);
    display.setLineWrap(true);
    display.setEditable(false);
    convert.addActionListener(this);
  } // Converter()
  public void actionPerformed( ActionEvent e ) {
    double miles =
       Double.valueOf(input.getText()).doubleValue();
    double km = MetricConverter.milesToKm(miles);
    display.append(miles + " miles equals " +
                     km + " kilometers\n");
  } // actionPerformed()
  public static void main(String args[]) {
    Converter f = new Converter();
    f.setSize(400, 300);
    f.setVisible(true);
    f.addWindowListener(new WindowAdapter() {
      public void windowClosing(WindowEvent e) {
        System.exit(0); // Quit the application
      }
    });
  } // main()} // Converter
Converter class implements a simple GUI interface.We have to do all initializing tasks in the constructor. First, we have to set the JFrame's layout to FlowLayout. A layout manager is the object that is responsible for sizing and arranging the components in a container so that the elements are organized in the best possible manner. A flow layout is the simplest arrangement: The components are arranged left to right in the window, wrapping around to the next “row” if necessary.
Second, note the statements used to set the layout and to add components directly to the JFrame. Instead of adding components directly to the JFrame, we must add them to its content pane:
getContentPane().add(input);
A content pane is a JPanel that serves as the working area of the JFrame. It contains all of the frame's components. Java will raise an exception if you attempt to add a component directly to a JFrame.
Principle 13.6.4. DEBUGGING TIP:Content Pane.
A JFrame cannot directly contain GUI elements. Instead, they must be added to its content pane, which can be retrieved using the getContentPane() method.
The JFrame and all the other top-level Swing windows have an internal structure made up of several distinct objects that can be manipulated by the program. Because of this structure, GUI elements can be organized into different layers within the window to create many types of sophisticated layouts. Also, one layer of the structure makes it possible to associate a menu with the frame.
Finally, note how the Converter frame is instantiated, made visible, and eventually exited in the application's main() method:
public static void main(String args[]) {
   Converter f = new Converter();
   f.setSize(400, 300);
   f.setVisible(true);
   f.addWindowListener(new WindowAdapter() {
                         // Quit the application
       public void windowClosing(WindowEvent e) {
           System.exit(0);
       }
   });} // main()
It is necessary to set both the size and visibility of the frame, since these are not set by default. Because we are using a FlowLayout, it is especially important to give the frame an appropriate size. Failure to do so can cause the components to be arranged in a confusing way and might even cause some components to not appear in the window. These are limitations we will fix when we learn how to use some of the other layout managers.
Subsection 13.6.2 Inner Classes and Adapter Classes
In this section we introduce two new language features, inner classes and adapter classes, which are used in the main() method shown above to handle the closing of the Converter application's window when the program is exited:
f.addWindowListener(new WindowAdapter() {
       public void windowClosing(WindowEvent e) {
           System.exit(0);
       }
 });
This code segment provides a listener that listens for window closing events. When such an event occurs, it exits the application by calling System.exit().
The syntax used here is an example of an anonymous inner class. An inner class is a class defined within another class. The syntax is somewhat ugly, because it places the class definition right where a reference to a window listener object would go. In effect what the code is doing is defining a subclass of WindowAdapter and creating an instance of it to serve as a listener for window closing events.
Anonymous inner classes provide a useful way of creating classes and objects on the fly to handle just this kind of listener task. The syntax used actually enables us to write one expression that both defines a class and creates an instance of it to listen for window closing events. The new subclass has local scope limited here to the main() method. It is anonymous, meaning we aren't even giving it a name, so you can't create other instances of it in the program. Note that the body of the class definition is placed right after the new keyword, which takes the place of the argument to the addWindowListener() method. For more details on the inner and anonymous classes, see Appendix F.
\BOXtwo{Inner Class.}{An inner class is a class defined within another class. Inner classes are mostly used to handle a task that supports the work of the containing class.}
An adapter class is a wrapper class that implements trivial versions of the abstract methods that make up a particular interface. (Remember from Chapter 4 that a wrapper class contains methods for converting primitive data into objects and for converting data from one type to another.)
The WindowAdapter class implements the methods of the WindowListener interface. When you implement an interface, such as ActionListener, you must implement all the abstract methods defined in the interface. For ActionListener there's just one method, the actionPerformed() method, so we can implement it as part of our applet or frame class. However, we want to use only one of the seven methods available in the WindowListener interface, the windowClosing() method, which is the method implemented in the anonymous inner class:
public void windowClosing(WindowEvent e) {
    System.exit(0);}
The WindowAdapter is defined simply as
public abstract class WindowAdapter
                          implements WindowListener {
    public void windowActivated(WindowEvent e) {}
    public void windowClosed(WindowEvent e) {}
    ...
    // Five other window listener methods}
Note that each method is given a trivial implementation (). To create a subclass of WindowAdapter, you must override at least one of its trivially implemented methods.
Another way to manage the application's window closing event is to define a subclass of WindowAdapter:
import javax.swing.*;
import java.awt.*;
import java.awt.event.*;
public class WindowCloser extends WindowAdapter {
    public void windowClosing(WindowEvent e) {
        System.exit(0);
    }}
Given this class, we can then place the following statement in Converter's main() method:
f.addWindowListener(new WindowCloser());
This is somewhat more familiar looking than the inner class construct. If you prefer this way of handling things, you can use this method in place of the inner classes here and in other examples.
Principle 13.6.5. EFFECTIVE DESIGN:Anonymous Adapter Classes.
Anonymous adapter classes provide a useful way of creating an object to handle one particular kind of event within a program.
Subsection 13.6.3 GUI Design Critique
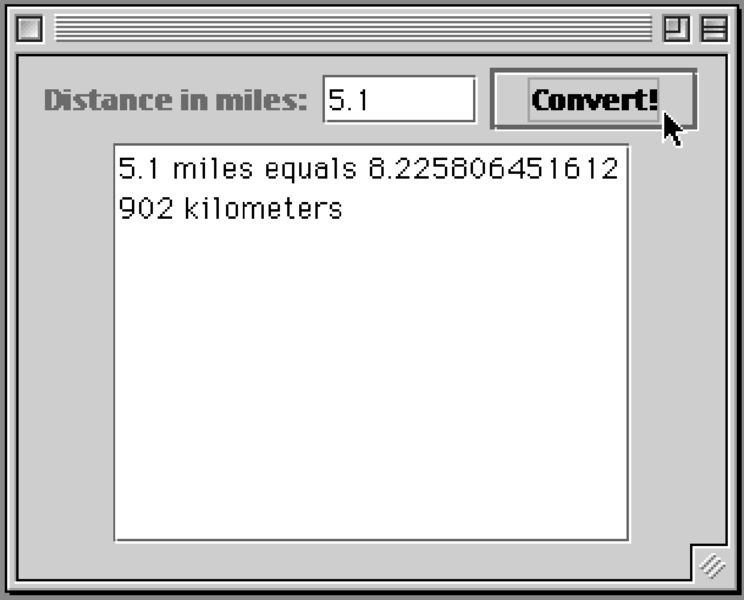
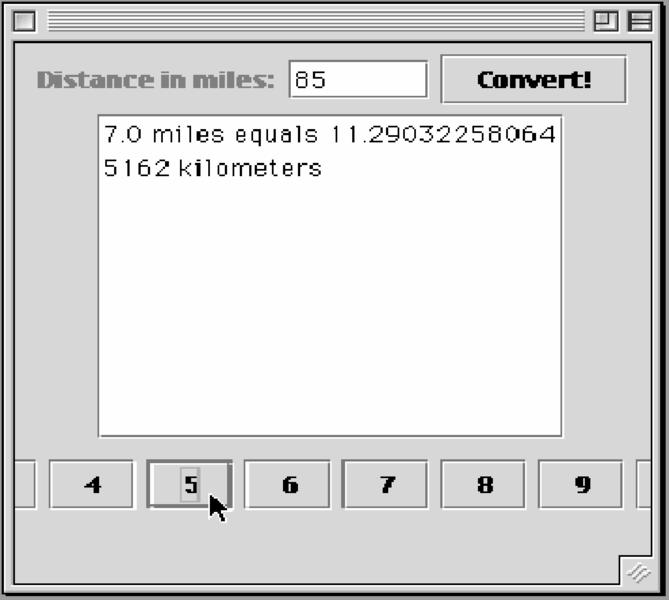
Figure 13.13 shows the converter interface.
First, it forces the user to manually clear the input field after each conversion. Unless it is important that the user's input value remain displayed until another value is entered, this is just an inconvenience to the user. In this case, the user's input value is displayed along with the result in the JTextArea, so there's no reason not to clear the input text field:
input.setText(""); // Clear the input field
Principle 13.6.6. EFFECTIVE DESIGN:Reduce the User's Burden.
A GUI should aim to minimize the responsibility placed on the user. In general, the program should perform any task that it can perform, unless, of course, there is a compelling reason that the user should do the task.
A second problem with our design is that it forces the user to switch between the keyboard (for input) and the mouse (for control). Experienced users will find this annoying. An easy way to fix this problem is to make both the JTextField and the JButton serve as controls. That way, to get the program to do the conversion, the user can just press the Enter key after typing a number into the text field.
To give the interface this type of control, we only need to add an ActionListener to the JTextField during the initialization step:
input.addActionListener(this);
A JTextField generates an ActionEvent whenever the Enter key is pressed. We don't even need to modify the actionPerformed() method, since both controls will generate the same action event. This will allow users who prefer the keyboard to use just the keyboard.
Principle 13.6.7. EFFECTIVE DESIGN:User Interface.
A GUI should aim to minimize the number of different input devices (mouse, keyboard) that the user has to manipulate to perform a particular task.
Given that the user can now interact with the interface with just the keyboard, a question arises over whether we should keep the button at all. In this case, it seems justifiable to keep both the button and the text field controls. Some users dislike typing and prefer to use the mouse. Also, having two independent sets of controls is a desirable form of redundancy. You see it frequently in menu-based systems that allow menu items to be selected either by mouse or by special control keys.
Principle 13.6.8. EFFECTIVE DESIGN:Desirable Redundancy.
Certain forms of redundancy in an interface, such as two sets of independent controls (mouse and keyboard), make it a more flexible or more widely usable program.
Subsection 13.6.4 Self-Study Exercises
Another deficiency in the converter interface is that it doesn't round off its result, leading sometimes to numbers with 20 or so digits. Develop Java code to fix this problem.
Give an example of desirable redundancy in automobile design.
Subsection 13.6.5 Extending the Basic GUI: Button Array
Suppose the coach likes our program but complains that some of the folks in the office are terrible typists and would prefer not to have to use the keyboard at all. Is there some way we could modify the interface to accommodate these users?
This gets back to the point we were just making about incorporating redundancy into the interface. One way to satisfy this requirement would be to implement a numeric keypad for input, similar to a calculator keypad. Regular JButton s can be used as the keypad's keys. As a user clicks keypad buttons, their face values—0 through 9—are inserted into the text field. The keypad will also need a button to clear the text field and one to serve as a decimal point.
This new feature will add 12 new JButton components to our interface. Instead of inserting them into the JFrame individually, it will be better to organize them into a separate panel and to insert the entire panel into the frame as a single unit. This will help reduce the complexity of the display, especially if the keypad buttons can be grouped together visually. Instead of having to deal with 16 separate components, the user will see the keypad as a single unit with a unified function. This is an example of the abstraction principle, similar to the way we break long strings of numbers (1-888-889-1999) into subgroups to make them easier to remember.
Principle 13.6.9. EFFECTIVE DESIGN:Reducing Complexity.
Organizing elements into distinct groups by function helps to reduce the GUI's complexity.
Figure 13.6.10 shows the revised converter interface design. The containment hierarchy shows that the 12 keypad JButton s are contained within a JPanel. In the frame's layout, the entire panel is inserted just after the text area.
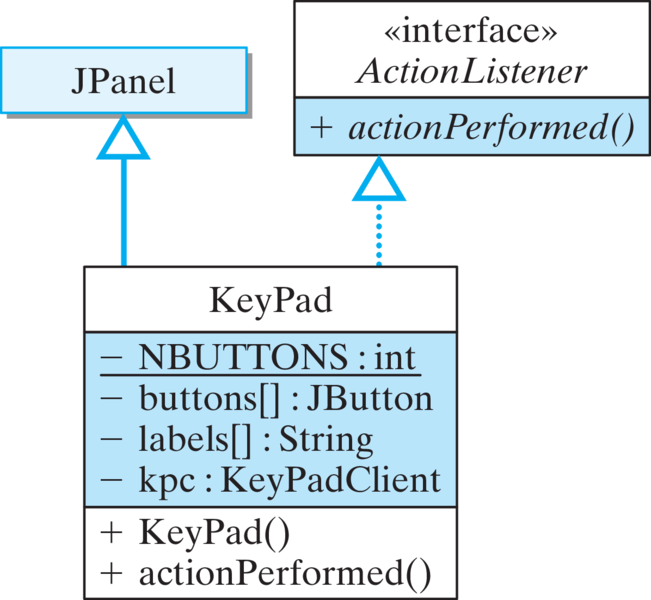
Incorporating the keypad into the interface requires several changes in the program's design. Because the keypad has such a clearly defined role, let's make it into a separate object by defining a KeyPad class (Fig. 13.15). The KeyPad will be a subclass of JPanel and will handle its own ActionEvent s. As we saw in Chapter 4, a JPanel is a generic container. It is a subclass of Container via the JComponent class (Fig. Figure 13.2.2). Its main purpose is to contain and organize
In this case, we will use a JPanel to hold the keypad buttons. As you might recall from Chapter 4, to add elements to a JPanel, you use the add() method, which is inherited from Container. (A JApplet is also a subclass of Container via the Panel class.)
As a subclass of JPanel, the KeyPad will take care of holding and organizing the JButton s in the visual display. We also need some way to organize and manage the 12 keypad buttons within the program's memory. Clearly, this is a good job for an array. Actually, two arrays would be even better, one for the buttons and one for their labels:
private JButton buttons[];
private String labels[] = // An array of button labels
            { "1","2","3",
              "4","5","6",
              "7","8","9",
              "C","0","." };
The label array stores the strings that we will use as the buttons' labels. The main advantage of the array is that we can use a loop to instantiate the buttons:
buttons = new JButton[NBUTTONS]; // Create the array
                          // For each labeled button
for(int k = 0; k < buttons.length; k++) {
 buttons[k] = new JButton(labels[k]); // Create button
 buttons[k].addActionListener(this); // and a listener
 add(buttons[k]);           // and add it to the panel} // for
This code should be placed in the KeyPad() constructor. It begins by instantiating the array itself. It then uses a for loop, bounded by the size of the array, to instantiate each individual button and insert it into the array. Note how the loop variable here, k, plays a dual role. It serves as the index into both the button array (buttons) and the array of strings that serves as the buttons' labels (labels). In that way the labels are assigned to the appropriate buttons. Note also how each button is assigned an ActionListener and added to the panel:
buttons[k].addActionListener(this); // Add listener
add(buttons[k]);            //  Add button to panel
An important design issue for our KeyPad object concerns how it will interact with the Converter that contains it. When the user clicks a keypad button, the key's label has to be displayed in the Converter's text area. But because the text area is private to the converter, the KeyPad does not have direct access to it. To address this problem, we will use a Java interface to implement a callback design. In this design, whenever a KeyPad button is pressed, the KeyPad object calls a method in the Converter that displays the key's label in the text area.
Figure 13.6.11 provides a summary of the callback design. Note that the association between the Converter and the KeyPad is bi-directional. This means that each object has a reference to the other and can invoke the other's public methods. This will be effected by having the Converter pass a reference to itself when it constructs the KeyPad:
Converter implements the KeyPadClient interface. It passes a reference to itself when it creates the KeyPad object. The KeyPad object can then invoke the keypressCallback() method whenever a keypad button is pressed, and the Converter can display the result of the keypress.private KeyPad keypad = new KeyPad(this);
Another important design issue is that the KeyPad needs to know the name of the callback method and the Converter needs to have an implementation of that method. This is a perfect job for an abstract interface:
public abstract interface KeyPadClient {
    public void keypressCallback(String s);}
The KeyPad can interact with any class that implements the KeyPadClient interface. Note that the KeyPad has a reference to the KeyPadClient, which it will use to invoke the keypressCallback() method.
The implementation of KeyPad is shown in Figure 13.17. Note that its constructor takes a reference to a KeyPadClient and saves it in an instance variable. Its actionPerformed() method then passes the key's label to the KeyPadClient's callback method.
import java.awt.*;
import java.awt.event.*;
import javax.swing.*;
public class KeyPad extends JPanel implements ActionListener{
  private final static int NBUTTONS = 12;
  private KeyPadClient kpc;  // Owner of the KeyPad
  private JButton buttons[];
  private String labels[] =  // An array of button labels
                { "1","2","3",
                  "4","5","6",
                  "7","8","9",
                  "C","0","." };
  public KeyPad(KeyPadClient kpc) {
    this.kpc = kpc;
    buttons = new JButton[NBUTTONS];         // Create the array
    for(int k = 0; k < buttons.length; k++) { // For each button
      buttons[k] = new JButton(labels[k]);   //  Create a button
      buttons[k].addActionListener(this);     //  and a listener
      add(buttons[k]);                    // and add it to panel
    } // for
  } // KeyPad()
  public void actionPerformed(ActionEvent e) {
    String keylabel = ((JButton)e.getSource()).getText();
    kpc.keypressCallback(keylabel);
  } // actionPerformed()} // KeyPad
KeyPad object implements a 12-key keypad in a JPanel. It has a reference to the KeyPadClient that contains the keypad.Given the KeyPad design, we need to revise our design of the Converter class (Fig. Figure 13.6.11). The Converter will now implement the KeyPadClient interface, which means it must provide an implementation of the keypressCallback() method:
public void keypressCallback(String s) {
    if (s.equals("C"))
        input.setText("");
    else
        input.setText(input.getText() + s);}
Recall that whenever the KeyPad object calls the keypressCallback() method, it passes the label of the button that was pressed. The Converter object simply appends the key's label to the input text field, just as if the user typed the key in the text field.
The complete implementation of this revised version of the interface is shown in Figure 13.18 on the next page. The appearance of the interface itself is shown in Figure 3.19.
import javax.swing.*;      // Packages used
import java.awt.*;
import java.awt.event.*;
public class Converter extends JFrame   // Version 2
                 implements ActionListener, KeyPadClient {
  private JLabel prompt = new JLabel("Distance in miles: ");
  private JTextField input = new JTextField(6);
  private JTextArea display = new JTextArea(10,20);
  private JButton convert = new JButton("Convert!");
  private KeyPad keypad = new KeyPad(this);
  public Converter () {
    getContentPane().setLayout(new FlowLayout());
    getContentPane().add(prompt);
    getContentPane().add(input);
    getContentPane().add(convert);
    getContentPane().add(display);
    getContentPane().add(keypad);
    display.setLineWrap(true);
    display.setEditable(false);
    convert.addActionListener(this);
    input.addActionListener(this);
  } // Converter()
  public void actionPerformed(ActionEvent e) {
    double miles =
      Double.valueOf(input.getText()).doubleValue();
    double km = MetricConverter.milesToKm(miles);
    display.append(miles + " miles equals " +
                   km + " kilometers\n");
    input.setText("");
  } // actionPerformed()
  public void keypressCallback(String s) {
    if (s.equals("C"))
        input.setText("");
     else
        input.setText(input.getText() + s);
  }
  public static void main(String args[]) {
    Converter f = new Converter();
    f.setSize(400, 300);
    f.setVisible(true);
    f.addWindowListener(new WindowAdapter() {
      public void windowClosing(WindowEvent e) {
        System.exit(0);  // Quit the application
      }
    });
  } // main()} // Converter
Converter class, which implements the GUI shown in Figure 13.19.Subsection 13.6.6 GUI Design Critique
Figure 3.19 shows that despite our
KeyPad (which is a JPanel) is FlowLayout, which is not appropriate for a numeric keypad that needs to be arranged into a two-dimensional grid pattern, which is the kind of layout our design called for (Fig. Figure 13.6.10).
Fortunately, this flaw can easily be fixed by using an appropriate layout manager from the AWT. In the next version of the program, we employ the java.awt.GridLayout, which is perfectly suited for a two-dimensional keypad layout (Section 13.7.2).
The lesson to be learned from this example is that screen layout is an important element of an effective GUI. If not done well, it can undermine the GUI's effort to guide the user toward the appointed tasks. If done poorly enough, it can even keep the user from doing the task at all.
Principle 13.6.14. EFFECTIVE DESIGN:Layout Design.
The appropriate layout and management of GUI elements is an important part of interface design. It contributes to the interface's ability to guide the user's action toward the interface's goals.