


9.6. Thinking About Pixel Locations
So far, we have been getting a list of all of the pixels from an image using img.getPixels()
and then looping through all the pixels using for p in pixels:. This processed all the
pixels in the first row, then all the pixels in the second row, and so on until it processed
all the pixels in the image.
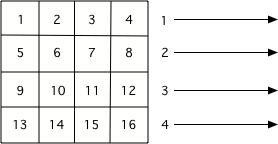
The order that pixels are processed if you use img.getPixels()
This approach has some limitations because we never know what coordinates the pixel we are working on is located at. This prevents us from writing programs that change where pixels are or do different things in different parts of the image.
If we want to have access to the location of the pixel we are working with, we need to change our loop strategy. We will use nested loops, with an outer one that iterates over all the columns in the image and inner one that iterates over all of the rows in that column. This sample shows the basic idea but just prints out the locations of pixels in the order they would be visited instead of doing actual work on an image.
Notice that we start counting from 0 in images (in programming we generally start counting from 0 instead of 1). So the uppermost left pixel is 0, 0. The bottom left pixel in a 4 x 4 image is 3, 0.
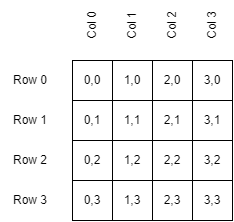
The x, y locations of various pixels in a 4 x 4 image.
Since the outer loop in our program changes the x (the column) and the inner loop changes the y (the row), we will start on column 0. On that column, the inner loop processes all the rows in that column. Then we move to column 1, where we process all of its rows…
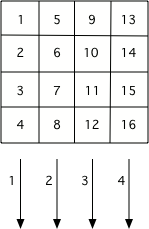
The order that pixels are processed if you use a nested loop with x changing in the outer loop and y changing in the inner loop.
- 4, 9
- Remember that the width defines the possible x coordinates and the x comes first
- 5, 10
- Remember that the width defines the possible x coordinates and the x comes first
- 9, 4
- Correct. We start counting from 0, so a width of 10 means columns 0-9. A height of 5 means rows 0-4.
- 10, 5
- That would be true if the image had a width of 11 and a height of 6.
In the program above, if we set imageWidth to be 10 and imageHeight to be 5, what
would the coordinates of the last pixel processed be?
Now let’s put the pixel coordinates to work. To do so, instead of printing coordinates like 0,0
we will use them to call getPixel on the image. In the past, our loop was given a big list of
all the pixels and iterated through those. Now we have two loops, that are iterating through all
the location in the image. We use those locations to get the pixels one by one.
The sample below dose exactly that. Then, after getting the pixel, it modifies the There color channels (red, green, blue) of that pixel by subtracting the x coordinate. This means on the left side of the image, where x is 0 or close to it, there is little change. On the right side, where x is larger, we remove more and more of the color, getting closer and closer to pure black. (Once we hit column 255, we could only get black as the starting red/green/blue values are all 255 at most.)
We don’t always have to modify the pixel color. We can also use the coordinates to move a particular
pixel to a new location. This sample calculates a newY that is used as the y coordinate for the
pixel when we put it back in the image. This newY is calculated as the height of the image
minus one minus the y location of where we got the pixel.
- We rotated the image 90 degrees to the left and flipped it over.
- This would be true if we created a new image and set the values in the new image from the old pixel values.
- We mirrored the image around a horizontal line.
- Correct. The top rows are copied to the bottom and end up erasing the top part of the image.
- We flipped the image horizontally.
- This would be true if we created a new image and set the values in the new image from the old pixel values.
- No change.
- Compare this image to the original student2.jpg image.
What happened when we copied the pixel from (x,y) to (x, newY)?
Say an image has a height of 10. When y is 0 (top row), newY will be \((10 - 1) - 0 = 9\) which is the last row in the image. When y is 1, newY will be: \((9 - 1) - 0 = 8\), or the next to last row in the image. So the top row gets copied to the bottom. The second row gets copied to the row above that, etc…
Unfortunately, as we move rows from the top to the bottom, we lose the data that used to be there.
So once we get to the bottom half, we are copying data that was copied from the top half back
to its starting location. If we want to fix that problem, we need to copy our data from one Image
to another so that we don’t wipe out the original as we make changes. This program does exactly
that - it copies from imgSource to imgTarget and then draws imgTarget when it is done.
imgSource never changes - to verify that, after running the program, try changing the last
line to draw imgSource instead of imgTarget.