Using a formal version control system (VCS) has many advantages over using just an informal system of version control like the one we described in the last section. Some of the important advantages of VCSs include:
Versioning.
They allow users to track changes to a codebase over time. Users can see why changes were made and can go back to a previous version of the code if needed.
They allow multiple people to work on the same project at the same time, make changes to the code, and track the changes made by others. This facilitates collaboration.
They allow users to create different branches of the codebase, which enables developers to work on separate features or fixes without affecting the main codebase. Once changes are completed and approved, the branches can be merged back into the main codebase.
For the examples in this chapter, we will use software source code as the files being version controlled, although in reality you can do this with nearly any type of file or set of files. For example, if you are a website designer and want to keep every version of the site, a VCS is a very wise thing to use. It allows you to revert selected files back to a previous state, revert the entire project back to a previous state, compare changes over time, see who last modified something that might be causing a problem, who introduced an issue and when, and more. Using a VCS also generally means that if you mess things up or lose files, you can easily recover.
Many people’s first personal version-control method of choice is an informal one such as copying files into another directory or up into the cloud. These informal approaches are common because they are simple, but they are also error prone. It is easy to forget which directory you’re in and accidentally write to the wrong file or copy over files you don’t mean to.
To deal with this issue, programmers long ago developed a more formal system of version control. Local VCSs provide a more automatic, less error-prone and more structured way of keeping all the changes to files under revision control on the local computer. Local VCSs typically operate quickly because they do not have to communicate with a remote server. With a local system, developers have access to the entire history of the codebase on their local machine, and they can work on the codebase offline, without an internet connection.
However, there are significant disadvantages to using local VCSs. For example, local VCSs do not support collaboration because multiple developers cannot easily work on the same codebase at the same time. So. local VCSs are more suited for individual developers who are working on their own projects. Local VCSs store code data locally, which increases the risk of data loss due to machine failure or corruption because whenever you have the entire history of a project in a single place, you risk losing everything. In addition, local systems are not scalable, so as the codebase grows in size, the performance of the local system may degrade.
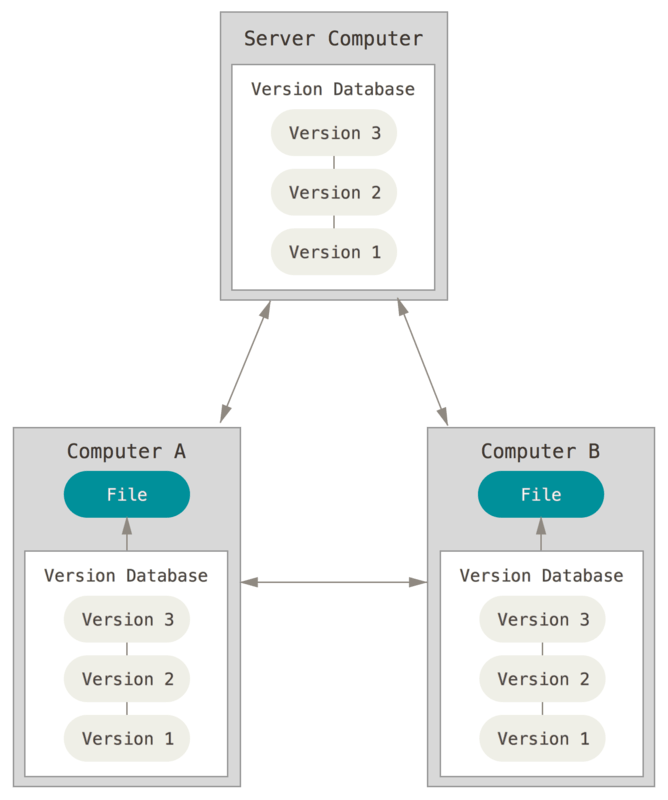
Many developers need to collaborate with other developers on other systems. To deal with this, centralized VCSs were developed. These systems (such as CVS, Subversion, and Perforce) have a single server that contains all the versioned files, and a number of clients check out files from that central server. For many years, this was the standard for version control.
Centralized VCSs offer many advantages over local VCSs. For example, everyone knows or can see to a certain degree what everyone else on the project is doing. Administrators have fine-grained control over who can do what.
However, centralized VCSs also have some serious downsides. Conflict resolution can be a challenge because if individual copies of the repository diverge significantly from one another, conflicts can arise when merging changes is attempted. This lead to a process of resolving the conflicts, which can be time-consuming even when using conflict resolution tools. In fact, resolution of conflicts can delay the development process. To mitigate this, developers must communicate regarding direction and must also synchronize copies of the codebase regularly by merging changes often. Effective communication and frequent updating can help prevent significant divergence and reduce the risk of conflicts in centralized VCSs.
Another obvious is that like local VCSs, the centralized server represents a single point of failure. If that server goes down for an time, then during that downtime nobody can collaborate at all and no one can save versioned changes to anything they’re working on. If the disk of the central server becomes corrupted, and proper backups haven’t been kept, the project could lose absolutely everything — the entire history of the project except whatever single snapshots people happen to have on their local machines.
This is where distributed VCSs step in. In a distributed VCS (such as Git, Mercurial, Bazaar or Darcs), clients don’t just check out the latest snapshot of the files; rather, they fully mirror the repository, including its full history. Thus, if any server dies, and these systems were collaborating via that server, any of the client repositories can be copied back up to the server to restore it. Every clone is really a full backup of all the data.
Furthermore, many of these distributed systems deal pretty well with having several remote repositories they can work with, so you can collaborate with different groups of people in different ways simultaneously within the same project. This allows you to set up several types of workflows that aren’t possible in centralized systems, such as hierarchical models.
The bridge of communication in a Linux system between the user applications and the underlying hardware is called the kernel, and the Linux kernel is an open source software project of fairly large scope. During the early years of kernel maintenance (1991–2002), changes to the software were passed around by email as descriptions of the differences in source files. In 2002, the Linux kernel project began using a proprietary distributed VCS called BitKeeper.
In 2005, the relationship between the community that developed the Linux kernel and the commercial company that developed BitKeeper broke down, and the tool’s free-of-charge status was revoked. This prompted the Linux development community (and in particular Linus Torvalds, the creator of Linux) to develop their own tool based on some of the lessons they learned while using BitKeeper. Some of the goals of the new system were as follows:
Since its birth in 2005, Git has evolved and matured to be easy to use and yet retain these initial qualities. It’s amazingly fast, it’s very efficient with large projects, and it has an incredible branching system for non-linear development.
So, what is Git in a nutshell? This is an important topic to absorb, because if you understand what Git is and the fundamentals of how it works, then using Git effectively will probably be much easier for you.
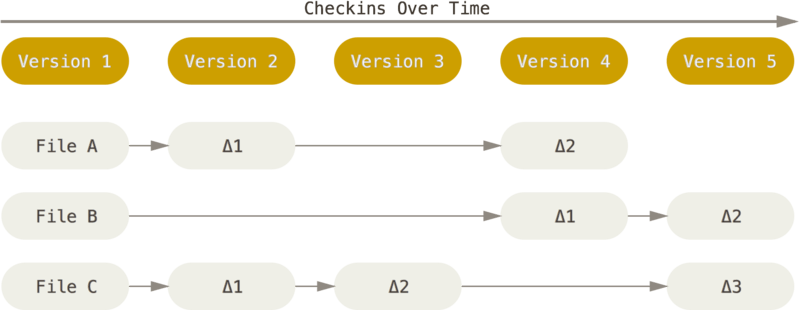
The major difference between Git and most other VCSs is the way Git thinks about its data. Conceptually, most other systems store information as a list of file-based changes. These other systems (CVS, Subversion, Perforce, Bazaar, and so on) think of the information they store as a set of files and the changes made to each file over time (This is commonly described as delta-based version control).
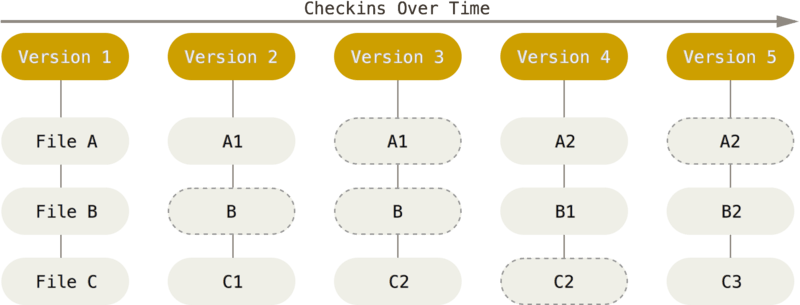
Git doesn’t think of or store its data this way. Instead, Git thinks of its data more like a series of snapshots of a miniature filesystem. With Git, every time you commit, or save the state of your project, Git basically takes a picture of what all your files look like at that moment and stores a reference to that snapshot. To be efficient, if files have not changed, Git doesn’t store the file again, just a link to the previous identical file it has already stored. Git thinks about its data more like a stream of snapshots.
This is an important distinction between Git and nearly all other VCSs. It makes Git reconsider almost every aspect of version control that most other systems copied from the previous generation. This makes Git more like a mini filesystem with some incredibly powerful tools built on top of it, rather than simply a VCS. We’ll explore some of the benefits you gain by thinking of your data this way when we cover Git branching in Git Branching.
Most operations in Git need only local files and resources to operate — generally no information is needed from another computer on your network. Because you have the entire history of the project right there on your local disk, most operations seem almost instantaneous.
For example, to browse the history of the project, Git doesn’t need to go out to the server to get the history and display it for you — it simply reads it directly from your local repository. This means you see the project history almost instantly. If you want to see the changes introduced between the current version of a file and the file a month ago, Git can look up the file a month ago and do a local difference calculation, instead of having to either ask a remote server to do it or pull an older version of the file from the remote server to do it locally.
This also means that there is very little you can’t do if you’re offline. If you get on an airplane or a train and want to do a little work, you can commit happily (to your local copy, remember?) until you get to a network connection to upload.
Everything in Git is stored via a unique digital fingerprint of the data. This means it’s impossible to change the contents of any file or directory without Git knowing about it. This functionality is built into Git at the lowest levels and is integral to its philosophy. You can’t lose information in transit or get file corruption without Git being able to detect it.
The mechanism that Git uses for creating this unique digital fingerprint of the data is called a SHA-1 hash. This is a 40-character string composed of hexadecimal characters (0–9 and a–f) and calculated based on the contents of a file or directory structure in Git. A SHA-1 hash looks something like this:
You will see these hash values all over the place in Git because it uses them so much. In fact, Git stores everything in its repository not by file name but by the hash value of its contents. Because they are a long incomprehensible strings, they look strange, but try not to let that bother you.
During ordinary use of Git, nearly all of your actions only add data. It is intended to be hard to get Git to do anything that is not undoable or to make it erase data in any way. As with any VCS, you can lose or mess up changes you haven’t committed yet, but after you commit a snapshot into Git, it is more difficult to lose, specially if you regularly push the state of your repository to a remote. Having said this, novices can get themselves into a mess. Some advice is to always make sure you are working on a branch other than main or master, and always check to be sure you are on the intended branch before you begin working.
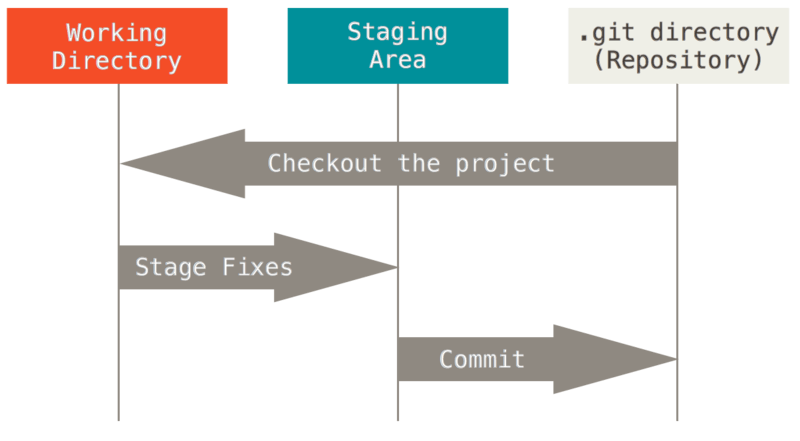
Pay attention now — here is the main set of concepts to remember about files in Git if you want the rest of your learning process to go smoothly. Git has three main states that your files can reside in, modified, staged, and committed:
As a metaphor for better understanding these concepts, let’s imagine you are shopping for a shirt and some other items online. You find a page with a shirt you are considering, and you make several choices by clicking on things like the style (long-sleeved vs short-sleeved, for example), the size, the color, etc. The state of your browser has been modified from the default state, but you haven’t completely decided if you want it, so you have not put it into your shopping cart. That is analogous to modifying your codebase before staging in Git.
Next, maybe you decide that you like these shirt choices enough that you don’t want to lose them, so you put the style, size, and color shirt you like into your shopping cart. That is analogous to staging — you have not yet completely committed to buying the shirt, but you are ready to do so, and you are still able to change your mind and make additional changes to your choices or remove the shirt from the shopping cart altogether. You can also keep shopping and postpone making a decision about buying while you continue shopping.
Once you have made all of your shopping choices and are ready to commit to paying for the items in your shopping cart, you go through the process of paying. This is analogous to committing — you have made a commitment to receive the items that you paid for, and the online store keeps a record of your purchase. Of course, once you receive the shirt and it isn’t quite what you had hoped for, you can still return the shirt, but it is more complicated to do so than before you made the purchase and a record will be made of the return as well. This is also analogous to how Git works.
The concepts of modified, staged, and committed describe the different stages that files can go through as they are modified and committed to the repository. Next, let’s discuss how Git is organized.
A Git repository is more than just a set of files. It is also more than just a set of snapshots of files. It’s a complete history of a project’s development, which includes information about who made what changes, when those changes were made, and why they were made because the repository includes not only the committed snapshots of files, but also the metadata that accompanies those snapshots, such as commit messages and author information. Additionally, the repository includes information about the branches and tags that have been created to manage the development of the project.
The Git working tree refers to the set of files and directories that are currently being worked on in a local repository, but it is more than just the set of files and directories. It is also a service that continuously monitors the resource status of the files and the file system in that local repository. For example, the Git working tree logs when a new file is added or deleted or modified.
The Git staging area, also known as the Git index, is a file where the changes to files that have been staged are stored and stand ready to be committed.
Once changes have been staged in the staging area, you can create a new commit. This then takes the staged changes and creates a new snapshot of the files in the Git directory.
The Git directory is where all the committed snapshots of the project are stored along with the associated metadata, such as commit messages and author information. This is the most important part of Git. Along with the files and file directory, the Git directory is copied when you clone a repository from another computer.
You then do a commit, which takes the files as they are in the staging area and stores that snapshot permanently to your local Git directory (on your computer). Note that in Section 4.6, we will learn how to push your work to a remote copy of the repository.
If a particular version of a file is in the Git directory, it’s considered committed. If it has been modified and was added to the staging area, it is staged. And if it was changed since it was checked out but has not been staged, it is modified. In Section 4.3 you’ll learn more about these states and how you can either take advantage of them or skip the staged part entirely.
There are a lot of different ways to use Git. There are the original command-line tools, and there are many graphical user interfaces of varying capabilities. For this chapter, we will be using Git on the command line. For one, the command line is the only place you can run all Git commands — most of the GUIs implement only a partial subset of Git functionality for simplicity. If you know how to run the command-line version, you can probably also figure out how to run the GUI version, while the opposite is not necessarily true. Also, while your choice of graphical client is a matter of personal taste, all users will have the command-line tools installed and available.
So you will need to know how to open the Terminal in macOS or Linux or the Command Prompt or PowerShell in Windows. If you don’t remember what we’re talking about here, please review Section 3.1.
Before you start using Git, you have to make it available on your computer. Even if it’s already installed, it’s probably a good idea to update to the latest version. You can either install it as a package or via another installer, or download the source code and compile it yourself. If you are a beginner, we strongly recommend using an installer.
For more options, there are instructions for installing on many different Linux distributions on the Git website, at https://git-scm.com/download/linux.
Another excellent way is to install the Xcode Command Line Tools, which is an Apple package with useful developer tools that run on the command line. Apply has made this very easy to do simply by trying to run Git from the Terminal the very first time. If you open a terminal and type the following:
If you are using WSL2 or are developing in a VM, then open a terminal in that environment and follow the directions for installing Git in Ubuntu from the Linux section above.
If you are working in WSL2, Git for Windows might also be useful. Git for Windows provides a native set of tools that bring the full feature set of the Git SCM to Windows as well as bash emulation which can be used to run Git from the command line. To install go to https://gitforwindows.org. Not that Git for Windows will not be useful to you if you are developing in a VM running Ubuntu.
If you don’t need the full-blown manpage help, but just need a quick refresher on the available options for a specific Git command, you can ask for the more concise “help” output with the -h option, as in the following for the Git add command::
Now that you have Git on your system, you’ll want to do a few things to customize your Git environment. You should have to do these things only once on any given computer; they’ll stick around between upgrades. You can also change them at any time by running through the commands again.
The first thing you should do when you install Git is to set your user name and email address. This is important because every Git commit uses this information, and it’s immutably baked into the commits you start creating:
Again, you need to do this only once if you pass the --global option, because then Git will always use that information for anything you do on that system. If you want to override this with a different name or email address for specific projects, you can run the command without the --global option when you’re in that project.
Now that your identity is set up, you can configure the default text editor that will be used when Git needs you to type in a message. If not configured, Git uses your system’s default editor.
If you want to use a non-default text editor, such as VSCode, on a macOS system you may need to select "Shell Command: Install ’Code’ command in path" from the Command Palette in VSCode. On a Windows system, if you want to use a different text editor, you must specify the full path to its executable file. This will be different depending on how your editor is packaged.
The --wait option is needed to wait for the VSCode window to close before returning to the terminal. So a new window will open in a new instance of VSCode, and once you save the file and close it, you will return to your terminal.
If you have that working, you can use VSCode to add some additional functionality .Git diff is a particularly useful command for reviewing changes before committing them to the repository. We will continue to use the git diff command in various ways throughout the rest of the chapter. To set up VSCode to handle git diff commands, we need to change the git config file. To get to it globally, type the following:
You should now have a basic understanding of different types of VCSs, as well as some of their advantages and disadvantages. You should also now know what Git is and should also now have a working version of Git set-up on your system. In the next section, we will learn some Git basics.
The Git staging area is a file where committed snapshots of the project are stored along with their associated metadata.
This option describes the purpose of the Git repository itself, not specifically the staging area.
The Git staging area continuously monitors the resource status of files and the file system in a local repository.
This option describes a monitoring function, which is not the main purpose of the Git staging area.
The Git staging area is used to selectively add a list of changes that will be part of the next commit.
Correct! The Git staging area, also known as the Git index, is used to selectively stage changes to files that will be part of the next commit. It allows developers to control which modifications are included in a commit, helping create clean and organized commits.
The Git staging area is where all the committed snapshots of the project are stored.
This option incorrectly states that all committed snapshots of the project are stored in the staging area, whereas the staging area is just a step before creating a commit.