
8.9.7. Picture Lab A9: Simple Edge Detection
8.9.7.1. Edge Detection
Detecting edges is a common image processing problem. For example, digital cameras often feature face detection. Some robotic competitions require the robots to find a ball using a digital camera, so the robot needs to be able to “see” a ball. One way to look for an edge in a picture is to compare the color at the current pixel with the pixel in the next column to the right. If the colors differ by more than some specified amount, this indicates that an edge has been detected and the current pixel color should be set to black. Otherwise, the current pixel is not part of an edge and its color should be set to white (Figure 1).
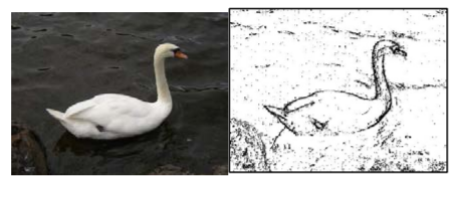
Figure 1: Original picture and after edge detection
How do you calculate the difference between two colors? The formula for the difference between two points (x1,y1) and (x2,y2) is the square root of ((x2 - x1)2 + (y2 - y1)2 ). The difference between two colors (red1,green1,blue1) and (red2,green2,blue2) is the square root of ((red2 - red1)2 +(green2 - green1)2 +(blue2 - blue1)2 ). The colorDistance method in the Pixel class uses this calculation to return the difference between the current pixel color and a passed color.
The following method implements this simple algorithm. Notice that the nested for loop stops earlier than when it reaches the number of columns. That is because in the nested loop the current color is compared to the color at the pixel in the next column. If the loop continued to the last column this would cause an out-of-bounds error.
public void edgeDetection(int edgeDist)
{
     Pixel leftPixel = null;
     Pixel rightPixel = null;
     Pixel[][] pixels = this.getPixels2D();
     Color rightColor = null;
     for (int row = 0; row < pixels.length; row++)
     {
          for (int col = 0; col < pixels[0].length-1; col++)
          {
               leftPixel = pixels[row][col];
               rightPixel = pixels[row][col+1];
               rightColor = rightPixel.getColor();
               if (leftPixel.colorDistance(rightColor) > edgeDist)
                   leftPixel.setColor(Color.BLACK);
               else
                   leftPixel.setColor(Color.WHITE);
          }
     }
}
You can test this with the edgeDetection method below.
Picture Lab A9: Run to see edgeDetection working.
 Coding Exercises
1. Notice that the current edge detection method works best when there are big color changes from left to right but not when the changes are from top to bottom. Add another nested loop that compares the current pixel with the pixel below it and sets the current pixel color to black as well when the color distance is greater than the specified edge distance.
Picture Lab A9: Improve the edgeDetection method by adding another nested loop that compares the current pixel with the pixel below it and sets the current pixel color to black as well, when the color distance is greater than the specified edge distance.
Work in groups to come up with another algorithm for edge detection and test it below.
Picture Lab A9: Come up with another algorithm for edgeDetection in a method called myEdgeDetection.
Choose from these images in this lesson. To use your own images, you can fork this replit.com Swing project or this alternative replit.com project (click output.jpg to see the result) or download the project files form replit to your own IDE.
swan.jpg
temple2.jpg
8.9.7.2. How image processing is related to new scientific breakthroughs
Many of today’s important scientific breakthroughs are being made by large, interdisciplinary collaborations of scientists working in geographically widely distributed locations, producing, collecting, and analyzing vast and complex datasets.
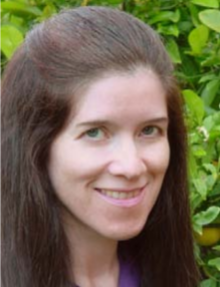
One of the computer scientists who works on a large interdisciplinary scientific team is Dr. Cecilia Aragon. She is an associate professor in the Department of Human Centered Design & Engineering and the eScience Institute at the University of Washington, where she directs the Scientific Collaboration and Creativity Lab. Previously, she was a computer scientist in the Computational Research Division at Lawrence Berkeley National Laboratory for six years, after earning her Ph.D. in Computer Science from UC Berkeley in 2004. She earned her B.S. in mathematics from the California Institute of Technology.
Her current research focuses on human-computer interaction (HCI) and computer-supported cooperative work (CSCW) in scientific collaborations, distributed creativity, information visualization, and the visual understanding of very large data sets. She is interested in how social media and new methods of computer-mediated communication are changing scientific practice. She has developed novel visual interfaces for collaborative exploration of very large scientific data sets, and has authored or co-authored many papers in the areas of computer-supported cooperative work, human-computer interaction, visualization, visual analytics, image processing, machine learning, cyberinfrastructure, and astrophysics.
In 2008, she received the Presidential Early Career Award for Scientists and Engineers (PECASE) for her work in collaborative data-intensive science. Her research has been recognized with four Best Paper awards since 2004, and she was named one of the Top 25 Women of 2009 by Hispanic Business Magazine. She was the architect of the Sunfall data visualization and workflow management system for the Nearby Supernova Factory, which helped advance the study of supernovae in order to reduce the statistical uncertainties on key cosmological parameters that categorize dark energy, one of the grand challenges in physics today.
Cecilia Aragon is also one of the most skilled aerobatic pilots flying today. A two-time member of the U.S. Aerobatic Team, she was a medalist at the 1993 U.S. National Championships and the 1994 World Aerobatic Championships, and was the California State Aerobatic Champion.
8.9.7.3. Steganography Lab
If you enjoyed this lab and have time, continue on with the Steganography Lab that explores hiding messages in images.