
Activecode
The activecode directive embeds executable, editable code in your pages.
Your students can experiment with your examples by changing them and running them over and over again.
Synopsis
The general format of the activecode directive is:
.. activecode:: unique_id
   :options:

   + --- Content area ---+
   | question text or additional instructions
   | ~~~~
   | one or more lines of code in a supported language
   | ====
   | hidden code to be executed
   + --------------------+
Depending on the code within the content area, either a pre-formatted text area, or an HTML graphics canvas will be created to contain the program output.
Required Arguments
A unique identifier after a space and the :: in the activecode directive.
Valid identifiers must not contain spaces.
You should also avoid the characters `` ` , ``,, :, and *.
The unique identifier will be the div id that contains this specific code block.
The unique identifier allows you to tie activecode blocks to a grading interface,
or any other groupings for assessment within the Runestone interface.
For this reason, we recommend that you follow some type of naming convention
for unique identifiers in directives.
Optional Arguments
- content area
String. The content area is a language dependent formatted string.Content may be null and can be logically divided into 3 distinct regions, all of which are optional.
The region above the
~~~~delimiter defines a block of text that is not treated as source code. It can contain any text as well as inline or paragraph level markup. This block can be as large as you like and will be displayed at the top of the rendered output, before the Run button.The region below the
====delimiter defines a block of text that is treated as source code, but not displayed in the code editor.All other content is treated as source code and displayed in the code editor.
.. activecode:: ac_ex_content
   :language: python

   Fix the following code so that it **always** correctly adds ``two`` numbers.

   * Your solution must use the parameters a and b
   ~~~~
   def add(a,b):
       return 4

   ====
   # TODO: add unit tests
- autograde
Boolean. Declare anactivecodeblock that will run unittest. Python only.- autorun
Boolean. Declare anactivecodeblock that will begin running as soon as the web page is fully loaded.- available_files
CSV. A comma separated list of simulated input files for use.Each entry must be the unique_id of a Datafile directive.
- caption
String. Define a caption for the bottom of the directive frame.- chatcodes
Boolean. Enable users to talk about this code snippet with others- compileargs
Array. A list of compiler flags, passed to the external server with your code. One string per array element.This option is only used if the language uses a compiler: C and C++. For example:
:language: cpp
:compileargs: ['-Wall', '-Wextra', '-pedantic', '-std=c++11']
- datafile
CSV. A comma separated list of simulated input files for use.Each entry must be the unique_id of a Datafile directive.
- enabledownload
Boolean. Allow textfield contents to be downloaded to local file- hidecode
Boolean. Make theactivecodeeditor initially hidden, and add a button to automatically show the editor.When code is hidden, the ‘Run’ button is also disabled.
To run the code, either press ‘Show Code’, then ‘Run’, or use the
autorunoption to run on page load.You might use this if you want to put an
activecodeblock in the page in order to include it in anotheractivecodeblock, but you don’t need or want students to see it right away.- include
CSV. Include anotheractivecodecontent area verbatim. For example:.. activecode:: ac-example3 :include: ac-example1, ac-example2
This option allows you to prepend other code blocks to this
activecodeblock.includeis useful because it allows you to writeactivecodeexamples that build on each other without having to duplicate all the code and force the user to scroll through the code to find the newly introduced content.For example, if you write a function definition in one
activecodeblock, you can include that block in a lateractivecodeblock using the:include:argument, and thus can invoke that function in the currentactivecodeblock without redefining it.This argument requires at least one, and optionally multiple, parameters. The list must contain the unique identifiers of the
activecodeblocks that you want to include, each item separated by a comma. Each item is added made available to theactivecodeblock in the order listed, but the code is not shown in the content area. The code in the content area is processed last byactivecode.- interpreterargs
Array. A list of interpreter flags, passed to the external server with your code. One string per array element.This option is only used if the language uses a interpreter: Python2 or 3, Java, and octave. For example:
:language: java
:interpreterargs: ['-Xrs', '-Xss8m', '-Xmx200m']
- language
String. Set the language of the content area. The default language is python.- linkargs
Array. A list of linker flags, passed to the external server with your code. One string per array element.This option is only used if the language uses a linker: C and C++. For example:
:language: cpp
:linkargs: ['-lm', '-Wextra', '-pedantic', '-std=c++11']
- nocodelens
Boolean. Hide the button to step through code in codelens.- sourcefile
String. Replace the default temporary source file name with the specified value.Current defaults are
test., followed by a language appropriate extension. For java, the file name matches the class name.- stdin
String. Define a virtual ‘standard input’ for an active code block.If present,
:stdin:creates a text area and allows a string to be passed to the program for processing. An optional value after the argument defines the default value.- timelimit
Integer. Maximum time allowed, in milliseconds, for a program to compile and run. Default is 25 seconds.- tour_{1,2,3,4,5}
Formatted String. Used for audio tours of the code.You can have up to five different audio tours of the same code. The format of a tour directive is
tour name; line #: audio_file_namewhereaudio_file_nameis the path to the audio file.:tour_1: "Overall Tour"; 1-4: Tour01_Line01; 3: Tour01_Line03; :tour_2: "Line by Line Tour"; 1: Tour02_Line01; 2: Tour02_Line02; 3: Tour02_Line03; 4: Tour02_Line04;
See this tool for easy creation of
activecodeblocks with audio tours.
Languages supported
Supported languages are:
python, python3, java, c, cpp, ruby, javascript, and html.
The default language is Python2 (python).
Languages other than python, JavaScript, and html
require an external server to compile code on behalf of activecode.
Sphinx configuration options
The following options.build.template_args values can be set in a book pavement.py file.
- default_ac_lang
The default language for
activecodedirectives.- jobe_server
The URL to the Jobe server.
See https://github.com/trampgeek/jobe for details on setting up your own.
If hosting a book from Github pages, you may need to redirect requests to the default jobe host through a proxy: Jobe accepts http requests only and Github pages allows outbound POST content via https only.
- proxy_uri_runs
Direct the Jobe server to use the specified directory to hold temporary runtime artifacts.
- proxy_uri_files
Direct the Jobe server to use the specified directory to hold generated files to be returned within the response.
If you need to configure one of these Jobe server parameters, then you need to configure them all for requests sent to jobe to be handled correctly. Generally you can set the last two to:
'proxy_uri_runs': '/jobe/index.php/restapi/runs/',
'proxy_uri_files': '/jobe/index.php/restapi/files/'
Most authors will not need to use anything other than these values.
Sphinx bootstrap
The configuration parameters defined in your book sphinx_bootstrap/layout.html:
eBookConfig.jobehost = '';
eBookConfig.proxyuri_runs = '';
eBookConfig.proxyuri_files = '';
Known limitations and bugs
The ‘Scratch ActiveCode’ link available from the Help Navigation bar drop down is a temporary
activecode directive provided as a convenience.
The scratch ActiveCode only knows how to process code using the default_ac_lang property in pavement.py.
If not specified, then the scratch activecode content is python 2.
The ‘Show CodeLens’ feature is only available when using default python as the language.
External libraries such as turtle are not supported in codelens.
The ‘Show CodeLens’ feature is not currently compatible with the :include: argument.
If stdin is used with python, the default value is not used and
the text area appears in the popup dialog instead of being added to the code block.
input() works, but stdin.readline() does not.
The available_files option is python only.
Examples
The most trivial example: an activecode directive with no content area.
.. activecode:: empty_block
Write your own python program in the space provided.
The next example defines a basic ‘hello world’ program in the default language (python).
This example is so basic, perhaps no codelens is needed.
.. activecode:: function-example1
   :nocodelens:

   def hello(name):
       return "Hello, " + name + "!"

   print (hello("World"))
An output area is created only when needed.
.. activecode:: function-example2
   :language: python

   def example_func(inp):
       return inp + "!!"
:include: parameter
The include parameter allows examples to be built up incrementally. New examples can leverage code from earlier ones. This example calls functions defined in the previous two examples.
.. activecode:: loop_example3
   :language: python
   :caption: Demonstrate activecode include
   :nocodelens:
   :include: function-example1, function-example2

   for i in range(5):
       # function included from example 1
       print(hello(str(i)))

   # function included from example 2
   print (example_func('goodbye'))
Turtle Graphics
The built-in turtle library allows you and students to create simple 2D graphics programs.
.. activecode:: ac_example1
   :caption: A Turtle making a square
   :nocodelens:

   import turtle
   t = turtle.Turtle()

   for i in range(4):
       t.forward(100)
       t.left(90)
This next program shown below is an interesting the turtle and recursion to construct a type of fractal called a Sierpinski Triangle.
Try some other changes and see what happens (maybe change a few of the colors or make the level 2).
If you ever want to go back to the original example, simply reload the page in the browser.
One of the great things about activecode is that you can experiment as much as you want.
This can be very helpful as you are learning to program.
.. activecode:: ac-example-ex4-fractal
    :nocodelens:
    :autorun:
    :hidecode:

    Once you run the program,
    try experimenting with the number of triangle levels.
    You can find this on line 39 (it is currently set to 3).  Try 4!

    Note that this description did not affect line numbering in the source editor.
    ~~~~
    import turtle

    def drawTriangle(points,color,myTurtle):
        myTurtle.fillcolor(color)
        myTurtle.up()
        myTurtle.goto(points[0][0],points[0][1])
        myTurtle.down()
        myTurtle.begin_fill()
        myTurtle.goto(points[1][0],points[1][1])
        myTurtle.goto(points[2][0],points[2][1])
        myTurtle.goto(points[0][0],points[0][1])
        myTurtle.end_fill()

    def getMid(p1,p2):
        return ( (p1[0]+p2[0]) / 2, (p1[1] + p2[1]) / 2)

    def sierpinski(points,degree,myTurtle):
        colormap = ['blue','red','green','white','yellow',
                    'violet','orange']
        drawTriangle(points,colormap[degree],myTurtle)
        if degree > 0:
            sierpinski([points[0],
                            getMid(points[0], points[1]),
                            getMid(points[0], points[2])],
                       degree-1, myTurtle)
            sierpinski([points[1],
                            getMid(points[0], points[1]),
                            getMid(points[1], points[2])],
                       degree-1, myTurtle)
            sierpinski([points[2],
                            getMid(points[2], points[1]),
                            getMid(points[0], points[2])],
                       degree-1, myTurtle)

    def main():
       myTurtle = turtle.Turtle()
       myWin = turtle.Screen()
       myPoints = [[-100,-50],[0,100],[100,-50]]
       sierpinski(myPoints,3,myTurtle)
       myWin.exitonclick()

    main()
Once you run the program, try experimenting with the number of triangle levels. You can find this on line 39 (it is currently set to 3). Try 4!
Note that this description did not affect line numbering in the source editor.
JavaScript
Adding a JavaScript example is just as easy as Python,
all you need to do is add the :language: parameter to the activecode directive.
Codelens is not supported for JavaScript,
so there is no need to add a :nocodelens: parameter.
.. activecode:: ac-example-js
   :language: javascript
   :enabledownload:

   var x = 10;
   var y = 11;
   var z = x + y;
   console.log(z);
   function fact(n) {
      if(n <= 1) return 1;
      else {
          return n * fact(n-1);
      }
   }
   console.log(fact(10));
   writeln('hello world');
Java
Java support is possible through a backend server, not in the browser. No graphics libraries (for example AWT) are available in any Java programs.
Codelens is not supported for Java,
so there is no need to add a :nocodelens: parameter.
.. activecode:: ac-ex-java
   :language: java
   :interpreterargs: ['-Xrs', '-Xss8m', '-Xmx128m']
   :stdin: 100
   :enabledownload:

   import java.util.Scanner;

   public class TempConv {
       public static void main(String[] args) {
            Double fahr;
            Double cel;
            Scanner in;

            in = new Scanner(System.in);
            System.out.println("Enter the temperature in F: ");
            fahr = in.nextDouble();

            cel = (fahr - 32) * 5.0/9.0;
            System.out.println(fahr + " degrees F is: " + cel + " C");
       }

   }
The source code for this file is stored in file
ac_examples/activecode_ex_java_person.txt
.. activecode:: ac_ex_person
   :language: java
   :enabledownload:

   public class Person
   {
      private String name;

      public Person(String initialName)
      {
         name = initialName;
      }

      public String getName()
      {
         return name;
      }

      public boolean setName(String newName)
      {
         if (newName != null)
         {
            name = newName;
            return true;
         }
         return false;
      }

      public static void main(String[] args)
      {
         Person test = new Person("Alice");
         System.out.println(test.getName());
      }

   }
The source for the Person class can be included at the end of the Employee class. The source is hidden from users, but compiled into the final program.
.. activecode:: ac_ex_employee
   :language: java
   :enabledownload:
   :include: ac_ex_person

   public class Employee extends Person
   {

      private static int nextId = 1;
      private int id;

      public Employee(String theName)
      {
         super(theName);
         id = nextId;
         nextId++;
      }

      public int getId()
      {
         return id;
      }

      public static void main(String[] args)
      {
         Employee emp = new Employee("Mark");
         System.out.println(emp.getName());
         System.out.println(emp.getId());
      }
   }
The example source that does not compile ‘standalone’ can still be displayed in a standard code-block.
C and C++
The same rules that apply to Java, apply to C and C++ (no graphics examples, compilation handled by a remote server).
.. activecode:: ac_example-cpp11
   :language: cpp
   :compileargs: ['-Wall', '-Wextra', '-pedantic', '-std=c++11']
   :stdin: Alice
   :enabledownload:

   // A simple test for C++11 compiler
   #include <iostream>
   #include <string>

   int main () {
     int test[] = { 1, 2, 3, 5, 8 };  // can we use an initializer list?
     for (auto i: test) {             // can we use a range-for loop?
       std::cout << "i is " << i << '\n';
     }

     std::string name;
     std::cin >> name;
     std::cout << "Hello, " << name << "!\n";
     return 0;
   }
Accessing the Browser Document
Python and JavaScript programs written in activecode windows can import the document module.
The document module allows access to basic elements of the web page,
including the new text entry box called
text1
like this one.
You can use this similarly to the use of stdin in C++ and Java code blocks.
Try running the program, then change the value in the text entry box and run it again.
.. activecode:: ac-example-dom
   :nocodelens:

   import document

   t = document.getElementById('text1')
   print('value = ', t.value)
.. activecode:: ac-example-domjs
   :language: javascript
   :enabledownload:

   let t = document.getElementById('text1');
   writeln('value = ' + t.value);
Create a simple text field anywhere in a document using the following inline markup:
:textfield:`text1:example input:medium`
or more generally:
:textfield:`element_id:default value:width`
This translates to:
<input type='text' id='myid'
   class="form-control input-small"
   style="display:inline; width:width;" value='myvalue'></input>
where width can be specified in pixels or percentage of page width (standard CSS syntax). Width can also be specified using relative sizes:
Width |
Field width in pixels |
|---|---|
mini |
60 px |
small |
90 px |
medium |
150 px |
large |
210 px |
xlarge |
270 px |
xxlarge |
530 px |
Incorporating Unit Tests
It’s nice to be able to have students solve a particular problem by writing some code,
but even better if you can give them some feedback and provide some tests for them.
Much of the unittest module
from Python is available in the unittest module for activecode.
The full complement of assertXXX functions is available. In an introductory course exposing the inner workings of the unittest class may lead to more confusion that anything. However, you can still get the benefit of the unittest module with activecode by placing it in the hidden code at the end.
.. activecode:: example-unit
   :nocodelens:

   Fix the following code so that it **always**
   correctly adds ``two`` numbers.

   * Your solution must use the parameters a and b
   ~~~~
   def add(a,b):
       return 4

   ====
   from unittest.gui import TestCaseGui

   class myTests(TestCaseGui):

       def testOne(self):
           self.assertEqual(add(2,2),4,"You got lucky")
           self.assertAlmostEqual(add(2.0,3.0), 5.0, 5, "Try adding your parameters")
           self.assertEqual(add(3,-5),-2)

   myTests().main()
Fix the following code so that it always
correctly adds two numbers.
Your solution must use the parameters a and b
Built-in support for unit test libraries is currently limited to python.
It is still possible to use a combination of :include: and hidden code (====)
to achieve similar goals by rolling your own tiny test framework.
HTML Source
Adding a HTML example is similar to programming language code blocks.
Codelens is not supported for HTML,
so there is no need to add a :nocodelens: parameter.
.. activecode:: ac-example-html
   :language: html
   :enabledownload:

   <html>
     <body>
       <style>
         h2 { font-size: 48px;
            color: red;
         }
       </style>
       <h2>Hello World</h2>
       <ul>
         <li>one</li>
         <li>two</li>
       </ul>
     </body>
   </html>
.. activecode:: ac-example-html-frag
   :language: html

   <div style="background-color:lightblue">
      <h3>Active code HTML fragment</h3>
      <p>
        HTML examples do not need to be complete documents.
      </p>
   </div>
Of course, having explored both Javascript and HTML,
we may want an example that uses them both.
The activecode directive provides good support for embedding javascript code
directly in example HTML:
This example is adapted from Fundamentals of Web Programming
.. activecode:: ac-example-html-js
   :language: html
   :enabledownload:

   <html>
     <body>
       <h2>Guessing game</h2>
       <p>
         Try guessing a number I've picked between 0 and 99.
       </p>
       <label for="red">Guess:</label>
       <input id="guess" type="text" />
       <button onclick="check()">Check</button>
       <status> </status>

       <script type="text/javascript">
         let status = document.querySelector('status');
         let goal = Math.floor(Math.random()*100);
         let count = 0;

         check = function() {
           count++;
           guess = document.querySelector("#guess").value;
           if (guess == goal) {
             status.innerHTML =
               "<p>Correct! You took " + count + " tries.</p>";
           } else if (guess < goal) {
               status.innerHTML =
                 "<p>Guess # " + count + ". Try higher.</p>";
           } else {
               status.innerHTML =
                 "<p>Guess # " + count + ". Try lower.</p>";
           }
         }
       </script>
     </body>
   </html>
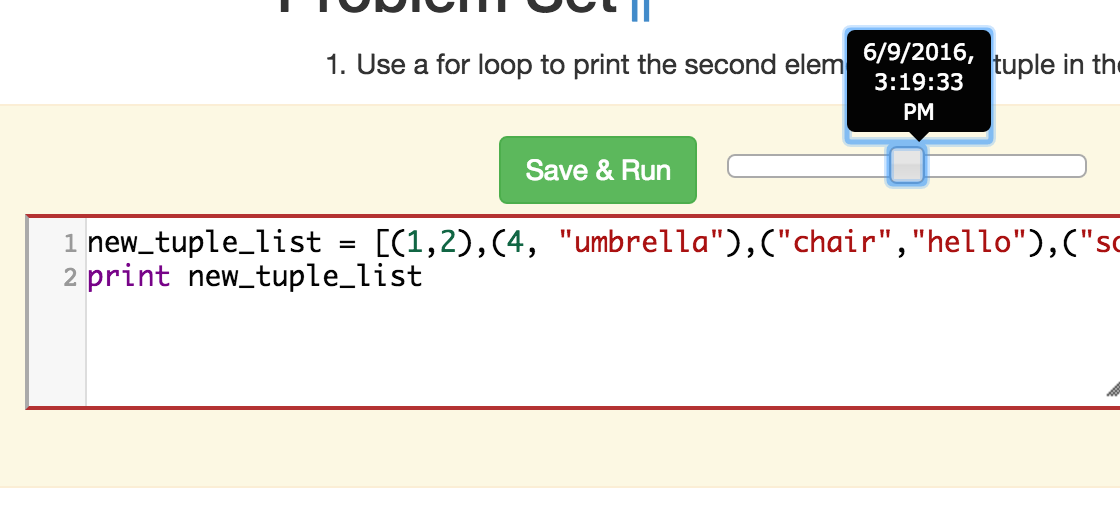
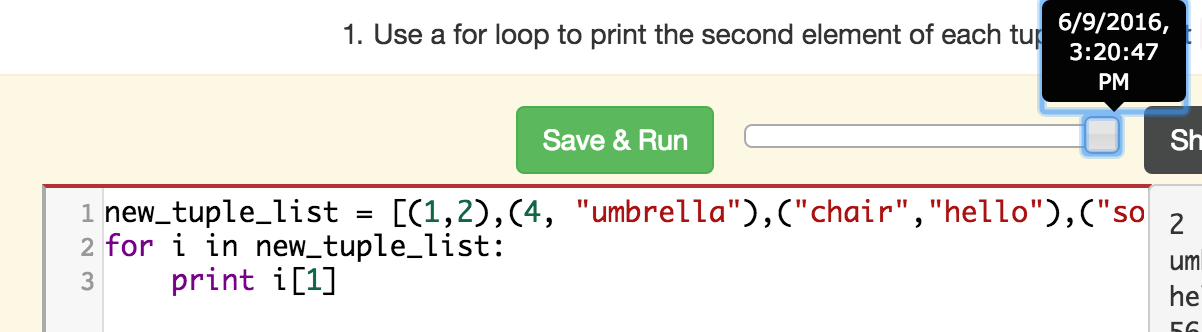
Logs and Grading
In an activecode window,
if logged in to a Runestone project with an account,
each time Run is pressed after an edit,
a new version is saved.
Each logged in user can view their own history, version by version, of the code they’ve edited in the window.
Logged in to a book, the load history appears like so:
Activecode windows can be graded in the Runestone interface and can be tied to assignments containing multiple problems. You can also include hidden code and data files in these windows, for instance, so students can invoke functions without seeing the function definitions.
See the User Guide for Instructors for an explanation of how to associate activecode blocks
with graded assignments.