
10.9. Event-Based Programming Made Elegant
There is a way to do event-based programming that doesn’t involve having lots of global variables to keep track of the state of the program. The solution is to use objects. In this section you’ll get a simple introduction to object-oriented programming, and then you can see how the event-based program from the last section can be rewritten in a way that is more elegant, uses no global variables, and is much more easy to extend with new features.
Caution
This section is long and involved. If you have gotten to this point in the chapter and your brain is exhausted, you can skip this section and go to the next one. You can always come back and read this later. The content here is not going to be tested. But, if you are interested in what comes later in computer programming, or how to make a more elegant version of the event-based example in the last section, read on!
10.9.1. A Simple Class Example
Object-oriented code is often referred to as ‘OO-code’ for short. In OO programming, you create objects to represent things in your program. Instead of having a variable for student number, a variable for student name, and a variable for student grade, you can have a single student object that stores all of that related information together.
Objects are things that have properties and methods. As an example, a dog has properties that describe the dog (fur color, breed, name, barking sound, name of human owner, age, etc.) and methods that define what it can do (bark, eat, sleep, fetch, etc.). Quite often, calling a method leads to the properties being updated. In object-oriented programming, we create classes, which you can think of as blueprints, and from any class you can create objects of that class. So, we could create a general class that can be used to make dog objects:
 1 class Dog:
 2     name = ""
 3     breed = ""
 4     fur_color = ""
 5     owner_name = ""
 6     bark_sound = ""
 7     num_balls_fetched = 0
 8     num_barks = 0
 9
10     def __init__(self, breed, name, owner, fur_color, bark_sound):
11         self.breed = breed
12         self.name = name
13         self.owner_name = owner
14         self.bark_sound = bark_sound
15
16     def fetch(self):
17         print(self.name + " fetched a ball!")
18         self.num_balls_fetched += 1
19
20     def bark(self):
21         print(self.bark_sound)
22         self.num_barks += 1
And then, we can ask the class to give us a dog, specifying properties of the dog we want:
bingo = Dog("beagle", "Bingo", "Angie", "brown and white", "Hawoooooooooooo")
The above line of code says create a Dog object, with the following information. It calls a special method inside the Dog class called a constructor. In Python a constructor is the method that has the special name __init__. The constructor constructs a new Dog object with the given information and returns a reference to the dog. In the line above the new Dog object is referenced by the bingo variable. Visually, this looks like this:
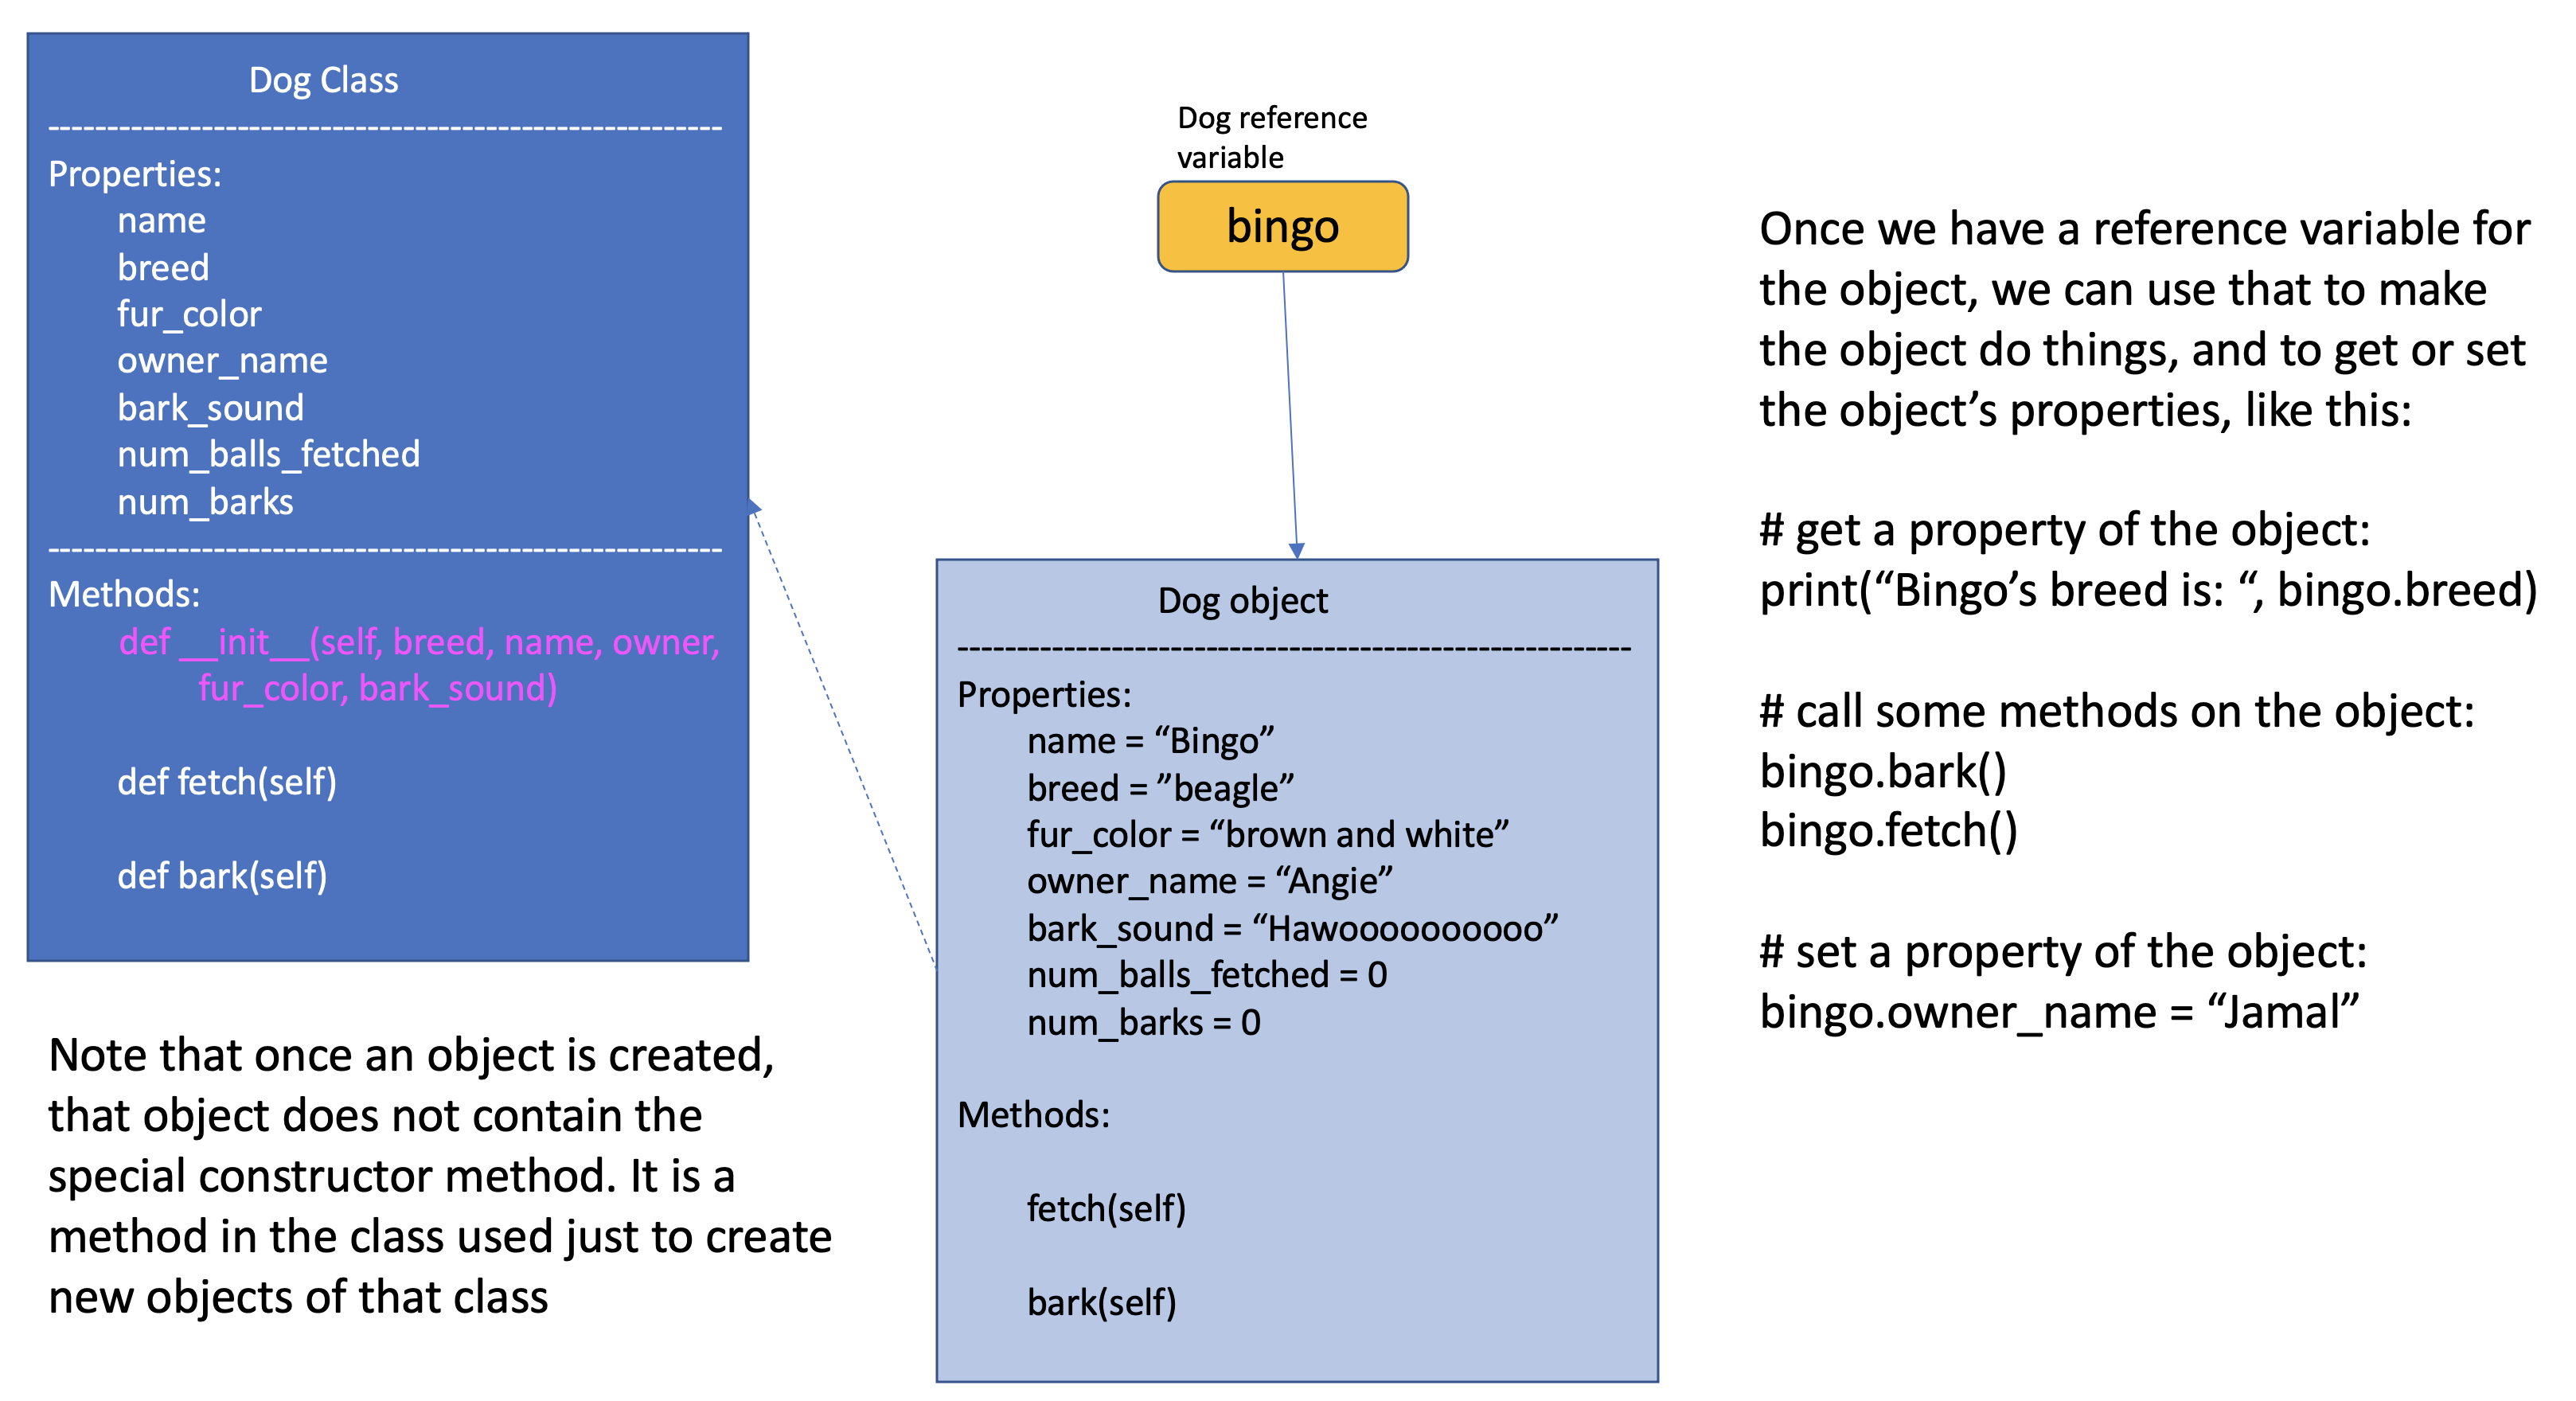
Once we have a variable that refers to a Dog object, we can call that object’s methods and read from or write to its properties:
bingo.fetch()
bingo.bark()
bingo.fetch()
print(bingo.num_barks)
print(bingo.num_balls_fetched)

CONSOLE OUTPUT:

> Bingo fetched a ball!
> Hawoooooooooooo
> Bingo fetched a ball!
> 1
> 2
Now, you may be looking at this and thinking “Why do we need a class? We could just set up a few variables to store information about Bingo the dog and it would be a lot simpler!”
But, what if you want to represent many different dogs in your program? Imagine you are programming a simulation to understand dog over-crowding in animal shelters. Let’s look at how we can work with multiple dogs using the class above.
 1import random
 2
 3bingo = Dog("beagle", "Bingo", "Angie", "brown and white", "Hawoooooooooooo")
 4maxine = Dog("golden retriever", "Maxine", "Tom", "gold", "Woooofff")
 5fido = Dog("german shepherd", "Fido", "Ellen", "brown and black", "Arrroooof")
 6sparky = Dog("yorkshire terrier", "Sparky", "Davina", "blond", "Yip")
 7queenie = Dog("mixed breed", "Queenie", "Ellen", "black and grey", "Arf")
 8
 9# put dogs into a list
10dogs = [bingo, maxine, fido, sparky, queenie]
11
12# simulate a bunch of dogs playing
13for _ in range(20):
14    # make a random dog bark
15    bark_index = random.randrange(len(dogs))
16    dogs[bark_index].bark()
17    # make a random dog fetch
18    fetch_index = random.randrange(len(dogs))
19    dogs[fetch_index].fetch()
20
21# print out what each dog did
22for dog in dogs:
23    print(dog.name + " barked " + str(dog.num_barks) + " times and fetched "
24          + str(dog.num_balls_fetched) + " balls")
Now, using the Dog class, we have created five different dogs, with a bunch of different information about each, and we haven’t had to create 25+ separate variables in our code to represent all of these dogs’ features. Then, we add our dog objects to a list. Then we can start to simulate dog play by picking random dogs from the list and calling the bark() or fetch() methods for those dogs. On lines 22-24, we then iterate across the list of dogs and report how many times each dog barked and how many balls each dog fetched. If you look at the Dog class, you’ll see that we have two property variables to keep track of the number of barks and the number of balls fetched. Every time we call the bark() method on a particular dog, that method increments that variable. What’s critical to understand here is that each dog has their own variable to keep track of the number of barks. You can see that in the sample console output below. You see the print statement “Sparky fetched a ball!” five times. And then if you look at the print statements at the bottom, it says Sparky barked once and fetched 5 balls. This is the power of object oriented programming: grouping things together into classes, creating objects from those classes, and calling methods on those objects.
CONSOLE OUTPUT:
> Arf
> Sparky fetched a ball!
> Hawoooooooooooo
> Bingo fetched a ball!
> Hawoooooooooooo
> Queenie fetched a ball!
> Hawoooooooooooo
> Fido fetched a ball!
> Hawoooooooooooo
> Queenie fetched a ball!
> Arf
> Sparky fetched a ball!
> Woooofff
> Fido fetched a ball!
> Arrroooof
> Sparky fetched a ball!
> Arrroooof
> Queenie fetched a ball!
> Woooofff
> Queenie fetched a ball!
> Woooofff
> Queenie fetched a ball!
> Arf
> Sparky fetched a ball!
> Arrroooof
> Sparky fetched a ball!
> Arf
> Fido fetched a ball!
> Hawoooooooooooo
> Queenie fetched a ball!
> Woooofff
> Fido fetched a ball!
> Woooofff
> Fido fetched a ball!
> Woooofff
> Maxine fetched a ball!
> Woooofff
> Fido fetched a ball!
> Yip
> Queenie fetched a ball!
> Bingo barked 5 times and fetched 1 balls
> Maxine barked 7 times and fetched 1 balls
> Fido barked 3 times and fetched 6 balls
> Sparky barked 1 times and fetched 5 balls
> Queenie barked 4 times and fetched 7 balls
10.9.2. The Event-Based GUI Example - OO Style
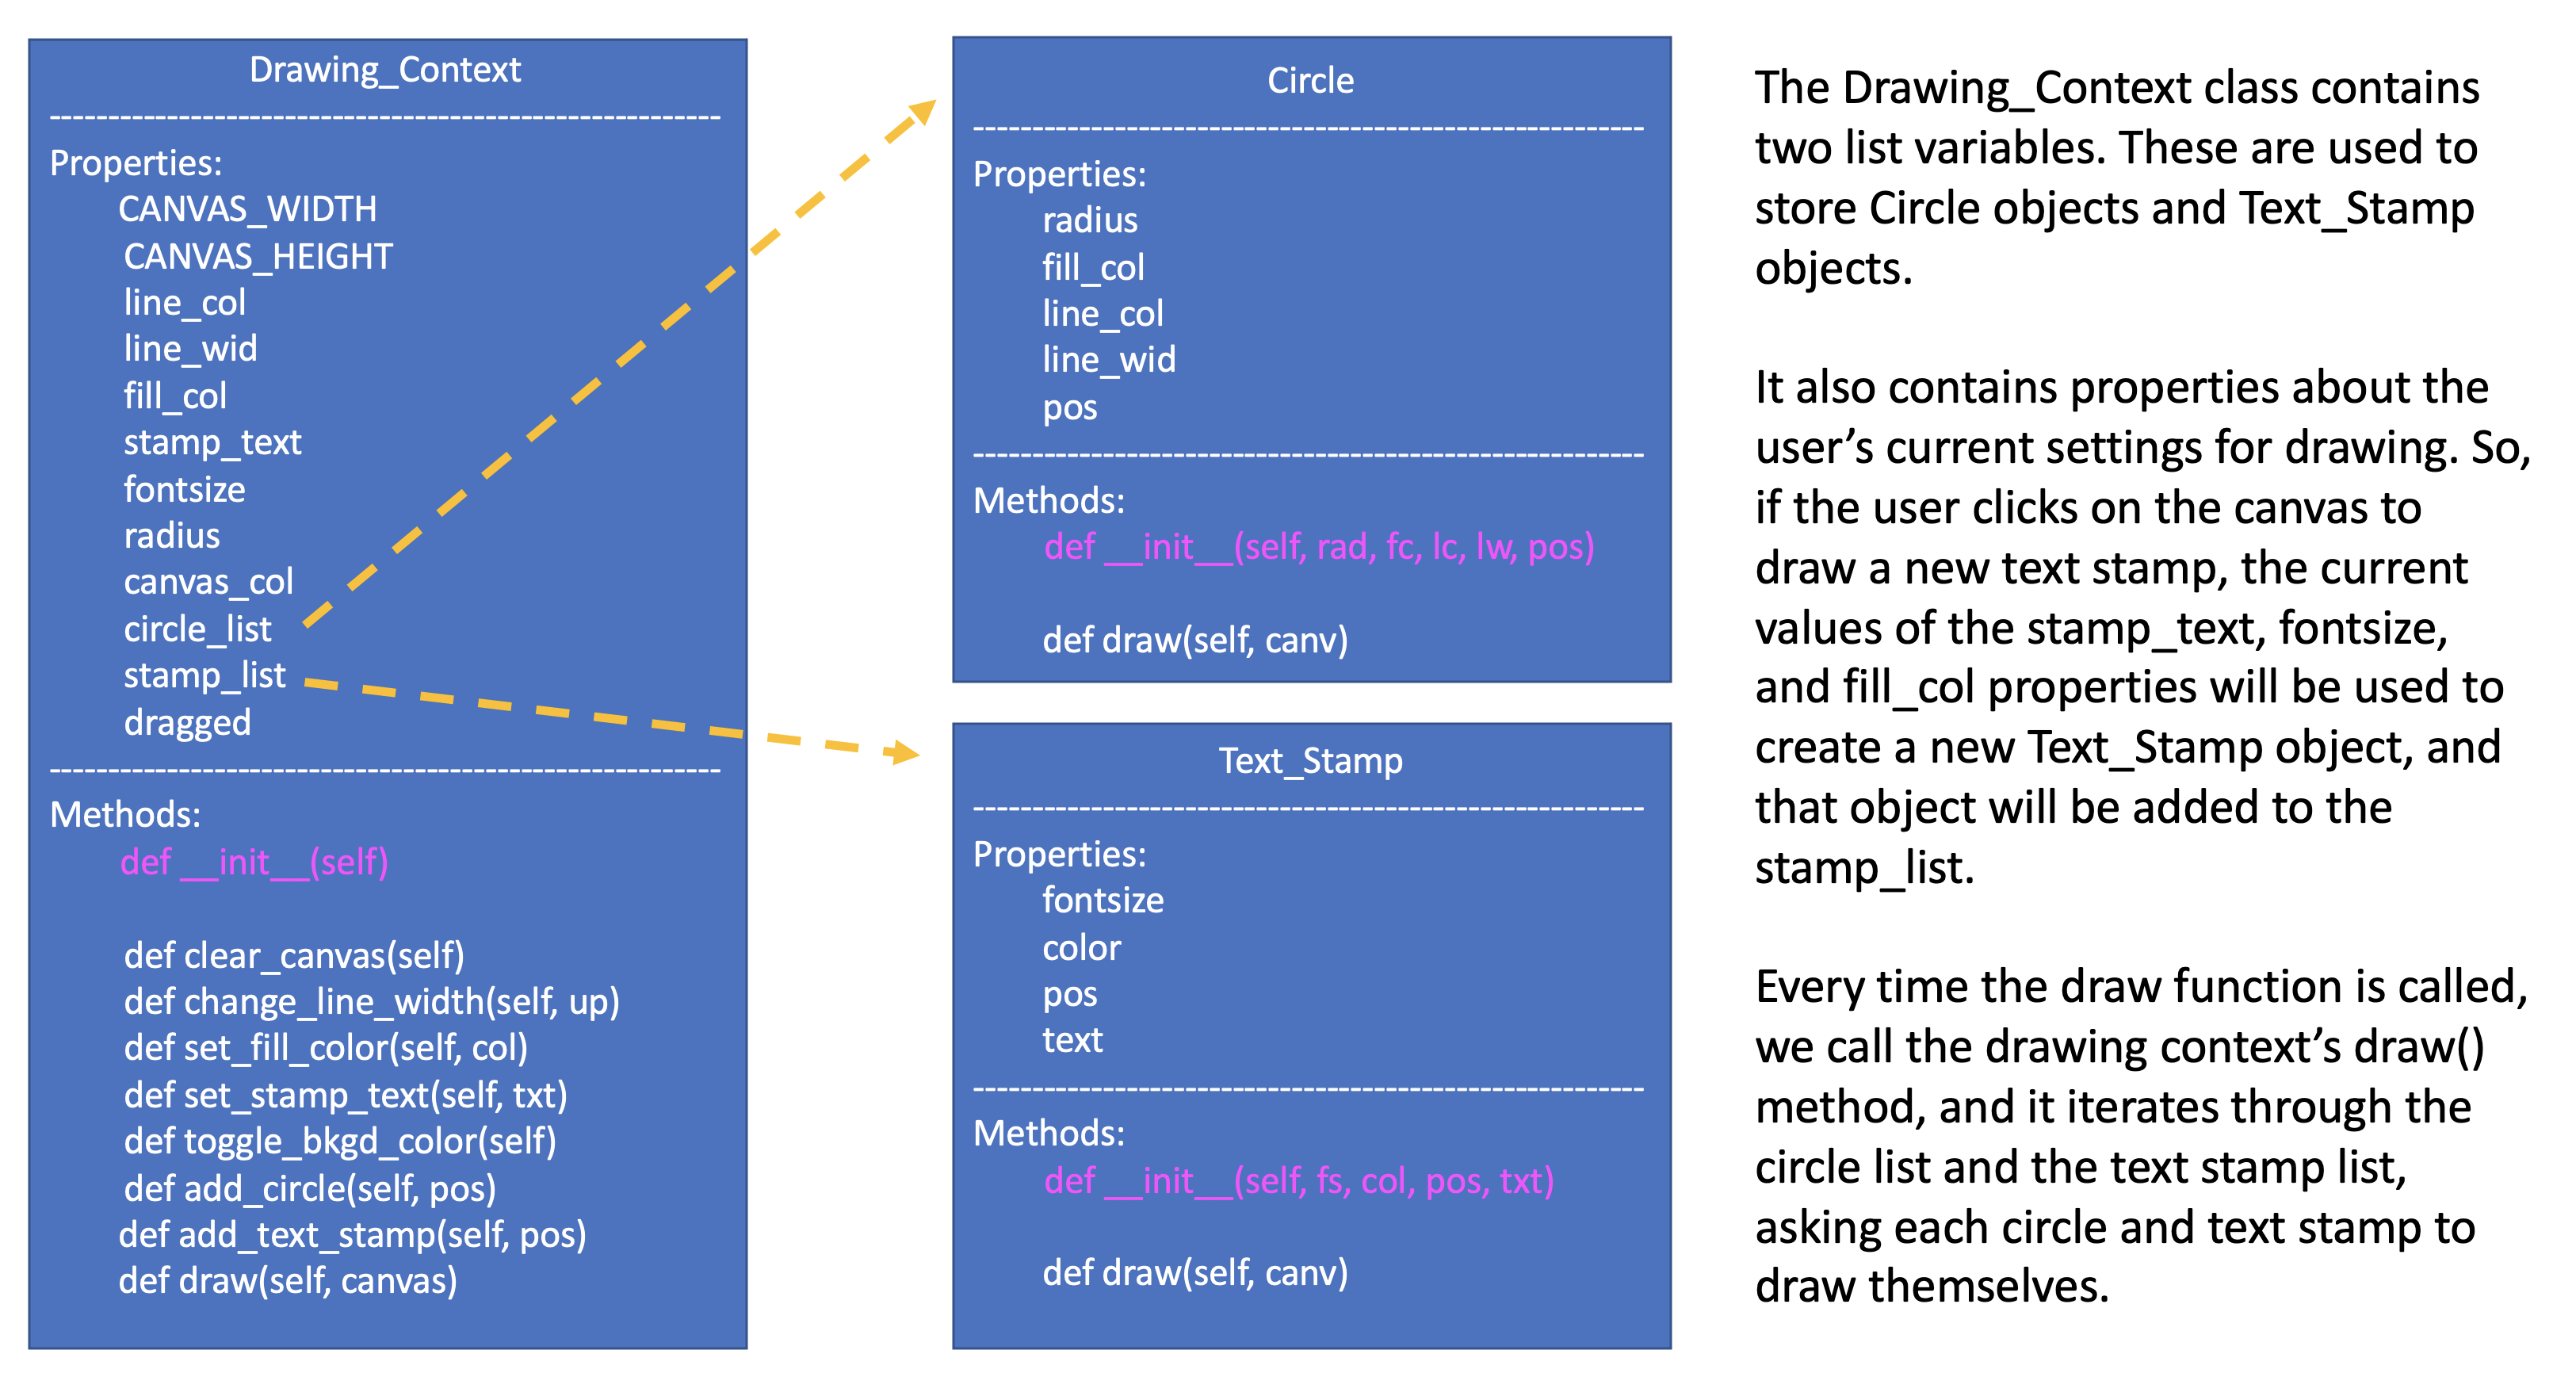
Now, you may be wondering, “Okay, but what does this have to do with event-based programming?”. In event-based programming, we can create a class that stores important information about the state of our program, and use methods to have things happen in the program in response to user interface events. In the example from the previous section, we created a program that allowed the user to draw with colored circles and stamp text. So, for that program, we can create a class to represent the circles, another class to represent text stamps, and a class to represent the overall drawing context.
Below is the object-oriented version of the SimpleGUI example. Note that there are no global variables at the top. Other than variables for the window frame and buttons at the bottom of the code, the only other global variable in this code is dc, which is the reference variable to the drawing context object created on line 222. Look carefully at the object classes defined on lines 95-215. In object-oriented programming, the bulk of the code is in the definition of the objects: defining the properties and the methods that can be called on the objects.
  1 # """""""""""""""""""""""""""""""""""""""""""""""""""""""""""""""""
  2 # Dr. Celine's COMP 1000 Event-based Programming Example OO Version
  3 # """""""""""""""""""""""""""""""""""""""""""""""""""""""""""""""""
  4
  5 import simplegui
  6
  7 ################################################################
  8 # GUI Control Handlers
  9 ################################################################
 10
 11 def draw(canvas):
 12     """
 13     Draw handler, called automatically, many times/sec, by SimpleGUI module
 14     DO NOT call this function from other parts of the code.
 15     In this version, we just call the drawing context and ask it to draw itself
 16     """
 17     dc.draw(canvas)
 18
 19 def clear_handler():
 20     """
 21     Gets called when clear button is clicked
 22     Clears all lists to remove content from canvas
 23     """
 24     dc.clear_canvas()
 25
 26 def bkg_handler():
 27     """
 28     Background toggle button - toggles between white and grey
 29     """
 30     dc.toggle_bkgd_color()
 31
 32 def lw_up_handler():
 33     """
 34     Linewidth + handler
 35     """
 36     dc.change_line_width(True)
 37
 38 def lw_dn_handler():
 39     """
 40     Linewidth - handler
 41     """
 42     dc.change_line_width(False)
 43
 44 def stamp_txt_handler(txt):
 45     """
 46     Stamp text input box handler
 47     When user types in text and then hits the enter key, this is called
 48     """
 49     dc.set_stamp_text(txt)
 50
 51 ###########################################################
 52 # Input Device Event Handlers
 53 ###########################################################
 54
 55 def drag(pos):
 56     """
 57     Mouse drag handler. Takes one parameter:
 58         a tuple of the current position of the mouse
 59     Called continuously while user is dragging - add a new circle
 60     """
 61     dc.add_circle(pos)
 62
 63
 64 def click(pos):
 65     """
 66     Mouse click handler, Takes one parameter:
 67         a tuple of the position of the mouse at moment of click
 68     """
 69     dc.add_text_stamp(pos)
 70
 71
 72 def key_handler(key):
 73     """
 74     Handles key presses, updates global variable fill_col
 75     """
 76     if chr(key) == 'R':
 77         dc.set_fill_color("Red")
 78     elif chr(key) == 'G':
 79         dc.set_fill_color("Green")
 80     elif chr(key) == 'B':
 81         dc.set_fill_color("Blue")
 82     elif chr(key) == 'C':
 83         dc.clear_canvas()
 84     elif key == 38:
 85         dc.change_line_width(True)
 86     elif key == 40:
 87         dc.change_line_width(False)
 88     else:
 89         #do nothing
 90         print("Unknown key event. Try pressing r, g, or b")
 91         print("key is:", key)
 92         return
 93
 94
 95 ######################################################
 96 # OBJECT CLASSES
 97 ######################################################
 98 class Circle:
 99     """
100     Stores information about a circle, and has a draw method
101     to draw the circle on the canvas
102     """
103
104     def __init__(self, rad, fc, lc, lw, pos):
105         self.radius = rad
106         self.fill_col = fc
107         self.line_col = lc
108         self.line_wid = lw
109         self.pos = pos
110
111     def draw(self, canv):
112         canv.draw_circle(self.pos, self.radius, self.line_wid, self.line_col, self.fill_col)
113
114 class Text_Stamp:
115     """
116     Stores information about a text stamp, and has a draw method
117     to draw the stamp on the canvas
118     """
119
120     def __init__(self, fs, col, pos, txt):
121         self.fontsize = fs
122         self.color = col
123         self.pos = pos
124         self.text = txt
125
126     def draw(self, canv):
127         canv.draw_text(self.text, self.pos, self.fontsize, self.color)
128
129 class Drawing_Context:
130     """
131     Stores all the information about the current drawing state
132     Including what has already been drawn (list of circles & list of text stamps)
133     Has a draw method to draw everything on the canvas
134     """
135     CANVAS_WIDTH = 400
136     CANVAS_HEIGHT = 400
137     line_col = "Black"
138     line_wid = 3
139     fill_col = "Red"
140     stamp_text = "Hello!"
141     fontsize = 12
142     radius = 10
143     canvas_col = "Grey"
144
145     # list vars to store circles/stamps that have been drawn
146     circle_list = []
147     stamp_list = []
148
149     # boolean variables to differentiate mouse click/drag
150     dragged = False
151
152     def clear_canvas(self):
153         """
154         Clears all lists to remove content from canvas
155         """
156         self.circle_list.clear()
157         self.stamp_list.clear()
158
159     def change_line_width(self, up):
160         """
161         Increases line width by 1 if true is passed,
162         otherwise, decreases line width
163         """
164         if (up): # increase
165             if self.line_wid < 5:
166                 self.line_wid += 1
167         else: # decrease
168             if self.line_wid > 1:
169                 self.line_wid -= 1
170         lw_label.set_text("Line width: " + str(self.line_wid))
171
172     def set_fill_color(self, col):
173         """ Sets fill color for subsequent drawing """
174         self.fill_col = col
175         fc_label.set_text("Fill color: " + str(self.fill_col))
176
177     def set_stamp_text(self, txt):
178         """ sets stamp text for subsequenet drawing"""
179         self.stamp_text = txt
180         text_stamp_label.set_text("Text stamp: " + self.stamp_text)
181         inp.set_text("") # resets input field to blank
182
183     def toggle_bkgd_color(self):
184         """ toggles canvas background between grey & white """
185         if (self.canvas_col == "Grey"):
186             self.canvas_col = "White"
187             bkg_button.set_text("Grey Background")
188         else:
189             self.canvas_col = "Grey"
190             bkg_button.set_text("White Background")
191         frame.set_canvas_background(self.canvas_col)
192
193     def add_circle(self, pos):
194         """ creates a new circle object and adds it to list """
195         circle = Circle(self.radius, self.fill_col, self.line_col, self.line_wid, pos)
196         self.circle_list.append(circle)
197         self.dragged = True # differentiate end of drag from click
198
199     def add_text_stamp(self, pos):
200         """ creates a new text stamp object and adds it to list """
201         if self.dragged:
202             # this was just the end of drag, don't make stamp
203             self.dragged = False
204         else:
205             stamp = Text_Stamp(self.fontsize, self.fill_col, pos, self.stamp_text)
206             self.stamp_list.append(stamp)
207
208     def draw(self, canvas):
209         """ draw everything - iterate through circle & stamp lists """
210         for circ in self.circle_list:
211             circ.draw(canvas)
212
213         for stamp in self.stamp_list:
214             stamp.draw(canvas)
215
216
217 #######################################################
218 # Set up window, GUI controls & register event handlers
219 #######################################################
220
221 # Create a drawing context
222 dc = Drawing_Context()
223
224 # Frame
225 frame = simplegui.create_frame("COMP 1000 Demo", dc.CANVAS_WIDTH, dc.CANVAS_HEIGHT)
226 frame.set_canvas_background(dc.canvas_col)
227
228 # Create & Register Buttons & Labels
229 # labels + bkgd button assigned to variables so they can be updated
230 frame.add_button('Clear', clear_handler)
231 bkg_button = frame.add_button('White Background', bkg_handler)
232 fc_label = frame.add_label("Fill color: " + dc.fill_col)
233 lw_label = frame.add_label("Line width: " + str(dc.line_wid))
234 frame.add_button('+', lw_up_handler)
235 frame.add_button('-', lw_dn_handler)
236 text_stamp_label = frame.add_label("Text stamp: " + dc.stamp_text)
237 inp = frame.add_input('New text stamp:', stamp_txt_handler, 50)
238
239 # Register Keyboard and Mouse Event Handlers
240 frame.set_draw_handler(draw)
241 frame.set_keydown_handler(key_handler)
242 frame.set_mousedrag_handler(drag)
243 frame.set_mouseclick_handler(click)
244
245 # Show the frame and start listening
246 frame.start()
Most of the functions that were in the previous version are now methods of the drawing context object. And most of the variables that were global variabbles before are now properties of the drawing context.
The Circle and Text_Stamp classes collapse the information from the prior version. In the previous version if we had three text stamps, we would have three entries in three separate lists, and if we wanted to be able to store different font sizes for each text stamp, we would have had to add a fourth list. In this version, the information for each text stamp is stored as properties of that Text_Stamp object. You can see that the Text_Stamp class already has fontsize as a property, so in this new version, it would be very easy to change the program so that every text stamp could have a different font size: we would just add + and - buttons (similar to the line width buttons we already have) and added a font_change() method to the Drawing_Context class. Then, when we create a new text stamp, we would use the current font size.
Below is a class diagram that shows the relations between the classes in this version:
If you look closely at the code for this object-oriented version of the circle and stamp drawing program, you will notice that we never have to use the keyword global to specify that we are changing a global variable. We are using dc, which is a global reference variable to the drawing context, but we are never overwriting that variable. Instead, we are calling that variable’s methods and properties to access and make changes to the drawing context. This is a much cleaner and more elegant version, with the same functionality. This version of the program is also easier to extend with new features. If looking at this version of the program seems very confusing to you - don’t stress about it. You have lots of time to learn about object-oriented approaches to programming in future courses.