
1.4. App Inventor Setup
Time Estimate: 15-45 minutes
1.4.1. Introduction and Goals
This course uses MIT's App Inventor, a visual drag and drop programming environment that can be used to quickly build mobile apps. Here's a fun introduction video about App Inventor.
In this lesson, you will try an already-built App Inventor project and make sure that it runs with your mobile device or computers. The setup requires that you already have a gmail account. If you do not, you should go back to the previous lesson before moving on.
1.4.2. Learning Activities
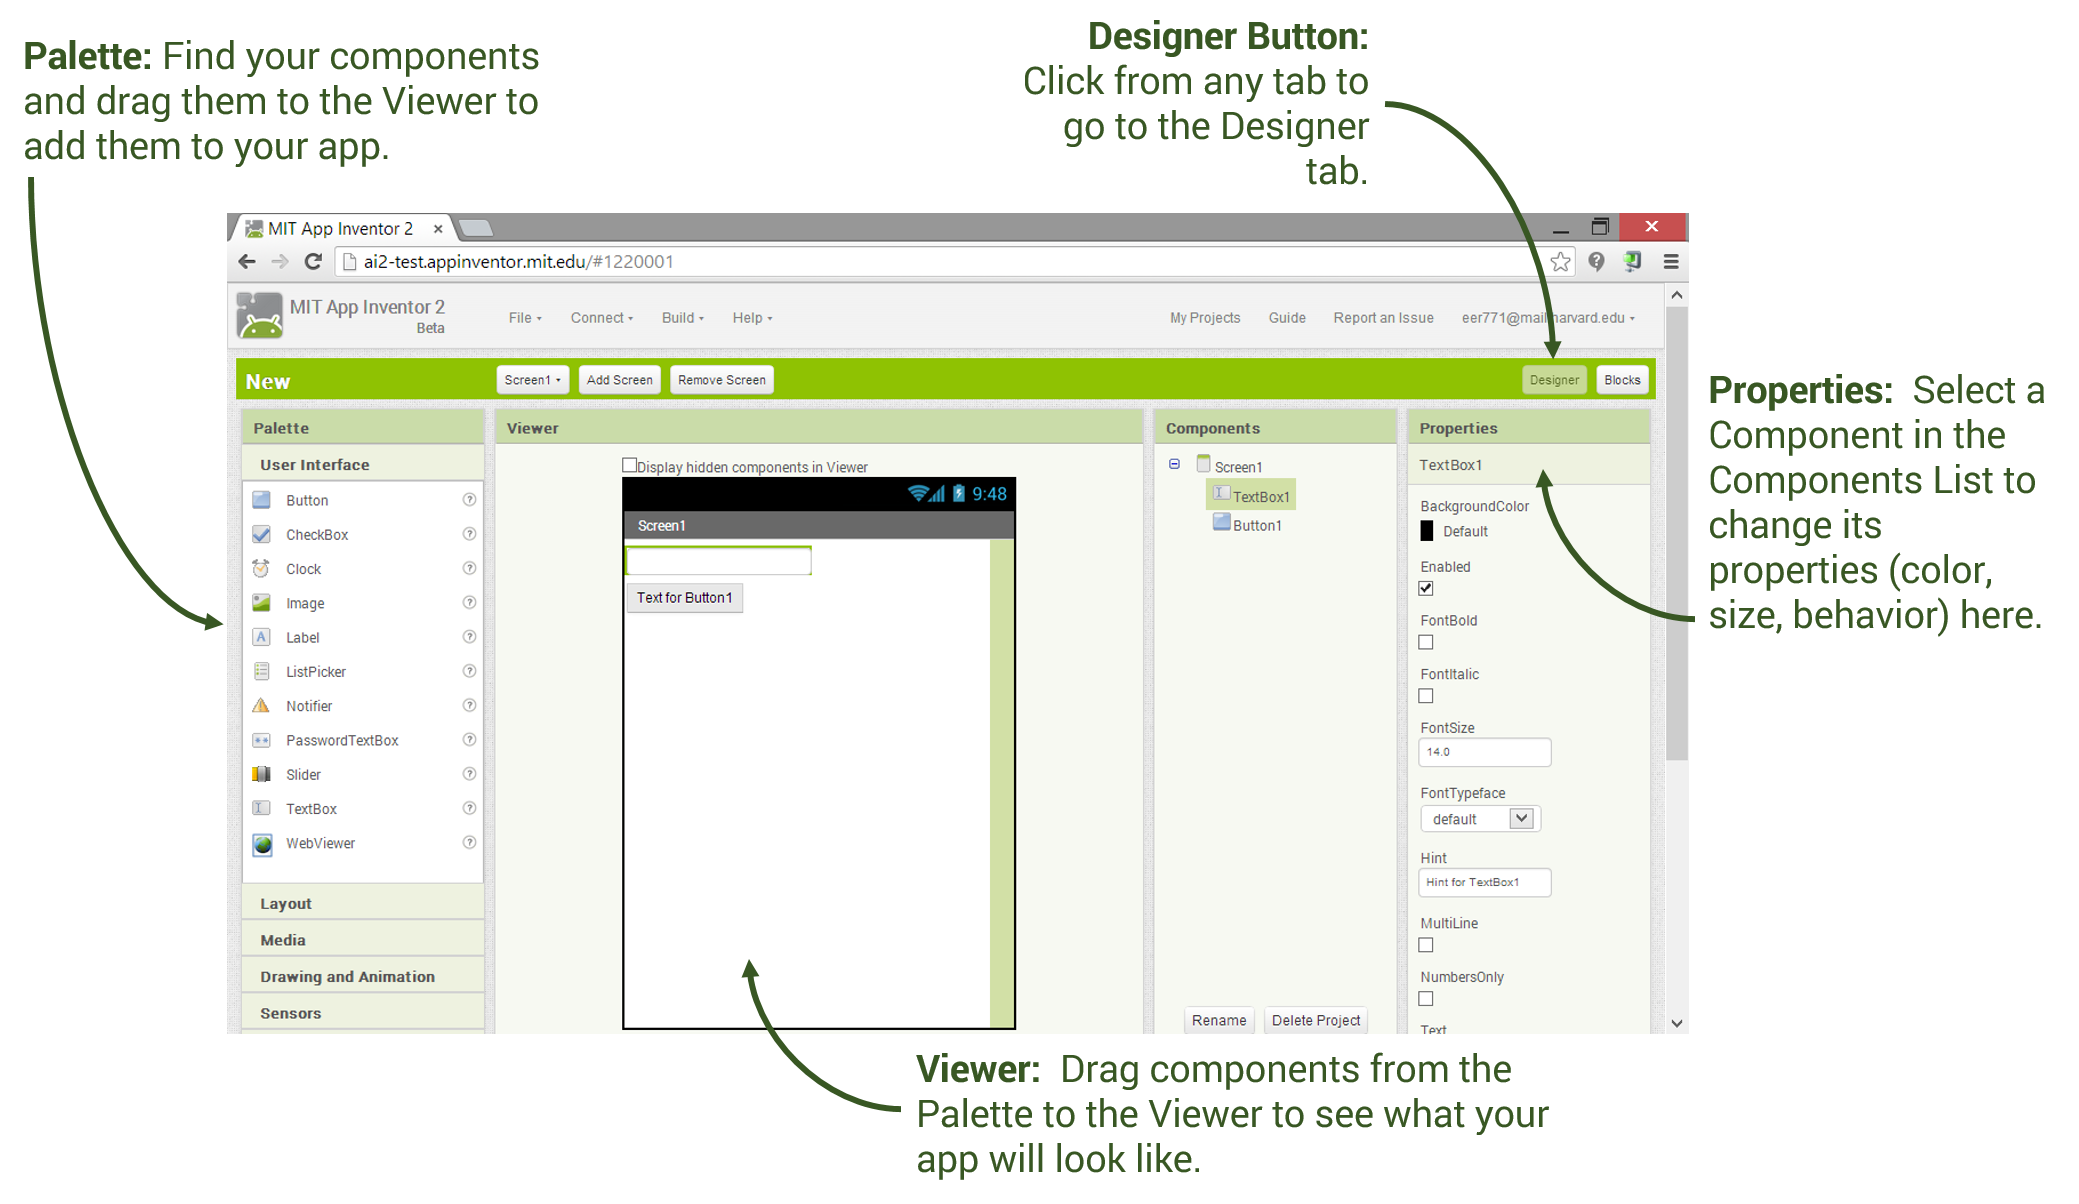
App Inventor is an example of an Integrated Development Environment (IDE), which means that all of the software tools needed to design, develop, and test a mobile app are integrated within the App Inventor platform. IDEs are part of the standard toolkit that programmers use to develop programs.
App Inventor is a cloud application. It runs completely within a browser. Chrome, Firefox and Safari are the recommended browsers. App Inventor is not supported on Internet Explorer! Make sure your computer has the latest version of your preferred browser.
The Setup instructions describe four options for developing apps with App Inventor. The following links will bring you to App Inventor's site for the setup instructions. We recommend that you set yourself up with at least a couple options.
- Wifi: Connecting an Android or iOS (iPhone, iPad, iPod) mobile device (tablet or smart phone) via a Wifi link.
- USB: Connecting a mobile device via a USB cable.
- Android emulator: Using emulator software running on your computer to test your apps.
- Other emulators
This course is best experienced with an Android or iOS mobile device, either a tablet or smartphone. App Inventor now works on iPhones too! Most lessons will work with the emulator too. If you are using a Chromebook, install the MIT AI2 Companion App from the play store and use Connect/Companion from App Inventor to connect to it in a different window by typing in the 6 character code. For best results on the Chromebook companion, change the Screen property Sizing to responsive instead of fixed in App Inventor before connecting.
Follow the directions in the Welcome App below to complete your setup.
Testing Your Setup: Welcome App
Click on the following App Inventor Template Welcome App (we recommend using Chrome browser for this). This will open up in App Inventor. You will need to log in with your Google (or App Inventor) account that you will use for this course. An embedded tutorial on the left of this app will guide you through the setup directions.
When the project opens, you will be viewing the App Inventor Designer. The Designer is where you will design your app's User Interface. The app you are testing has a button with an image (which displays on start up), a couple of labels that display text and a Player component that will play an applause sound.
If English is not your first language, you can switch App Inventor to a different language by clicking on English at the top right of the screen
Now, switch to the Blocks Editor by clicking on Blocks in the top right-hand corner of your window.
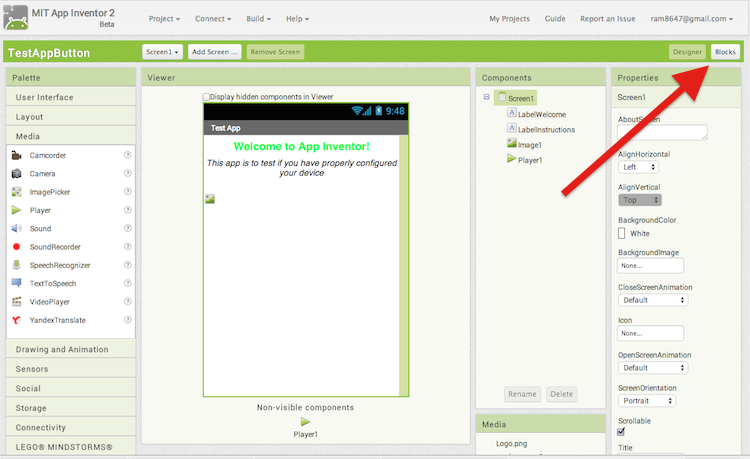
The Blocks Editor is where all the coding happens. There are built-in blocks as well as blocks for any component that you add in the Designer window.
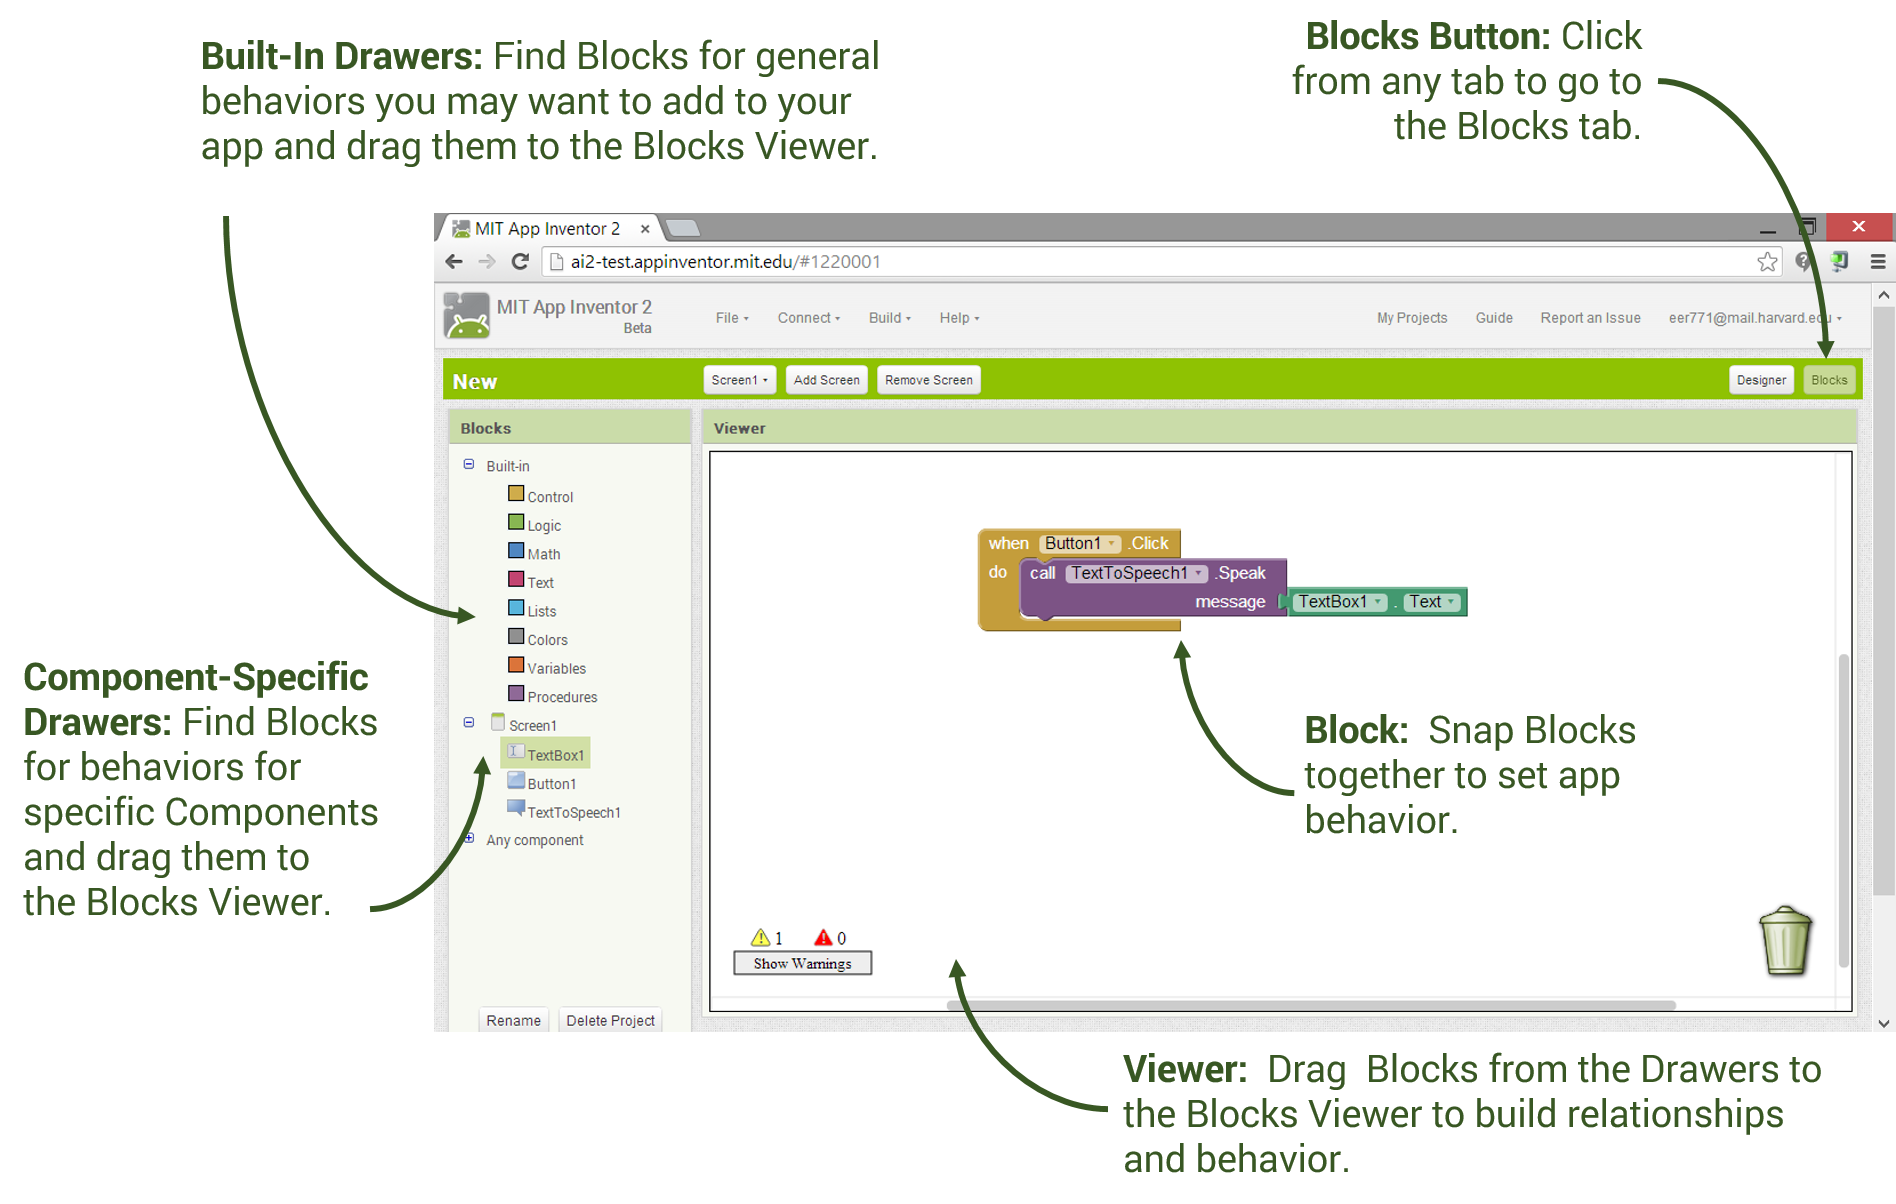
Notice that App Inventor blocks connect together like puzzle pieces. The blocks for this app will cause it to display a congratulatory message on your screen and play an applause sound on start up. When the button with the logo is clicked, the app will change the background color and say hello.
Running the App on your Device via Wifi Companion
In the next unit, you will be programming your own app. For now, we just want to make sure everything is set up properly. Follow these instructions to test your set up.
- Make sure that both your computer and your phone or tablet are connected to the same wifi.
- Install the Android MIT AI2 Companion app or iOS MIT App Inventor Companion from the Play Store.
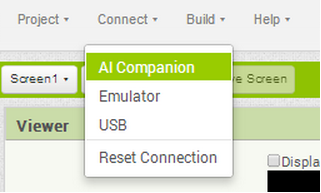
- In App Inventor on your computer, click Connect and then select AI Companion. This will display a 6-letter code both as a barcode and as plain text. (Note: The 6-letter code will be a unique code and different from the one shown below)
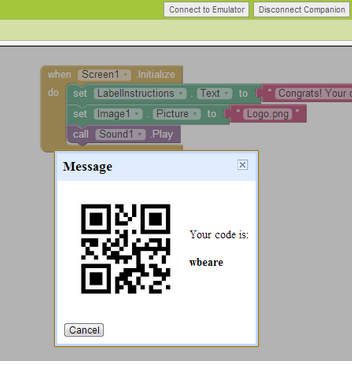
- On the companion app, either type in the 6-letter code and click the “Connect to App Inventor” button or scan the barcode. You should see the app on your device!
Running the App on your Device via USB Connection
For set up instructions to use a USB connection instead of WiFi, please go here and follow steps 1-6.
Running the App on the Emulator
If you are using the Emulator, the steps are as follows:
- Make sure the emulator software is installed on your computer following the instructions here.
- In App Inventor, click Connect and then select Emulator.
- This will automatically connect to the app to the the Emulator. There is no need to scan a barcode or type in a 6-digit code. The connection will happen automatically.
Troubleshooting
If everything is configured properly, you should see the Welcome app on your device or emulator. You should see a message and the Mobile CSP logo. You should also hear a round of applause for your great work! Try clicking on the logo too and changing some things like the notifier message or the background color as described in the embedded tutorial.
If the app is not running correctly, you may need to retrace your setup steps to make sure you performed all of the necessary steps. Make sure your mobile device and your computer are on the same WiFi or other network. If the app seems frozen, try Connect/Reset Connection and then try Connect/AI Companion again. See the Troubleshooting page or try another method of connecting your device such as USB or using the emulator.