6.2. Program Design
One of the secrets of solving large, complex problems is to do our best to turn them into a group of smaller problems. Then, we can try to solve these small problems and test our solutions one at a time.
The process of breaking a large problem up into smaller sub-problems is known as top-down design. Start with the big problem and then use this process:
1. Decide if you can solve the problem with a small number of lines of code (ideally ~10 or less). If so, great, solve the problem. (Or put on a list of problems you will solve when you are done breaking everything down.)
2. If the problem is too complex to solve with a small amount of code, break it up into parts. Then repeat this process (starting from step 1) with each of the parts.
As you identify parts of a task, think about what information you will need to give to the procedure responsible for that task so it can do its job. These will be the parameters for your procedure. In the case of a turtle graphics program, every procedure will need to know the name of the turtle it is supposed to use. We also may need parameters to specify things like a size or color.
Along the way, look for places where you are writing basically the same code in multiple places. Those are places you can maybe use a procedure to do the common part of the work. You may have to use parameters to make the procedure flexible enough to work in multiple situations.
Don’t worry about coming up with a perfect design on your first try. Sometimes you will think a problem is going to be easy and when you start working on it, realize it is much harder than you anticipated. In those cases you can stop and revise your design by breaking the complex procedure into smaller pieces.
6.2.1. Top-Down Design Example
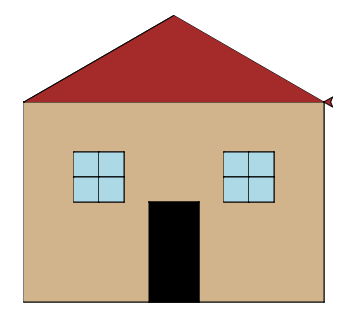
Say I want to draw a house using turtle graphics that looks like this:

My design process might look like this:
Can I
drawHousein ~10 lines of code? Pretty sure no. So let me break it down. Well, I need to:
drawWallby making a rectangledrawDoorby making a smaller rectangledrawWindowmake a square with cross in the middle. I'll need to do this twice.drawRoofwhich is a triangle
OK, lets start with the drawWall... That seems pretty easy. I bet I can do that in
about 10 lines of code.
Moving on to the drawDoor. That seems easy too. And it is a rectangle, like the wall.
Maybe I should make a drawRectangle that both of these use. If I do that, it needs
to allow me to specify a width and height so I can make rectangles of different
sizes. drawRectangle does not sound too bad - I can make that in under 10 lines. And
if I do, the door and wall will be a snap.
OK, how about drawWindow. Well, it might be more than 10 lines of code. But I can
use the drawRectangle to make this easier. If I have it to use, I think this won't be
too bad. I can just draw four small squares to make a window.
drawRoof doesn't sound too bad.
Now that I’ve broken everything down into manageable chunks, we are ready to start implementing…
Let’s make sure you understand the design listed above. Arrange the blocks to implementation the rough design.
Make sure you list the procedures in a valid order. Anything that draws a rectangle needs
to come after the low-level rectangle procedure. The highest-level procedure,
drawHouse must come after all of the other procedures because it makes use of them.
Don’t forget to indent the body of each procedure, even if it is not real code yet.
