3.9. Map Tour With TinyDB
Time Estimate: 45 minutes
3.9.1. Introduction and Goals
In this lesson we will extend the Map Tour App by adding two new features:
- Adding Destinations to the Tour. We will allow users to click on the map to add new destinations to the map tour.
- Data Persistence. We will incorporate TinyDB, MIT App Inventor's database component, which will enable the app to save new destinations for the user. Locations that are added to the destinations list will be saved to the database and re-loaded into the app when it starts up again.
|
(Teacher Tube version) |
Learning Objectives: I will learn to
Language Objectives: I will be able to
|
3.9.2. Learning Activities
- text-version
- |
- short handout
- |
- YouTube video
- |
- TeacherTube video
- |
- YouTube video - Tiny DB
- |
- TeacherTube video - Tiny DB
What is TinyDb?
Up until now, the data in our apps has been stored either in global variables or as the value of the properties of the app’s various components. For example, when you store a piece of text in a Label, that data is stored in the computer’s main memory, in its RAM — random access memory. And as we’ve learned, RAM is volatile, meaning that any data stored there will be destroyed when the app is exited.
By contrast, data stored in the computer’s long-term storage — e.g., on the phone’s flash drive — will persist as long as the app is kept on the device. There are various ways to store data permanently on a computer. For example, you could store it in a file, such as a document or image file. Another way to store persistent data is in a database. MIT App Inventor provides us a very simple, easy-to-use database in its TinyDb component. Any data that we store in the TinyDb, will not disappear when the app is exited. Instead, it will persist between uses of the app -- even if you turn off the device.
Before working on incorporating TinyDb into our app, the following video provides a brief overview of this very important component. (Teacher Tube version)
Map Tour with TinyDB Tutorial
To get started, you can use the app you created in the previous lesson and follow along with the video tutorial or the Text Tutorial or for an additional challenge, the Short Handout.
(Teacher Tube version)Enhancements
Your instructor may ask you to do some or all of the following enhancements for your Map Tour with TinyDB app.- Text To Speech: Add a TextToSpeech component to the UI, and when the user picks an item from the list, call TextToSpeech.speak to say the selected item.
-
Delete Locations: As you are testing your app, you may have added a lot of locations on your map tour that you do not want. You could delete the data stored for the installed app in your device under Settings/Applications Settings or by calling TinyDB.clearAll in your code, but in this enhancement you will add a Delete ListPicker button that lets you choose a location to remove from your lists and update the database. Here are the steps you need to do:
- Add a ListPicker to the UI to Delete destinations.
- In ListPicker.BeforePicking, set the ListPicker.Elements to the destinations list.
- In ListPicker.AfterPicking, use the remove list item block from the Lists drawer to remove the item at the ListPicker.SelectedIndex from both of the lists (destinations and destinationsLatLong). Save both lists in TinyDB. Use Notifier.Alert to tell the user the destination was deleted.
- Refactor your code to add a saveToDB procedure to save both lists in TinyDB and call it from ListPicker.AfterPicking and Notifier.AfterTextInput.
- Add My Location: If you have a device and location where GPS works. when you click on the My Location block, add that location to the destinationsLatLong lists using the Add Item to List block and use the Notifier.ShowTextDialog to get the location name for the destinations list (this will call the already written Notifier.AfterTextInput procedure).
3.9.3. Summary
In this lesson, you learned how to:
3.9.4. Self-Check
Vocabulary
Here is a table of the technical terms introduced in this lesson. Hover over the terms to review the definitions.| database |
Check Your Understanding
Complete the following self-check exercises.
- a. Data stored in a TinyDb can easily be shared with other devices and users.
- This is challenging, but rewarding!
- b. Data stored in a TinyDb will persist between different uses of the app.
- That's right! Data stored in a TinyDb persist between uses of the app, but these data are stored on the device (not in the cloud) and cannot be shared with other devices or users. A TinyDb can store strings or numbers or lists.
- c. Data stored in a TinyDb disappears when you quit the app.
- This is challenging, but rewarding!
- d. Data stored in a TinyDb is stored in the cloud.
- This is challenging, but rewarding!
- e. Only strings (text) can be stored in a TinyDb.
- This is challenging, but rewarding!
Q-2: Which of the following statements are true for a TinyDb component. Choose all that apply.
- a. Because that would be a bad score.
- OK, so you didn’t get it right this time. Let’s look at this as an opportunity to learn.
- b. Because that would be the value returned by TinyDb if nothing had yet been stored under the tag "highest".
- Good. If TinyDb does not find anything in the Db under the tag "highest" it will return the empty string. This is how you check that TinyDb does contain a value for a given tag.
- c. Because TinyDb can only be used to store numbers, not strings.
- OK, so you didn’t get it right this time. Let’s look at this as an opportunity to learn.
- d. Because TinyDb returns an empty string whenever the network is not available.
- OK, so you didn’t get it right this time. Let’s look at this as an opportunity to learn.
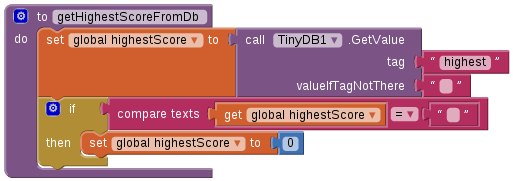
Q-5: In the block shown here why is it necessary to test whether the highestScore equals the empty string?
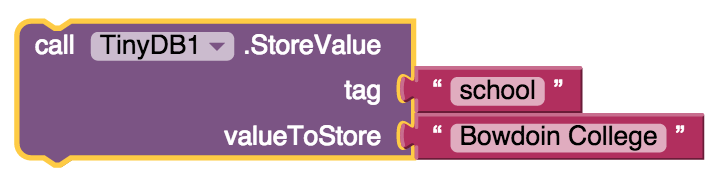
- There are now two colleges, Trinity and Bowdoin, associated with the tag 'school'.
- No. This is not the correct choice. Associating a value with a tag is not the same as adding new values to the tag.
- This would cause an error because the tag 'school' has already been used.
- No, this is a valid statement.
- The tag 'school' would now be associated with 'Bowdoin College' instead of 'Trinity College'.
- Yes. The value 'Bowdoin College' will now be associated with the tag 'school' in the TinyDb, replacing 'Trinity College' as the value of that tag.
- The tag 'school' is still associated with 'Trinity College'.
- No, we are associating a new value with the tag 'school'.
Q-6:
Consider the following depiction of the contents of a TinyDb for an app.
| Tags | Values |
|---|---|
| school | Trinity College |
| trinity | Trinity College |
| college | Amherst College |
| university | Harvard |
And suppose your app just executed the following block:
Which of these statements best describes the current state of the database?
- True
- Yes, a list can be empty. It's important in computer programming to be able to model a list with no elements. For many problems that is the list's initial state -- before items are added to it. A empty list has a length of 0.
- False
- Mistakes are welcome here! Try reviewing this; in computer programming is it a list is often considered to be empty in it's initial state -- before items are added to it.
Q-7: True or False: It is possible to have an empty list – i.e., a list with no elements.
3.9.5. Reflection: For Your Portfolio
Answer the following portfolio reflection questions as directed by your instructor. Questions are also available in this Google Doc where you may use File/Make a Copy to make your own editable copy.