
4.3. Implementing an Unordered Linked List
A linked list is a linear collection of data elements whose order is not determined by the placement in memory. Instead, each element is stored in a node which points to the next node. In the next sections we implement this linked list data structure. In doing so, we need to be sure that we can maintain the relative positioning of the items. However, there is no requirement that we maintain that positioning in contiguous memory. For example, consider the collection of items shown in Figure 1. It appears that these values have been placed randomly. If we can maintain some explicit information in each item, namely the location of the next item (see Figure 2), then the relative position of each item can be expressed by simply following the link from one item to the next.
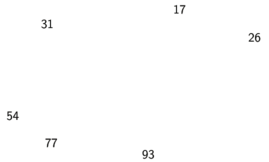
Figure 1: Items Not Constrained in Their Physical Placement

Figure 2: Relative Positions Maintained by Explicit Links.
It is important to note that the location of the first item of the list must be explicitly specified. Once we know where the first item is, the first item can tell us where the second is, and so on. The external reference is often referred to as the head of the list. Similarly, the last item needs to know that there is no next item.
4.4. The Node Class
The basic building block for the linked list implementation is the
node. Each node object must hold at least two pieces of information.
First, the node must contain the list item itself. We will call this the
data field of the node. In addition, each node must hold a reference
to the next node. Listing 1 shows the C++
implementation. To construct a node, you need to supply the initial data
value for the node. Evaluating the assignment statement below will yield
a node object containing the value 93 (see Figure 3). You
should note that we will typically represent a node object as shown in
Figure 4. The Node class also includes the usual methods
to access and modify the data and the next reference.
Listing 1
#include <iostream>
using namespace std;

class Node {
    private:
            int data; //data in the beginning node
            Node *next; //pointer to the next node

    public:
            Node(int initdata) {
                    data = initdata; //the initialized data is set as the head
                    next = NULL; //the next node is set as NULL, as there is no next node yet.
            }

            int getData() { //function that return data of a given node.
                    return data;
            }

            Node *getNext() {
                    return next;
            }

            void setData(int newData) {
                    data = newData;
            }

            void setNext(Node *newnext) {
                    next = newnext;
            }
};
>>> temp = Node(93) //sets the nodes data to the integer 93
>>> temp.getData() // calls the getData() function.
93
The special C++ reference value NULL will play an important role
in the Node class and later in the linked list itself. A reference
to NULL will denote the fact that there is no next node.
Note:
in the constructor that a node is initially created with
nextand a pointer toNULL. Since this is sometimes referred to as “grounding the node,” we will use the standard ground symbol to denote a reference that is referring toNULL.
Figure 3: A Node Object Contains the Item and a Reference to the Next Node
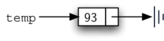
Figure 4: A Typical Representation for a Node
4.5. The Unordered Linked List Class
As we suggested above, the unordered linked list
will be built from a collection of nodes, each linked to the next by explicit
pointers. As long as we know where to find the first node (containing the first
item), each item after that can be found by successively following the
next links. With this in mind, the UnorderedList class must maintain
a reference to the first node. Listing 2 shows the
constructor. Note that each list object will maintain a single reference
to the head of the list.
Listing 2
class UnorderedList {
    public:
        Node *head;

        UnorderedList() {
               head = NULL;
        }
}
Initially when we construct a list, there are no items. The assignment and declaration statement
UnorderedList myList;
creates the linked list representation shown in
Figure 5. As we discussed in the Node class, the
special reference NULL will again be used to state that the head of
the list does not refer to anything. Eventually, the example list given
earlier will be represented by a linked list as shown in
Figure 6. The head of the list points to the first node
which contains the first item of the list. In turn, that node holds a
reference to the next node (the next item) and so on. It is very important to note that the list class itself does not contain any node
objects. Instead it contains a single pointer to only the first node
in the linked structure.
- If you lose the head, the next node becomes the head.
- No, if you lose the head node, your pointer will be pointing at nothing.
- If you lose the head, the list is still in memory, you just cannot find it.
- Yes, this occurs because the delete keyword is never used to get rid of the list.
- It is impossible to lose the head.
- No, if you lose the head node, your pointer will be pointing at nothing.
- If you lose the head, you lose access to the entire linked list.
- Right, however, it remains in memory, unknown to you.
Q-1: What would happen if you lose the head of a singularly-linked linked list?
Listing 2
Initially when we construct a list, there are no items. The assignment statement
>>> mylist = UnorderedList()

Figure 5: An Empty List
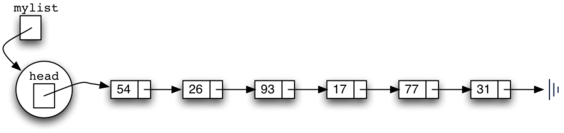
Figure 6: A Linked List of Integers
The isEmpty method, shown in Listing 3, simply checks to
see if the head of the list is a reference to NULL. The result of
the boolean expression this->head==NULL will only be true if there
are no nodes in the linked list. Since a new list is empty, the
constructor and the check for empty must be consistent with one another.
This shows the advantage to using the reference NULL to denote the
“end” of the linked structure. Two references are equal if they both refer to the same
object. We will use this often in our remaining methods.
Listing 3
bool isEmpty() {
    return head == NULL;
}
So, how do we get items into our linked list? We need to implement the add
method. However, before we can do that, we need to address the important
question of where in the linked list to place the new item. Since this linked
list is unordered, the specific location of the new item with respect to
the other items already in the linked list is not important. The new item can
go anywhere. With that in mind, it makes sense to place the new item in
the easiest location possible.
Recall that the linked list structure provides us with only one entry
point, the head of the linked list. All of the other nodes can only be reached
by accessing the first node and then following next links. This
means that the easiest place to add the new node is right at the head,
or beginning, of the linked list. In other words, we will make the new item the
first item of the linked list and the existing items will need to be linked to
this new first item so that they follow.
The linked linked list shown in Figure 6 was built by calling
the add method a number of times.
>>> mylist.add(31)
>>> mylist.add(77)
>>> mylist.add(17)
>>> mylist.add(93)
>>> mylist.add(26)
>>> mylist.add(54)
Note that since 31 is the first item added to the linked list, it will eventually be the last node on the linked list as every other item is added ahead of it. Also, since 54 is the last item added, it will become the data value in the first node of the linked list.
The add method is shown in Listing 4. Each item of the linked list
must reside in a node object. Line 2 creates a new node and places the
item as its data. Now we must complete the process by linking the new
node into the existing structure. This requires two steps as shown in
Figure 7. Step 1 (line 3) changes the next reference
of the new node to refer to the old first node of the linked list. Now that the
rest of the linked list has been properly attached to the new node, we can
modify the head of the linked list to refer to the new node. The assignment
statement in line 4 sets the head of the linked list.
The order of the two steps described above is very important. What happens if the order of line 3 and line 4 is reversed? If the modification of the head of the linked list happens first, the result can be seen in Figure 8. Since the head was the only external reference to the linked list nodes, all of the original nodes are lost and can no longer be accessed.
Listing 4
void add(int item) {
    Node *temp = new Node(item);
    temp->setNext(head);
    head = temp;
}
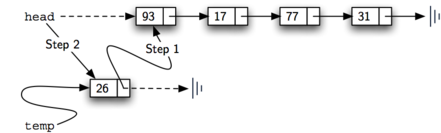
Figure 7: Adding a New Node is a Two-Step Process
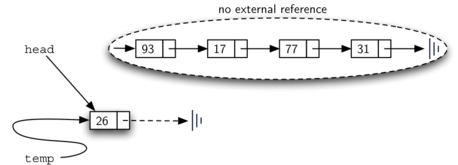
Figure 8: Result of Reversing the Order of the Two Steps
The next methods that we will implement – size, search, and
remove – are all based on a technique known as linked list
traversal. Traversal refers to the process of systematically visiting
each node. To do this we use an external reference that starts at the
first node in the linked list. As we visit each node, we move the reference to
the next node by “traversing” the next reference.
To implement the size method, we need to traverse the linked list
and keep a count of the number of nodes that occurred.
Listing 5 shows the C++ code for counting the number of
nodes in the linked list. The external reference is called current and is
initialized to the head of the linked list in line 2. At the start of the
process we have not seen any nodes so the count is set to \(0\).
Lines 4–6 actually implement the traversal. As long as the current
reference has not seen the end of the linked list (NULL), we move current
along to the next node via the assignment statement in line 6. Again,
the ability to compare a reference to NULL is very useful. Every
time current moves to a new node, we add \(1\) to count.
Finally, count gets returned after the iteration stops.
Figure 9 shows this process as it proceeds down the linked list.
Listing 5
int size() {
    Node *current = head;
    int count = 0;
    while (current != NULL) {
        count++;
        current = current->getNext();
    }

    return count;
}
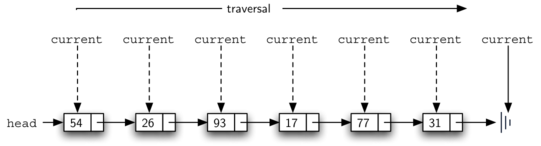
Figure 9: Traversing the Linked List from the Head to the End
Searching for a value in a linked list implementation of an unordered linked list also uses the traversal technique. As we visit each node in the linked list we will ask whether the data stored there matches the item we are looking for. In this case, however, we may not have to traverse all the way to the end of the linked list. In fact, if we do get to the end of the linked list, that means that the item we are looking for must not be present. Also, if we do find the item, there is no need to continue.
Listing 6 shows the implementation for the search method.
As in the size method, the traversal is initialized to start at
the head of the linked list (line 2). As long as there are
more nodes to visit and we have not found the item we are looking for,
we continue to check the next node. The question in line 4 asks whether
the data item is present in the current node. If so, we return True.
When we reach the end of the list and the item has not been found, we return False.
Listing 6
bool search(int item) {
    Node *current = head;
    while (current != NULL) {
        if (current->getData() == item) {
            return true;
        } else {
            current = current->getNext();
        }
    }
    return false;
}
- True
- Correct!
- False
- Not quite, without the while loop, the traversal could go for as long as the program is allowed to run.
Q-2: True / false: The while loop is needed to keep the traversal from going past the end of the list.
As an example, consider invoking the search method looking for the
item 17.
>>> mylist.search(17)
1
Since 17 is in the linked list, the traversal process needs to move only to the
node containing 17. At that point, the variable found is set to
True and the while condition will fail, leading to the return
value seen above. This process can be seen in Figure 10.
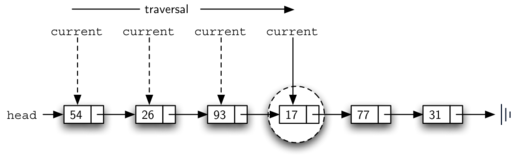
Figure 10: Successful Search for the Value 17
The remove method requires two logical steps. First, we need to
traverse the linked list looking for the item we want to remove. Once we find
the item (recall that we assume it is present), we must remove it. The
first step is very similar to search. Starting with an external
reference set to the head of the linked list, we traverse the links until we
discover the item we are looking for. Since we assume that item is
present, we know that the iteration will stop before current gets to
NULL. This means that we can simply use the boolean found in the
condition.
When found becomes True, current will be a reference to the
node containing the item to be removed. But how do we remove it? One
possibility would be to replace the value of the item with some marker
that suggests that the item is no longer present. The problem with this
approach is the number of nodes will no longer match the number of
items. It would be much better to remove the item by removing the entire
node.
In order to remove the node containing the item, we need to modify the
link in the previous node so that it refers to the node that comes after
current. Unfortunately, there is no way to go backward in the linked
list. Since current refers to the node ahead of the node where we
would like to make the change, it is too late to make the necessary
modification.
The solution to this dilemma is to use two external references as we
traverse down the linked list. current will behave just as it did
before, marking the current location of the traverse. The new reference,
which we will call previous, will always travel one node behind
current. That way, when current stops at the node to be removed,
previous will be referring to the proper place in the linked list
for the modification.
Listing 7 shows the complete remove method. Lines 2–3
assign initial values to the two references. Note that current
starts out at the linked list head as in the other traversal examples.
previous, however, is assumed to always travel one node behind
current. For this reason, previous starts out with a value of
NULL since there is no node before the head (see
Figure 11). The boolean variable found will again be
used to control the iteration.
In lines 6–7 we ask whether the item stored in the current node is the
item we wish to remove. If so, found can be set to True. If we
do not find the item, previous and current must both be moved
one node ahead. Again, the order of these two statements is crucial.
previous must first be moved one node ahead to the location of
current. At that point, current can be moved. This process is
often referred to as “inch-worming” as previous must catch up to
current before current moves ahead. Figure 12 shows
the movement of previous and current as they progress down the linked
list looking for the node containing the value 17.
Listing 7
void remove(int item) {
    Node *current = head;
    Node *previous = NULL;
    bool found = false;
    while (!found) {
        if (current->getData() == item) {
            found = true;
        } else {
            previous = current;
            current = current->getNext();
        }
    }
    if (previous == NULL) {
        head = current->getNext();
    } else {
        previous->setNext(current->getNext());
    }
}
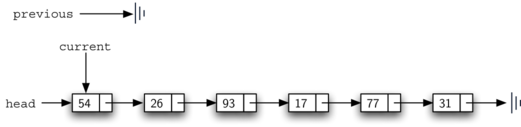
Figure 11: Initial Values for the previous and current References
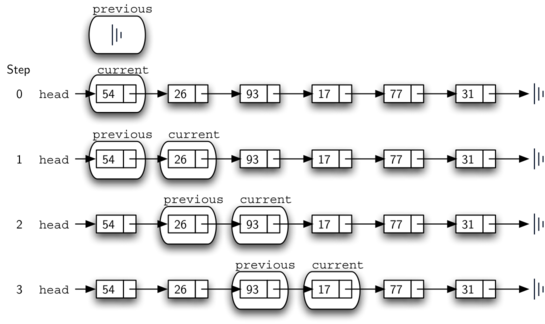
Figure 12: previous and current Move Down the Linked List
Once the searching step of the remove has been completed, we need to
remove the node from the linked list. Figure 13 shows the
link that must be modified. However, there is a special case that needs
to be addressed. If the item to be removed happens to be the first item
in the linked list, then current will reference the first node in the
linked list. This also means that previous will be NULL. We said
earlier that previous would be referring to the node whose next
reference needs to be modified in order to complete the remove. In this
case, it is not previous but rather the head of the linked list that needs
to be changed (see Figure 14).

Figure 13: Removing an Item from the Middle of the Linked List
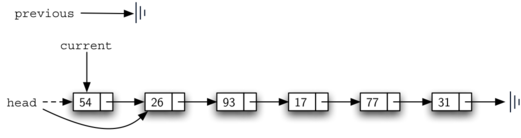
Figure 14: Removing the First Node from the Linked List
Line 12 allows us to check whether we are dealing with the special case
described above. If previous did not move, it will still have the
value NULL when the boolean found becomes True. In that case
(line 13) the head of the linked list is modified to refer to the node after
the current node, in effect removing the first node from the linked
list. However, if previous is not NULL, the node to be removed is
somewhere down the linked list structure. In this case the previous
reference is providing us with the node whose next reference must be
changed. Line 15 uses the setNext method from previous to
accomplish the removal. Note that in both cases the destination of the
reference change is current.getNext(). One question that often
arises is whether the two cases shown here will also handle the
situation where the item to be removed is in the last node of the linked
list. We leave that for you to consider.
You can try out the UnorderedList class in ActiveCode 1.
The remaining methods append, insert, index, and pop are
left as exercises. Remember that each of these must take into account
whether the change is taking place at the head of the linked list or someplace
else. Also, insert, index, and pop require that we name the
positions of the linked list. We will assume that position names are integers
starting with 0.
Self Check
- Every Node is contained within the UnorderedList class object. Making access to every Node of the linked list possible.
- Wrong! An UnorderedList class object will only reference the first item of the linked list.
- Every Node in the linked list is exactly one space in memory away from the next. Making it possible to find the next Node and traverse through the list.
- Wrong! A Node in a linked list can be in various locations in memory. This is very important to understand how linked lists operate.
- Every Node in the list is in various locations in memory, and those memory addresses are stored in an array inside of the UnorderedList object, which makes accessing each Node possible.
- Wrong! While every Node can and will likely be in various locations in memory, all those locations will not be contained in the UnorderedList class object.
- Every Node in the list is in various locations in memory, and each Node contains a pointer to the next Node in the list without needing to be contained in the UnorderedList class.
- Correct! An unordered linked list class object will have a pointer to the first Node of the list. That Node will contain a pointer to the second Node of the list, and so on.
Q-4: Select the correct statement below.
If you had a rough time with understanding the use of pointers in the question above, it might be a good idea to look back at chapter 1.9 and review how pointers work again.
Part I: Implement the append method for UnorderedList. What is the time complexity of the method you created?
Part II: In the previous problem, you most likely created an append method that was \(O(n)\) If you add an instance variable to the UnorderedList class you can create an append method that is \(O(1)\). Modify your append method to be \(O(1)\) Be Careful! To really do this correctly you will need to consider a couple of special cases that may require you to make a modification to the add method as well.