
10.2. Quickstart
Eager to get started? This page gives a good introduction to Flask. Follow installation to set up a project and install Flask first.
10.2.1. A Minimal Application
A minimal Flask application looks something like this:
from flask import Flask
from markupsafe import escape

app = Flask(__name__)

@app.route("/")
def hello_world():
    return f"<p>Hello, {escape(name)}!</p>"
So what did that code do?
First we imported the
Flaskclass. An instance of this class will be our WSGI application.Next we create an instance of this class. The first argument is the name of the application’s module or package.
__name__is a convenient shortcut for this that is appropriate for most cases. This is needed so that Flask knows where to look for resources such as templates and static files.We then use the
route()decorator to tell Flask what URL should trigger our function.The function returns the message we want to display in the user’s browser. The default content type is HTML, so HTML in the string will be rendered by the browser.
Note
HTML escaping
When returning HTML (the default response type in Flask), any user
input rendered in the output must be escaped to protect from
injection attacks. HTML templates in Jinja, introduced later, will
do this automatically. escape(), shown above, can
be used manually. It’s omitted for brevity in the examples below.
Save it as hello.py or something similar. Make sure to not call
your application flask.py because this would conflict with Flask
itself.
To run the application, use the flask command or
python -m flask. Before you can do that you need
to tell your terminal the application to work with by exporting the
FLASK_APP environment variable:
$ export FLASK_APP=hello.py
$ flask run
 * Running on http://127.0.0.1:5000/
If you are on Windows, the environment variable syntax depends on command line interpreter. On Command Prompt:
C:\path\to\app>set FLASK_APP=hello.py
And on PowerShell:
PS C:\path\to\app> $env:FLASK_APP = "hello.py"
This launches a very simple builtin server, which is good enough for testing but probably not what you want to use in production. For deployment options see deployment.
Now head over to http://127.0.0.1:5000/, and you should see your hello world greeting.
Externally Visible Server
If you run the server you will notice that the server is only accessible from your own computer, not from any other in the network. This is the default because in debugging mode a user of the application can execute arbitrary Python code on your computer.
If you have the debugger disabled or trust the users on your network,
you can make the server publicly available simply by adding
--host=0.0.0.0 to the command line:
$ flask run --host=0.0.0.0
This tells your operating system to listen on all public IPs.
10.2.2. What to do if the Server does not Start
In case the python -m flask fails or flask does not exist, there are multiple reasons this might be the case. First of all you need to look at the error message.
10.2.2.1. Old Version of Flask
Versions of Flask older than 0.11 use to have different ways to start the application. In short, the flask command did not exist, and neither did python -m flask. In that case you have two options: either upgrade to newer Flask versions or have a look at the server docs to see the alternative method for running a server.
10.2.2.2. Invalid Import Name
The FLASK_APP environment variable is the name of the module to import at
flask run. In case that module is incorrectly named you will get an
import error upon start (or if debug is enabled when you navigate to the
application). It will tell you what it tried to import and why it failed.
The most common reason is a typo or because you did not actually create an
app object.
10.2.3. Debug Mode
(Want to just log errors and stack traces? See application-errors)
The flask script is nice to start a local development server, but you would have to restart it manually after each change to your code. That is not very nice and Flask can do better. If you enable debug support the server will reload itself on code changes, and it will also provide you with a helpful debugger if things go wrong.
To enable all development features (including debug mode) you can export
the FLASK_ENV environment variable and set it to development
before running the server:
$ export FLASK_ENV=development
$ flask run
(On Windows you need to use set instead of export.)
This does the following things:
it activates the debugger
it activates the automatic reloader
it enables the debug mode on the Flask application.
You can also control debug mode separately from the environment by
exporting FLASK_DEBUG=1.
There are more parameters that are explained in the server docs.
Attention
Even though the interactive debugger does not work in forking environments (which makes it nearly impossible to use on production servers), it still allows the execution of arbitrary code. This makes it a major security risk and therefore it must never be used on production machines.
Screenshot of the debugger in action:
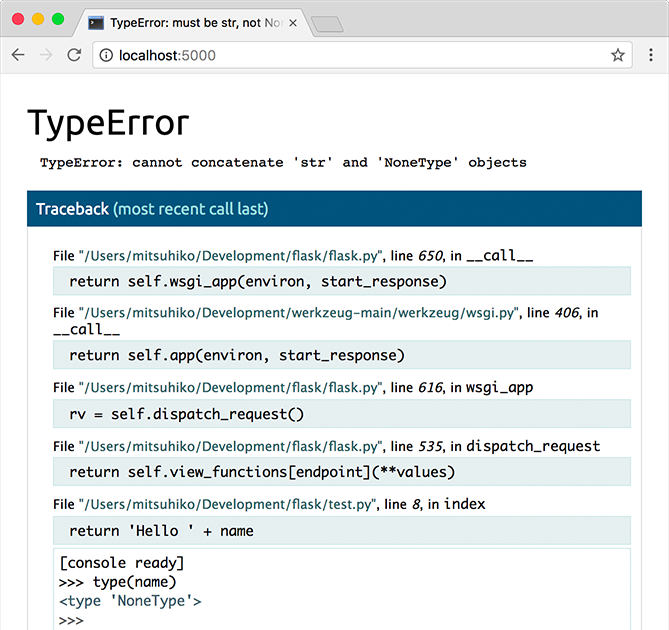
More information on using the debugger can be found in the Werkzeug documentation.
Have another debugger in mind? See working-with-debuggers.