
3.4. Paint Pot Projects
Time Estimate: 90 minutes
3.4.1. Introduction and Goals
| Be creative! In this lesson you will complete several small programming projects that add enhancements to the Paint Pot app. Hints and suggestions are provided. | |
|
Learning Objectives: I will learn to
Language Objectives: I will be able to
|
|
3.4.2. Learning Activities
Creative Mini Projects: Enhancing Paint Pot
To get started, open MIT App Inventor with your completed Paint Pot app from lesson 3.2 in a separate tab, and then complete the programming projects outlined below. Additional information is available in the text version of this lesson.
- Add a custom image to the app instead of using the cat image that is provided. You can upload images to your project from either the Designer View or Blocks Editor view. Use the image as the Canvas background image. Make sure the image doesn’t have any copyright restrictions.
- Add a button to support a 4th color option for the app.
- The app currently has a ButtonPlus and ButtonMinus. But, we only completed the code for ButtonPlus. Now that you understand how to increment variables by 1, implement an algorithm for ButtonMinus that will subtract 1 from dotsize.
- Test Cases: It is important to test out code to make sure it does what is expected, especially for critical values or boundary values. Check if your program performs correctly in the following test cases and make note of which tests fail--we will fix those soon.
- If Block Exercise: In computer programming, a bug is an error or defect, that prevents the app from working the way it is supposed to. The Lower Bounds Test above demonstrates a bug, the value of dotsize will eventually become negative. If dotsize is negative, what will be drawn when the user touches the screen? Try fixing this bug by adding an if/then algorithm to the ButtonMinus block. (Hint: The If/Then block is found under Control in the Toolbox. If you’ve done the I Have A Dream Part 2 lesson, you’ve already seen how to use an if/else block. You will need the = block from the Math drawer and to pull down its menu to get <). Once you have fixed the bug, test case 3 should generate the given results.
- Program Requirement: Naturally the dot size cannot be less than 1, but should there be an upper bound to the dot size? As an app designer, we can set an upper bound for the dot size and make this a program requirement. We will set a program requirement that the dot size cannot get larger than 25. Add an If block to the ButtonPlus block that will implement the new program requirement and satisfy the new test case we will define.
- Currently, if a user wants to use a larger dot and then use a smaller dot (or vice versus), they have to continually press the ButtonMinus (or ButtonPlus). If the current value of dotsize is 25, getting to a size of 4 would be pain. For easier use, add a button that resets the size of the dot (circle) back to its original value. (HINT: You’ll need a second variable here to remember the original value of the dotsize.)
- Optional: Instead of using an existing image, take a photo with the camera and use that as the Canvas background image! (Hint: For this you’ll need to use a new Button, the Camera component from the Media drawer, and the Camera’s TakePicture command and the AfterPicture event handler where you can set the image returned by the camera as Canvas' background image.)
- Optional: Add a Social/Sharing component and a share button to email what is drawn on the canvas using the Sharing.ShareFile block with the Canvas.Save block. You will have to set up an email account on your tablet to use the share component. (This may not work yet on iOS devices).
- Optional: Create one or more of your own enhancements for your app. Remember to write your ideas down in pseudocode before you begin programming.
| Test Name | Inputs | Expected Outputs |
| Standard Plus Test | With "Dot Size = 5", touch the canvas to draw a dot, press the + button, and touch the canvas to draw a second dot. | The dotsize label should show "Dot Size = 6" and the second dot should be larger than the first dot. |
| Standard Minus Test | With "Dot Size = 5", touch the canvas to draw a dot, press the + button, and touch the canvas to draw a second dot. | The dotsize label should show "Dot Size = 4" and the second dot should be smaller than the first dot. |
| Lower Bounds Test | With "Dot Size = 1", touch the canvas to draw a dot, then press the minus button, and touch the canvas to draw a second dot. | The display should stay at "Dot Size = 1" and the second dot should be the same size as the first dot. |
| Test Name | Inputs | Expected Outputs |
| Upper Bounds Test | With "Dot Size = 25", touch the canvas to draw a dot, then press the plus button, and touch the canvas to draw a second dot. | The display should stay at "Dot Size = 25" and the second dot should be the same size as the first dot. |
AP CSP Pseudocode: If Statements
Selection with if statements is used in every programming language. The AP CS Principles Exam uses a text-based and a block-based pseudocode for questions that involve code. The AP CSP reference sheet is provided during the exam describing this pseudocode. The table below compares AP CSP pseudocode to MIT App Inventor blocks for if statements and relational operators. Note that the curly brackets { } are used in AP text pseudocode (and in many text-based programming languages) to indicate the start and end of a block of code.
The relational operators (=, ≠, <, >,<=, >=) are used inside if statements to compare variables with values or mathematical expressions, and they evaluate to a Boolean (true, false) value. For example, a = b evaluates to true if a and b are equal; otherwise, it evaluates to false. The logical operators NOT, AND, and OR can be used to combine conditions inside an if statement and also evaluate to a true or false Boolean value.
If you have trouble telling < and > apart, think of a number line and think of < and > as arrows; < (less than) points towards 0 and smaller numbers on the number line and > (greater than) points towards the larger numbers on the number line.
| Function | Text Style | Block Style | MIT App Inventor |
|---|---|---|---|
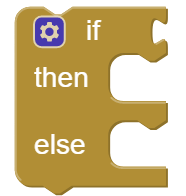
| Selection (else optional) | IF (condition) { block of statements } ELSE { block of statements } | ELSE |
 |
| Relational Operators | a = b a ≠ b a < b a > b a <= b a >= b | 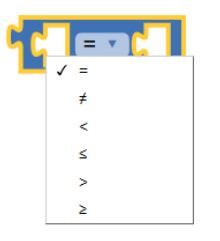 | |
| Logical Operators |
NOT(condition) (condition AND condition) (condition OR condition) | 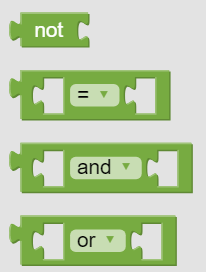 |
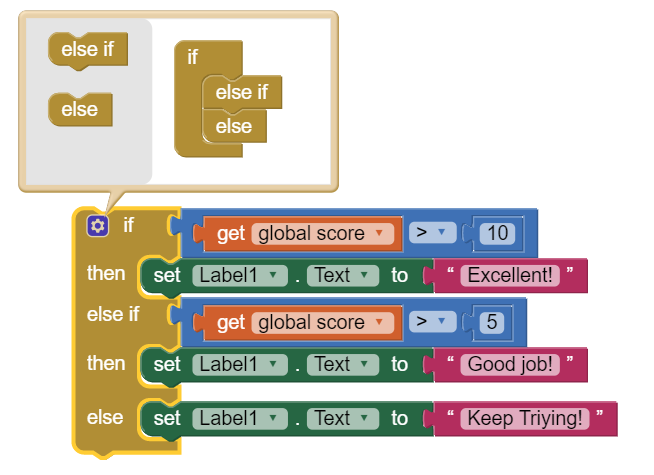
We usually use if/else blocks to make a two way choice, but you can make a three way or even an unlimited number of choices with nested else if statements. In MIT App Inventor, use the blue gear sign at the top of the if block and drag in as many else-if's as you need and end with an else block. For example, the block below will print out "Excellent" if your score is greater than 10, "Good job!" if your score is greater than 5, or "Keep Trying". If the first condition is false (for example if score is 2), it will fall down to the next condition and so on until it reaches that last else.
In addition, some conditional statements can be written as equivalent Boolean expressions or vice versa. For example,
  answer ← (x > 0 AND x < 10)

  is equivalent to

  IF (x > 0 AND x < 10)
  {

        answer ← true;
  }
3.4.3. Summary
In this lesson, you learned how to:
3.4.4. Self-Check
Check Your Understanding
Complete the following self-check exercises.
- 2, 3, 4, 5, 6, 7, 8, 9, 10, 11
- These values are in the middle of the legal range from 1 to 12, so they are not boundary values.
- 0 and 1, also 12 and 13
- Since the valid values for a month is 1 to 12, these are examples of both valid and invalid boundary values.
- -99 and +99
- While these are both invalid values, the are not on the boundary of the valid range of 1 to 12.
- 28, 29, 30, 31, and 32.
- These are examples of boundary values for the day of the month, but not the month number which has a valid range of 1 to 12.
Q-4: When testing software, it is important to test critical values or boundary values–both valid and invalid values at the extremes of a range of legal values. In an app where the user enters a number for the month of the year, what would be appropriate boundary values to check?
- Not so good!
- Sorry, "Not so good!" would only display if score is less than 5.
- Getting better!
- That's right! Since score is not less than 5, it would fall down to the next condition, and since score is less than 10, it would print it out.
- Going strong!
- Sorry, score is less than 10 so the condition before this one would work.
Q-5: What would the following code print out if the score was 6?

- "Not so good!"
- No, 10 is not less than 5.
- "Getting better!"
- No because 10 is not less than 10!
- "Going strong!"
- Yes, since 10 is not less than 5 and is not less than 10, it would fall through to the last else statement.
Q-6: What would the following code print out if the score was 10?
- II only
- I and II only
- I and III only
- II and III only
Q-7:
AP 2021 Sample Question: In a certain country, a person must be at least 16 years old to drive a car and must be at least 18 years old to vote. The variable age represents the age of a person as an integer. Which of the following expressions evaluates to true if the person is old enough to drive but not old enough to vote, and evaluates to false otherwise?
I. (age ≥ 16) AND (age ≤ 18)
II. (age ≥ 16) AND (NOT(age ≥ 18))
III. (age < 18) AND (NOT(age < 16))
- x = 1, y = 2, z = 3
- (B) x = 1, y = 3, z = 2
- (C) x = 2, y = 3, z = 1
- (D) x = 3, y = 2, z = 1
Q-8:
AP 2021 Sample Question: The following code segment is intended to set max equal to the maximum value among the integer variables x, y, and z. The code segment does not work as intended in all cases.

Which of the following initial values for x, y, and z can be used to show that the code segment does not work as intended?
Q-9:
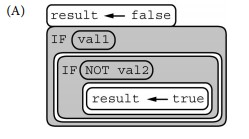
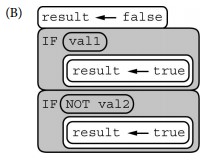
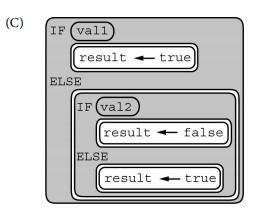
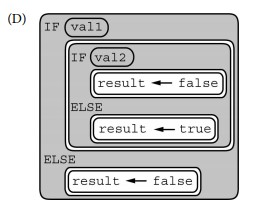
AP 2021 Sample Question: In the following statement, val1, val2, and result are Booleanvariables.

Which of the following code segments produce the same result as the statement above for all possible values of val1 and val2?
Select two answers.
3.4.5. Reflection: For Your Portfolio
Answer the following portfolio reflection questions as directed by your instructor. Questions are also available in this Google Doc where you may use File/Make a Copy to make your own editable copy.